
Advanced Importer Addon
The Advanced Importer Addon is a professional tool designed to make the process of migrating and syncing event data seamless by connecting Modern Events Calendar (MEC) to major third-party platforms 1. It allows you to authenticate your accounts from services like Facebook, Google, and Eventbrite with just a few clicks, enabling you to schedule automatic imports or perform bulk migrations from other WordPress event plugins.
Initial Setup
To begin importing events, ensure your environment meets the necessary requirements and follow these activation steps:
Requirements
- MEC Lite or Pro: Unlike many other addons, the Advanced Importer is compatible with both the Lite and Pro versions of Modern Events Calendar.
- Activation: Ensure both Modern Events Calendar and the Advanced Importer Addon are installed and activated on your WordPress site.
Accessing the Importer
- Locate Menu: Once activated, a new menu labeled Advanced Importer will appear under the M.E. Calendar section in your WordPress dashboard.
- Redirect: Clicking this menu will take you directly to the primary import interface.
Platform Configuration (Settings)
Before importing, you must connect and authenticate your third-party accounts within the Advanced Importer Settings.
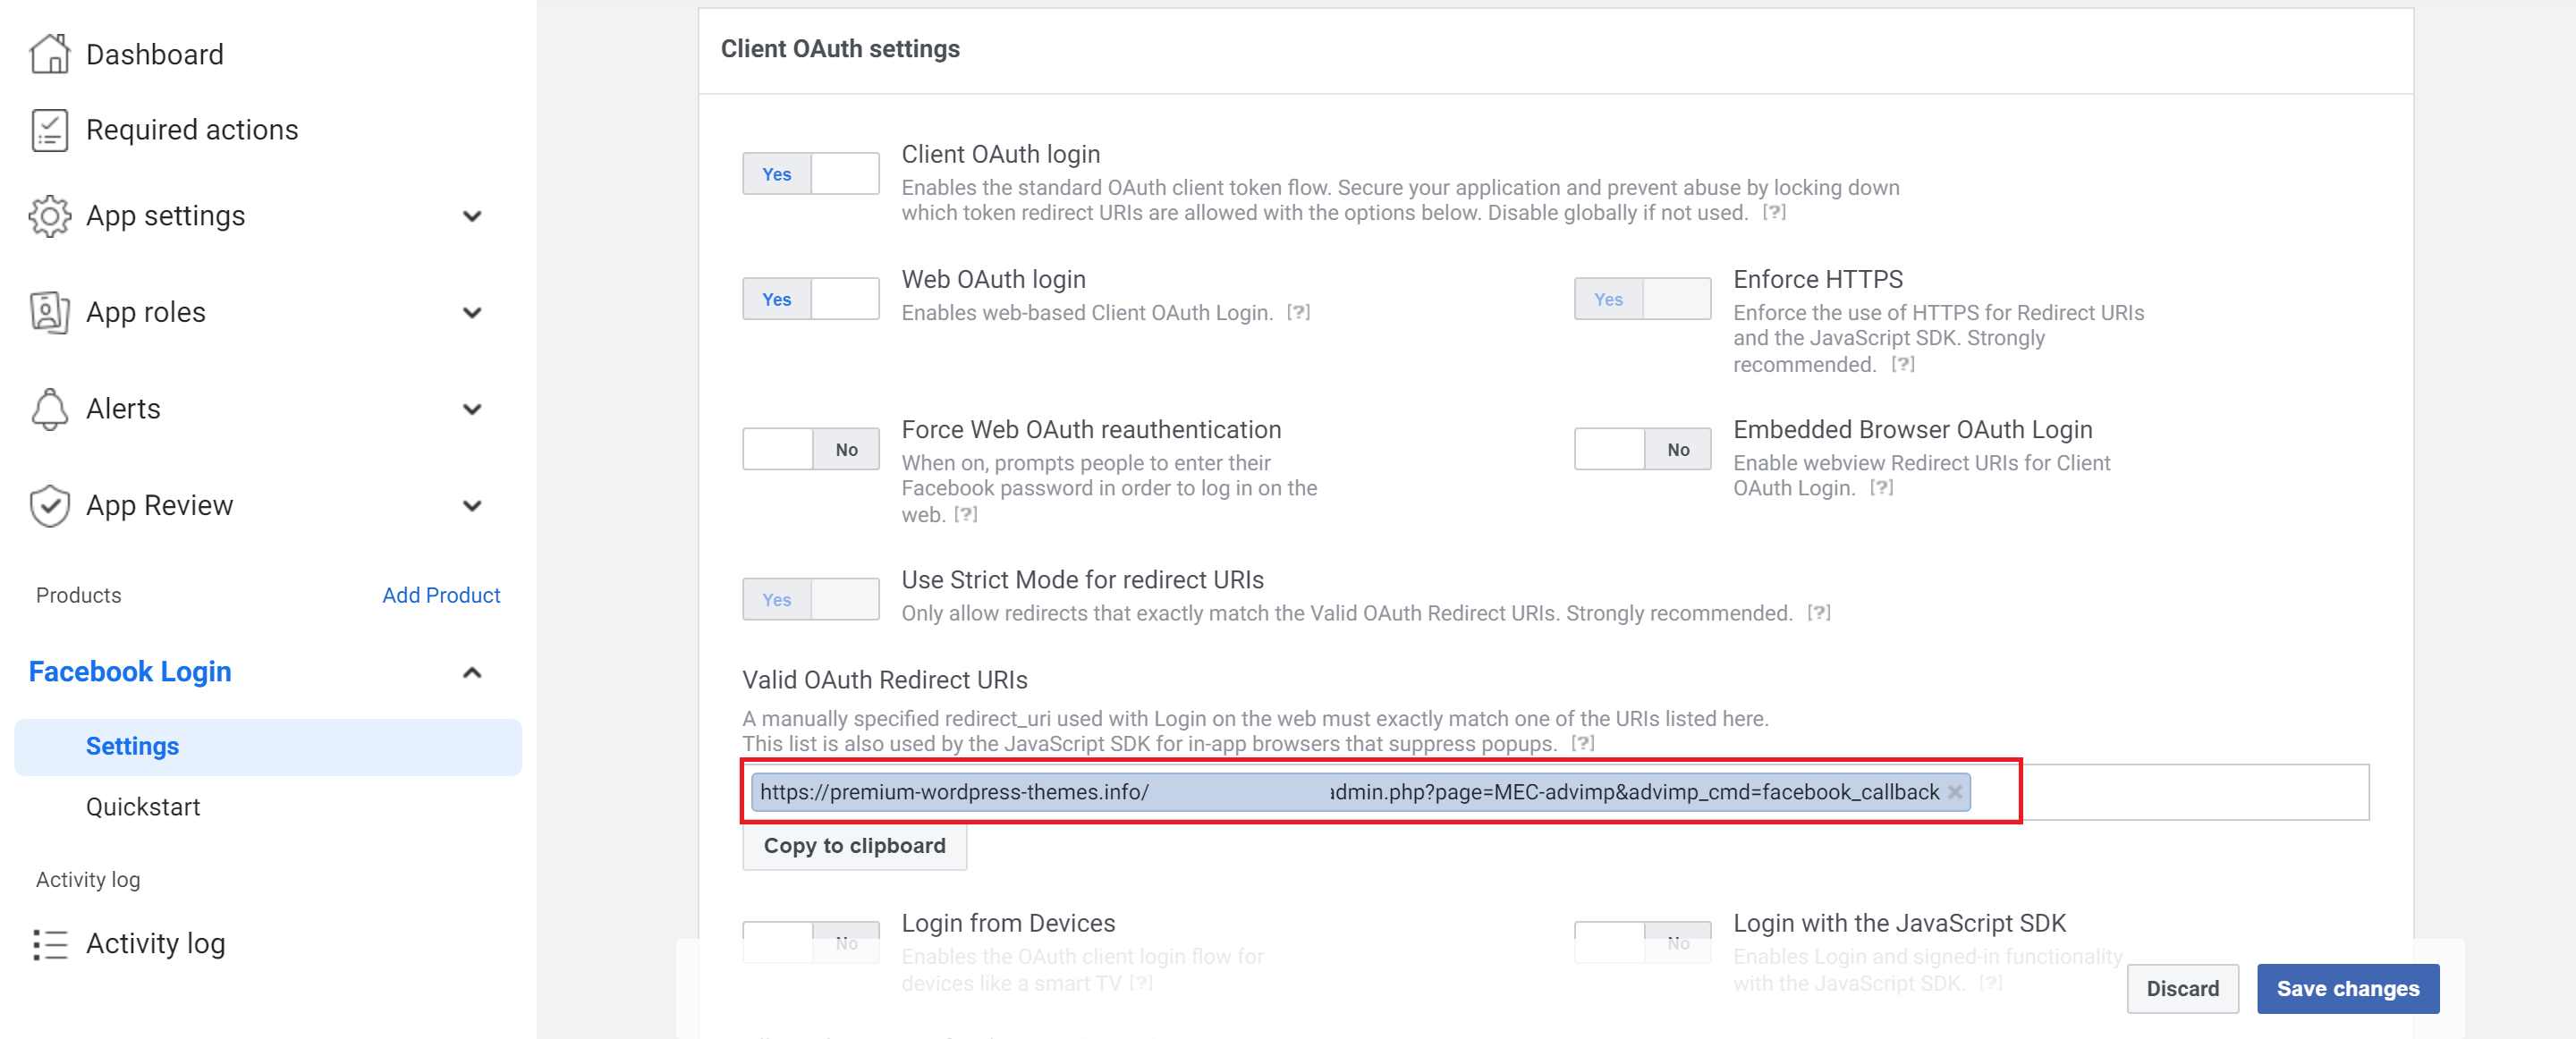
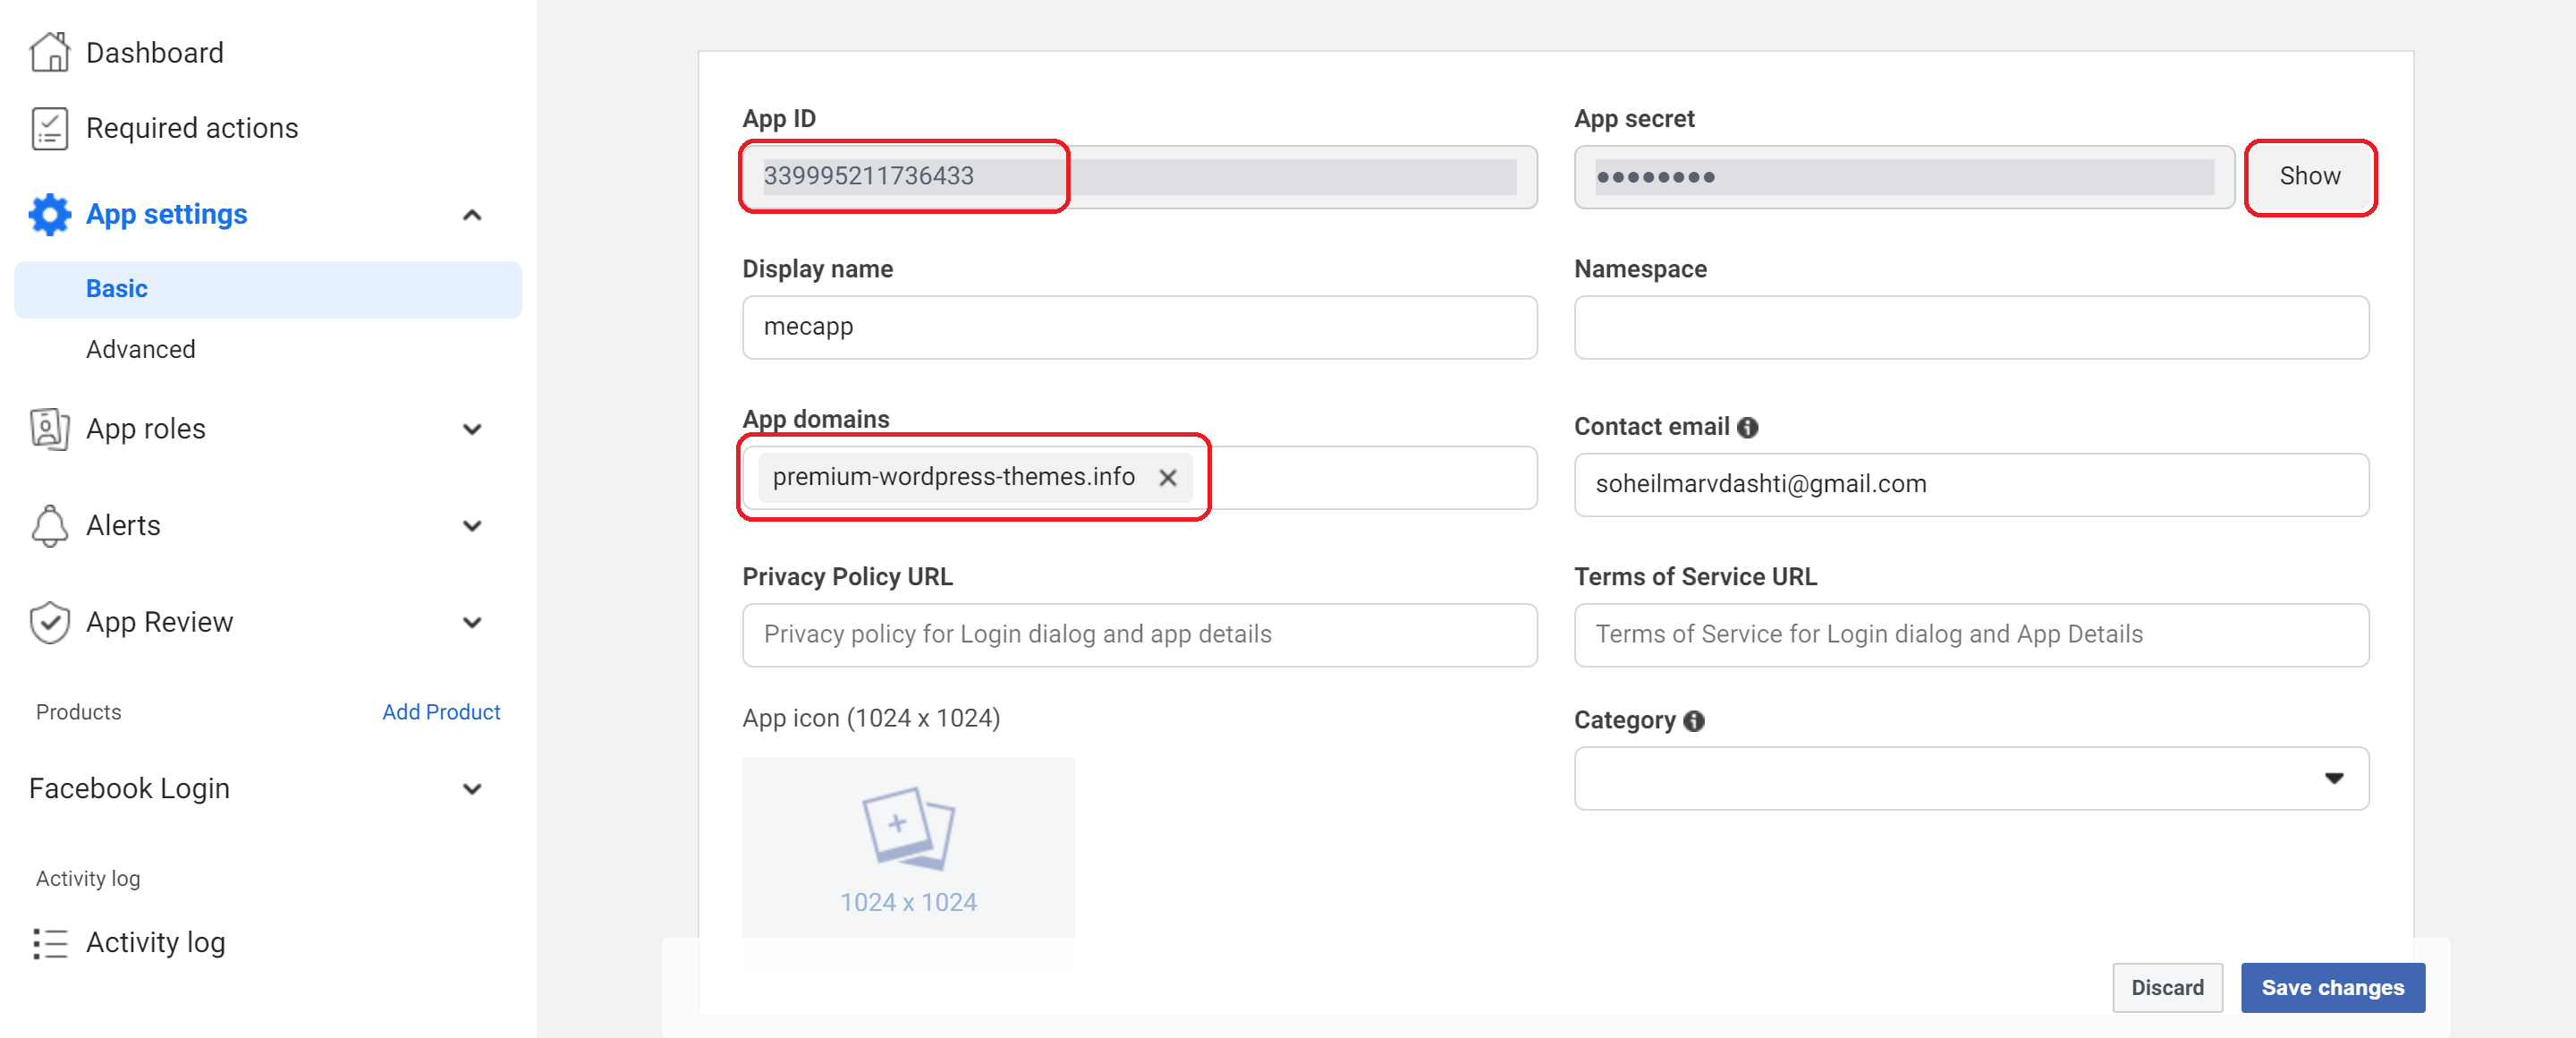
- Facebook: You must provide a dedicated URL in the Valid OAuth Redirect URIs field on the Facebook Developers portal to proceed.
- Eventbrite: Requires a free API Key, which can be obtained from the Eventbrite platform after logging into your account.

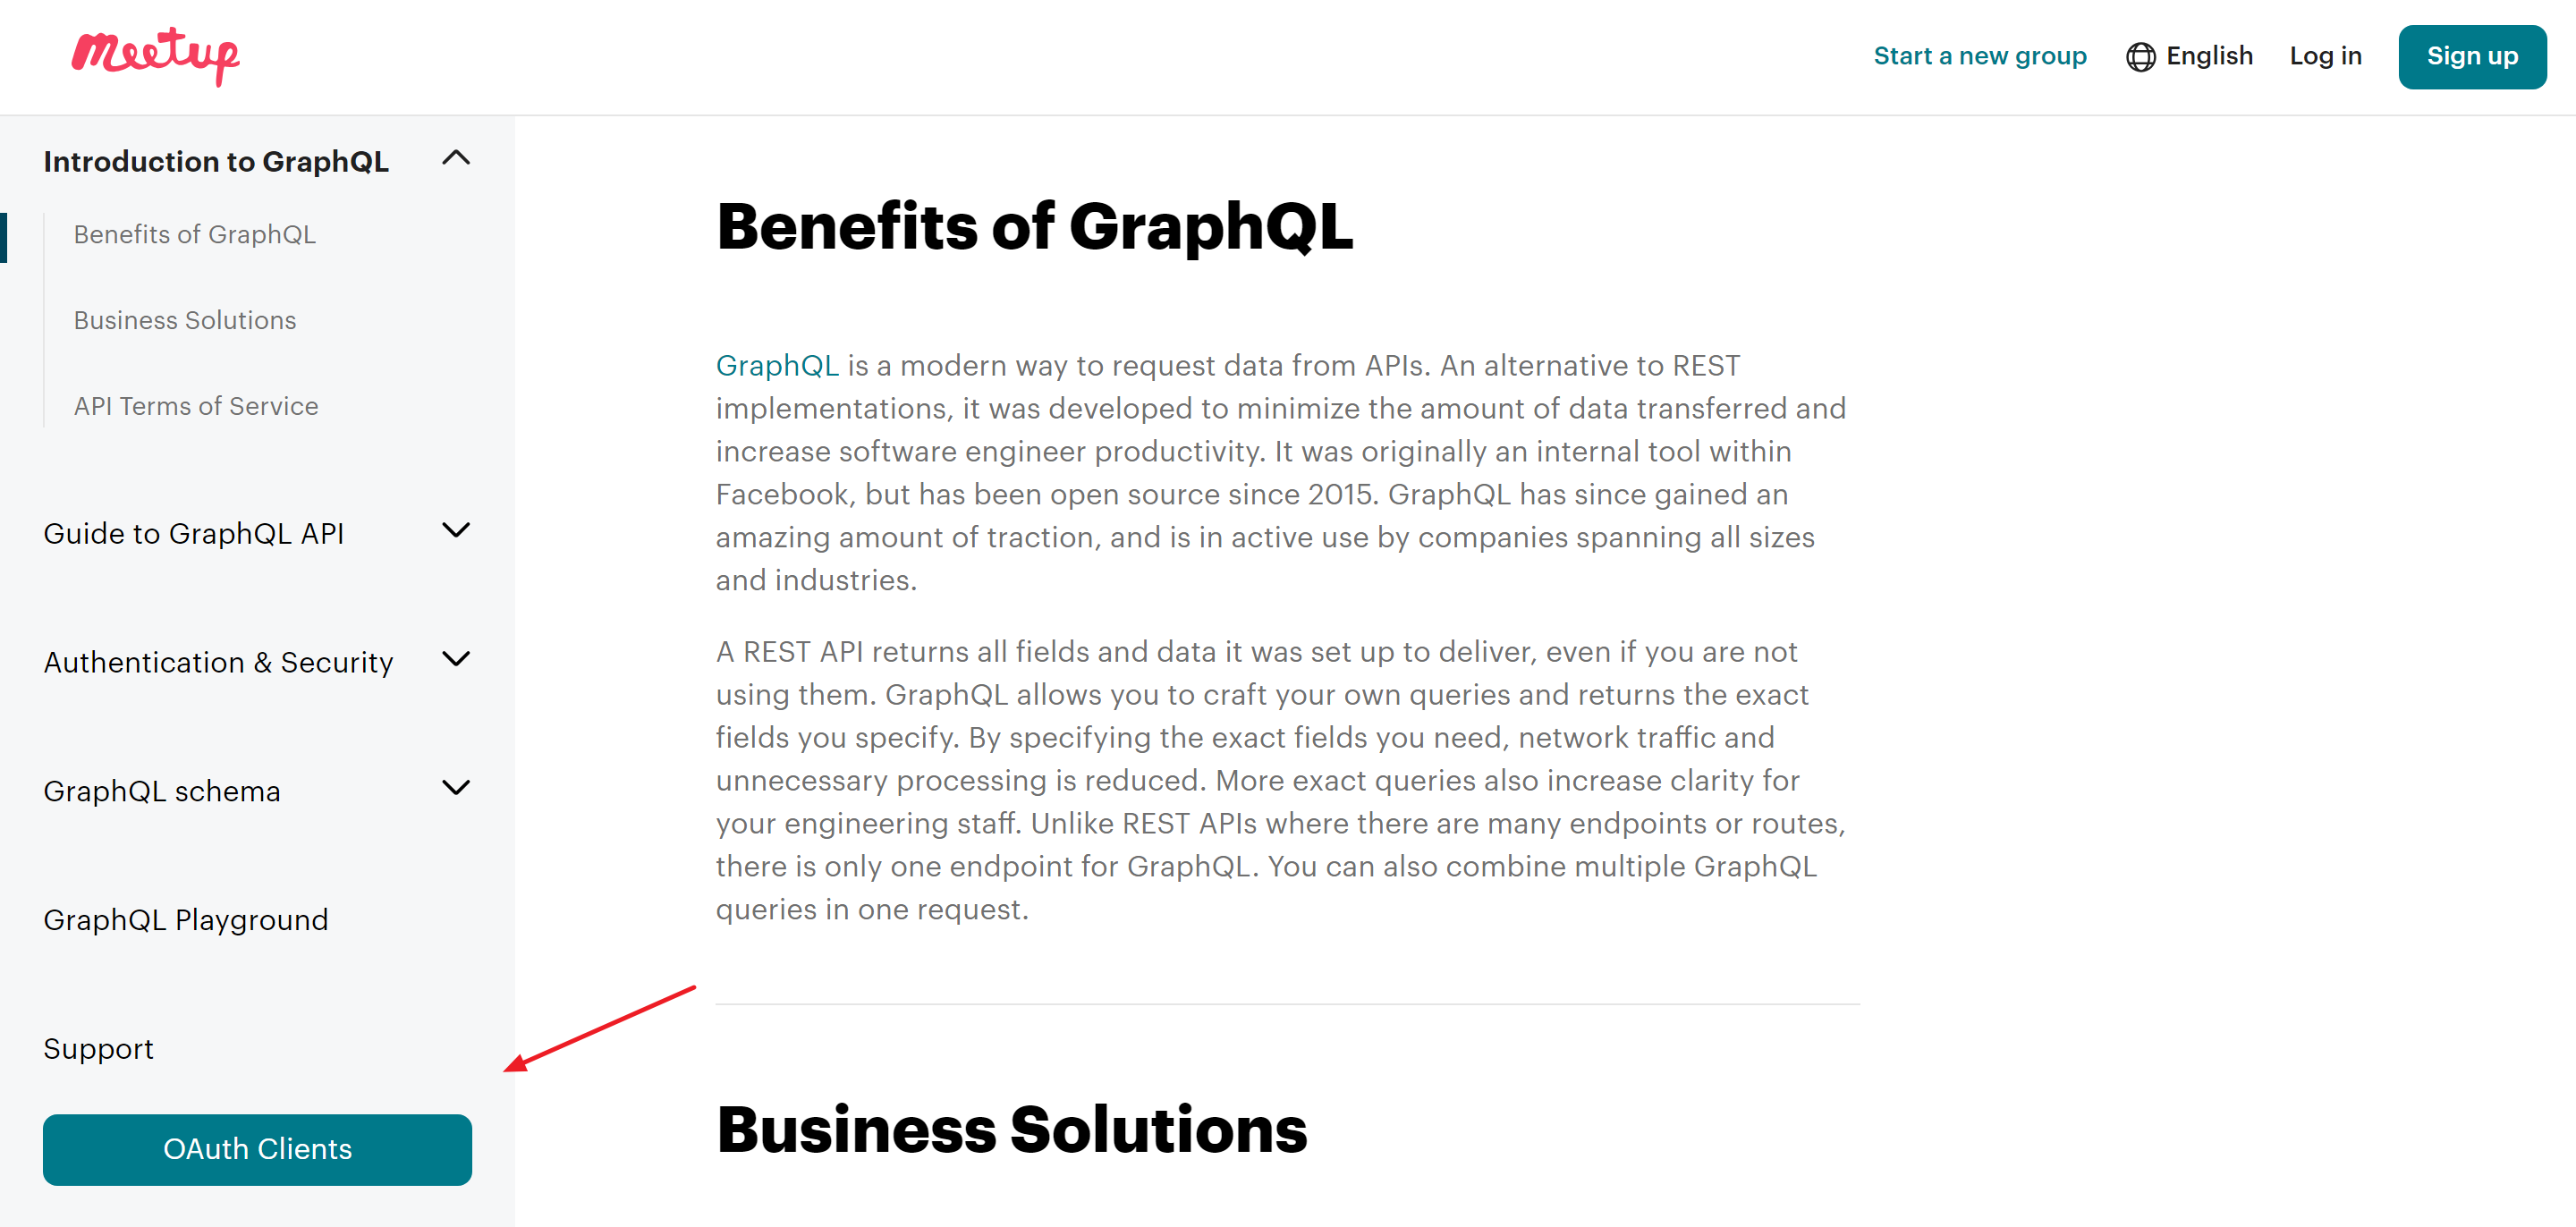
- Meetup: Requires OAuth Client credentials (Client ID and Secret) from the Meetup OAuth Clients page; note that activation of these credentials can take up to two hours.
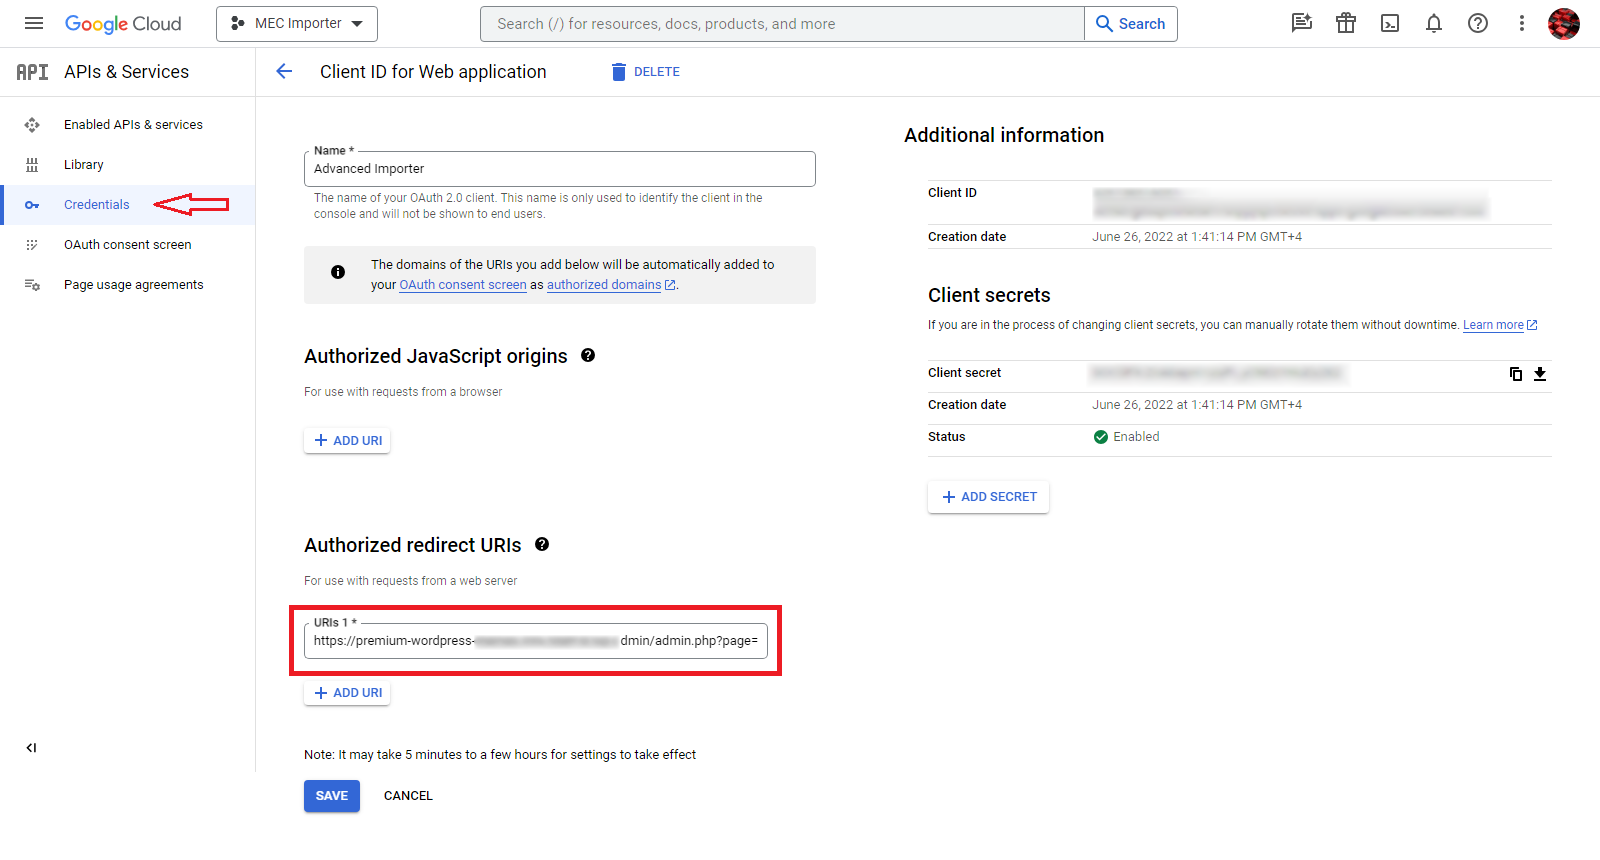
- Google Calendar: You must generate a Google Calendar API Key and provide an Authorized redirect URI to Google to enable the connection.
After completing the necessary steps as directed, you will receive your API Key.
Note: As of version 1.8.0, the addon automatically refreshes expired Google access tokens before every import and scheduled sync, so the connection stays alive without periodic re-authentication. Manual re-authentication is only required if you revoke the app’s access in your Google account or change your OAuth credentials.
- MEC API: This allows you to import events from another website using MEC 9. You must copy the URL from the source website and enter it along with an API Key into the target website’s settings.
Note: To use this feature, ensure the source website also has the Advanced Importer Addon active. You must navigate to that source site to copy the dedicated URL and API Key before entering them into the target website’s settings.
Important: In version 1.8.0, the Your MEC API token field on the source website now displays the correct token used by the REST API. If you configured a target website before this release, re-copy the token from the source website’s settings to make sure both sites match.
Performing an Import
After configuring your accounts, you must authenticate specific profiles to begin fetching data.
Authentication & Selection
- Need Authentication: At the bottom of each platform’s settings tab, find your username and click Need Authentication to open a login window and grant access to your events.
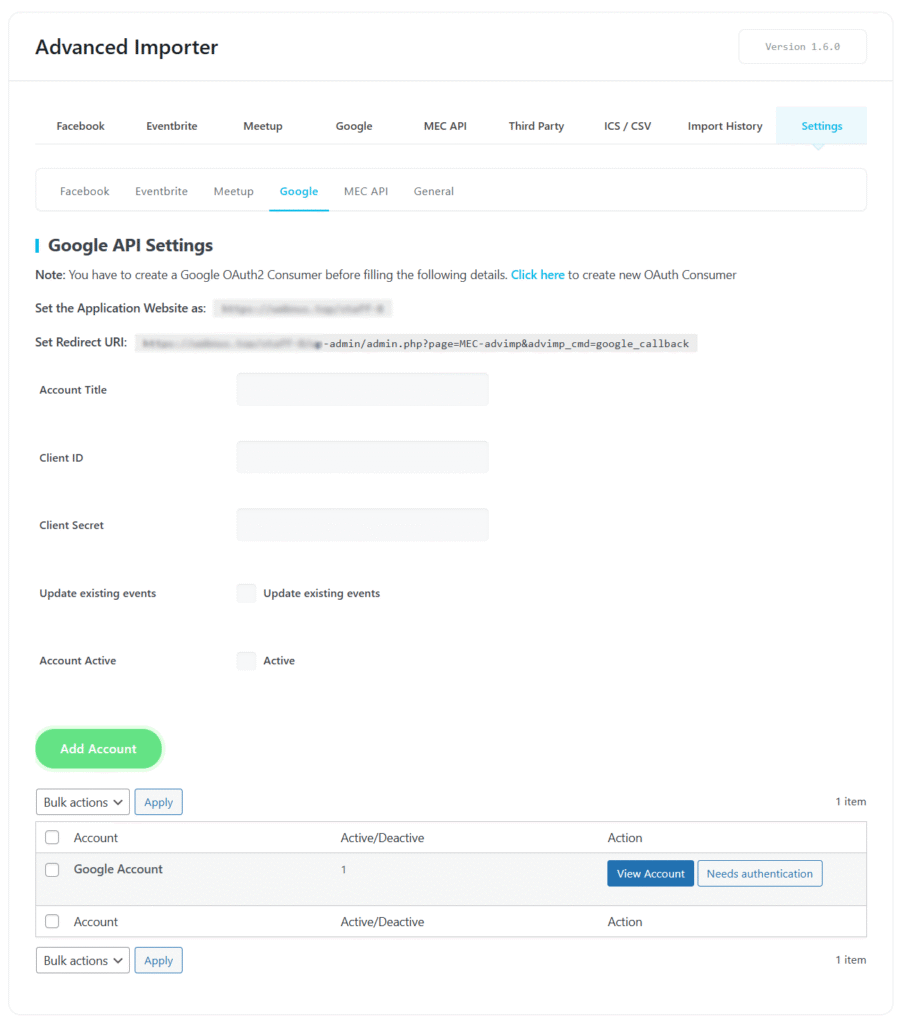
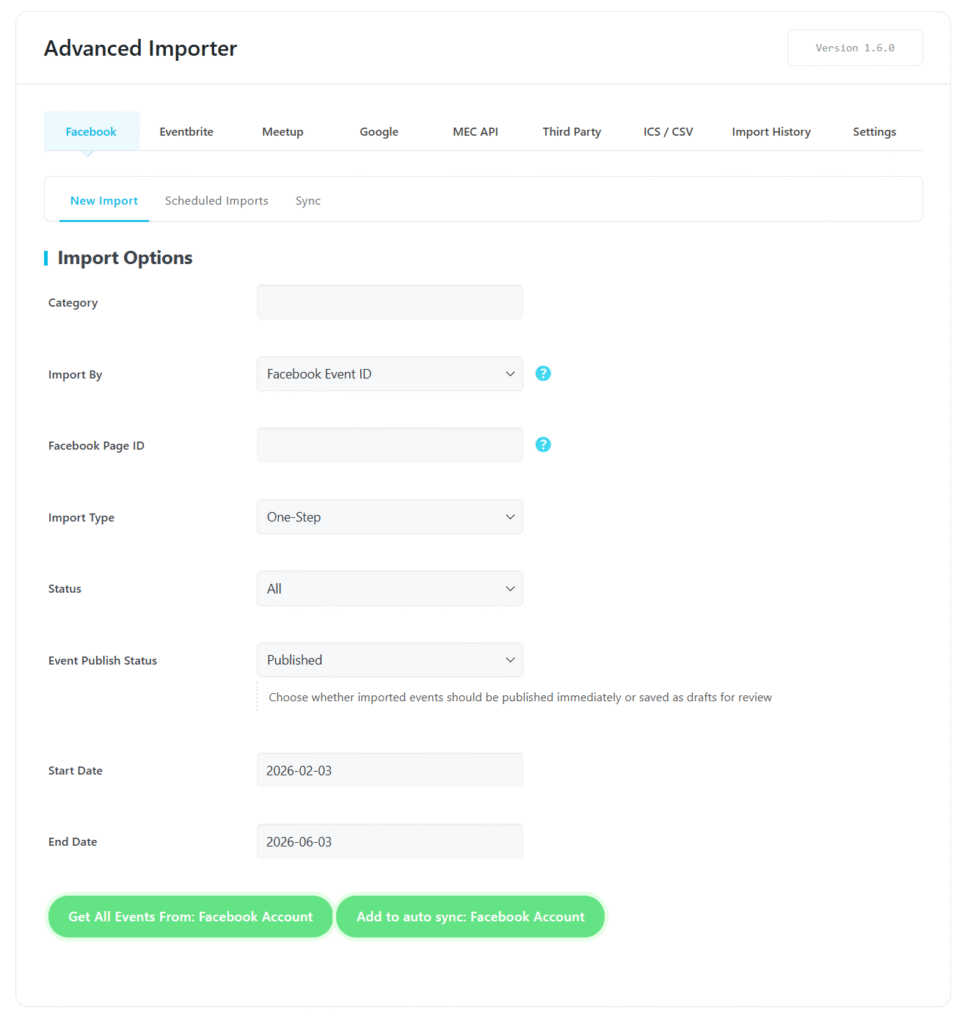
2 .Category Assignment: To put an import into a specific category, navigate to New Import > Import Option and choose one. As of version 1.8.0, the selected category is reliably applied to imported events and to Scheduled Imports / Sync jobs.
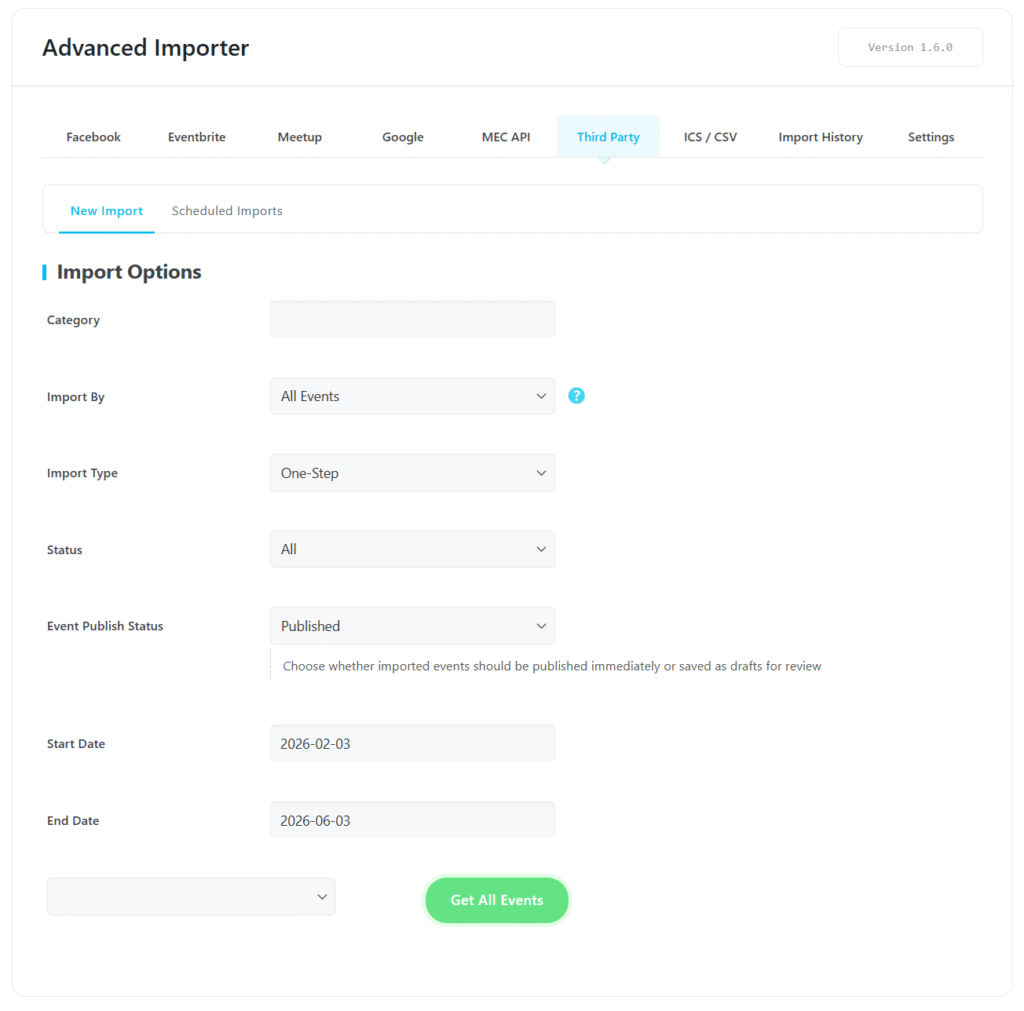
- Data Filtering: You can use specific Event IDs for targeted imports or set a Start and End Date range to only fetch events from a certain timeframe. For Eventbrite imports, the date range now matches events whose start date falls within the selected window.
Note: The import date range uses an exclusive End Date. This means the selected End Date itself is not included in the import range. If you want to include events from a specific day, set the End Date to the following day.
Event Visibility (Eventbrite)
New in version 1.8.0, the Event Visibility option lets you filter Eventbrite events by their listing visibility before importing:
- Public only: Imports only events that are publicly listed and searchable on Eventbrite (default).
- Private only: Imports only private (unlisted) events that are hidden from Eventbrite search.
- Public and Private: Imports every event from your account regardless of visibility.
The selected visibility is saved with the import and is also respected by Scheduled Imports and auto-sync jobs, so private events that are skipped or included stay consistent on every sync.
Note: If you upgrade from an older version and your Eventbrite syncs previously imported unlisted events, set Event Visibility to Public and Private after updating, since new imports default to Public only.
Eventbrite Tags
As of version 1.8.0, the Publish tags (search keywords) you assign to events in Eventbrite are imported automatically and assigned to your MEC events as WordPress/MEC tags. This makes it easier to filter and display imported events by their Eventbrite keywords.
Import Types
- One Step: This option performs the import immediately.
- Scheduled: This automates the process with frequencies ranging from Once Hourly to Once a Month.

Event Update Authority
The Event Update Authority option determines how imported events should be updated during scheduled synchronization when an event already exists in your WordPress website.
This option helps you decide whether changes made directly in WordPress should be preserved or replaced with the latest data from the external source.
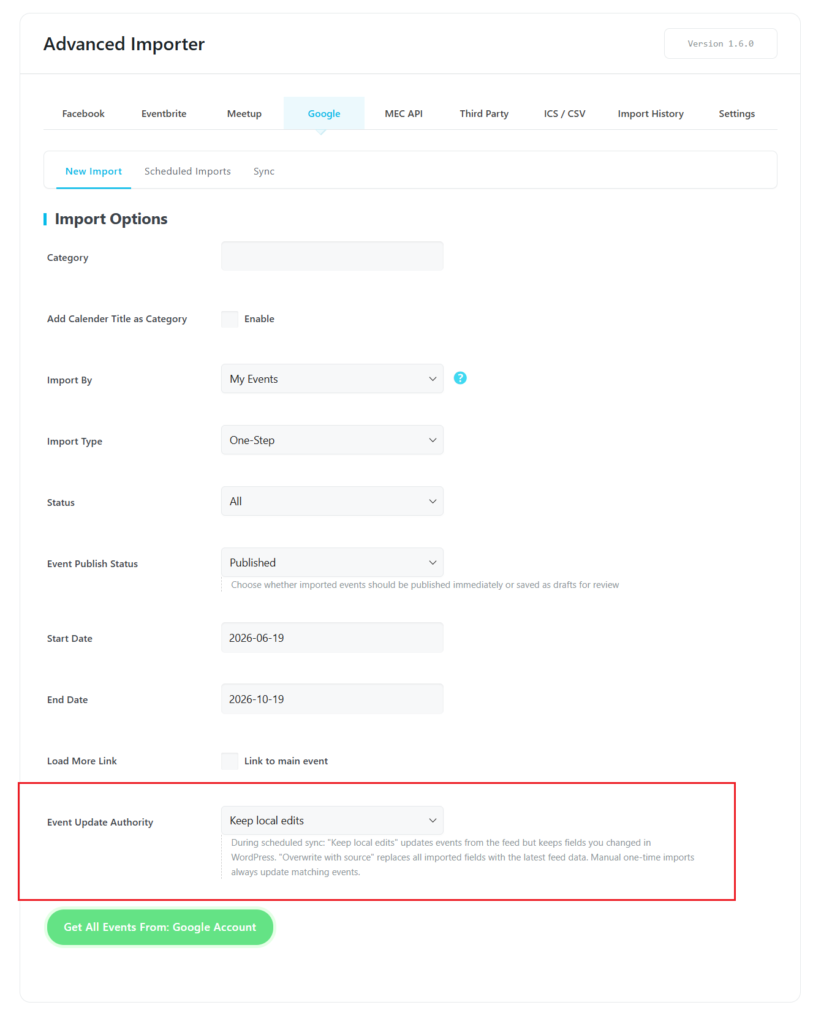
Two update modes are available:
Keep Local Edits
When this option is selected, scheduled synchronization updates the event using the latest information from the source while preserving any fields that you have modified manually inside WordPress.
This is the recommended option if you customize imported events after they have been imported and do not want those changes to be lost during future syncs.
Typical use cases include:
- Editing the event description
- Changing featured images
- Updating categories or tags
- Modifying custom fields
- Making SEO-related changes
Only fields that have not been locally modified will continue to receive updates from the source.
Overwrite with Source
Selecting Overwrite with Source causes every scheduled synchronization to completely refresh imported events using the latest data available from the external source.
Any supported field previously modified inside WordPress will be replaced by the data coming from the source.
Choose this option if the external calendar is considered your primary source of truth and you always want your imported events to exactly match it.

Note
This setting only affects Scheduled Sync operations.
The Event Update Authority setting only applies to scheduled synchronizations. Manual one-time imports always update matching imported events regardless of the selected option.
Specialized Import Methods
Importing by CSV or ICS
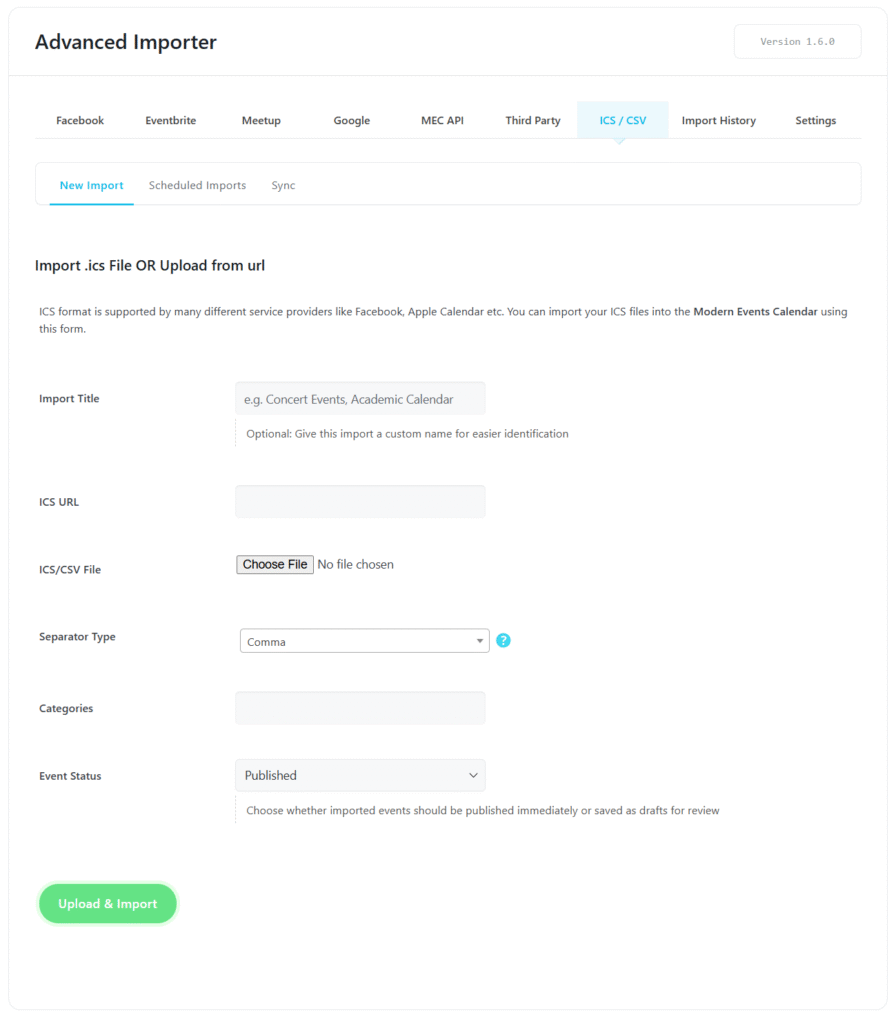
- Direct File Upload: You can import events directly using CSV or ICS files uploaded from your computer.
- Separator Type: For CSV files, the Separator Type field allows you to specify how your data is structured, with options for comma or tab delimiters.
- Event Status: Use the Event Status field to specify what status the event should hold (e.g., Published or Draft) immediately after the import is completed.
- ICS Feed URLs: If you have a URL for an external ICS feed, you can use it to facilitate the download process.
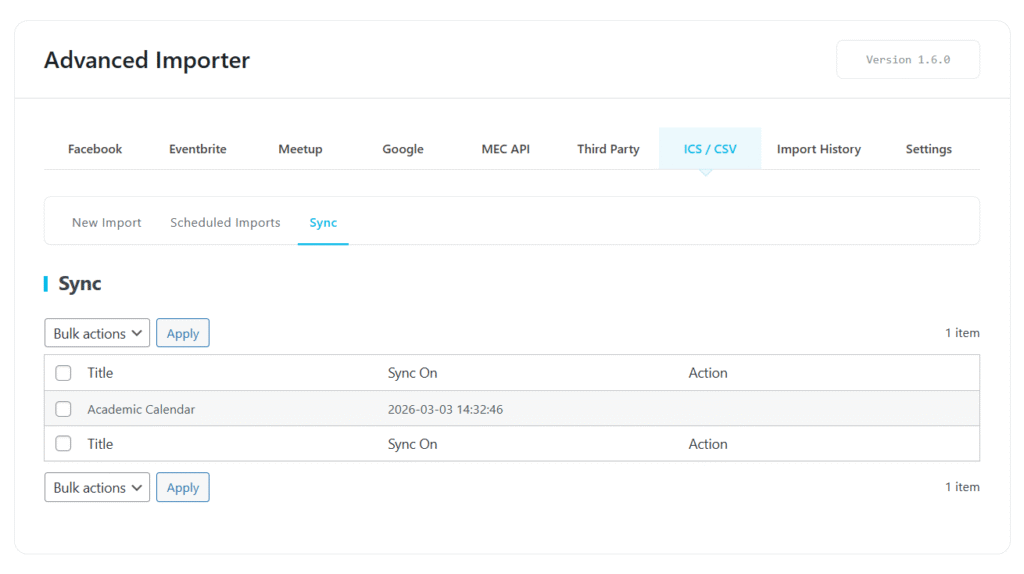
- Custom Labels: When adding external ICS feeds, you can assign a Custom Title (e.g., “Academic Calendar”) to help identify and organize multiple sources easily.
- Recurrence Exceptions (EXDATE): As of version 1.8.0, recurring events imported from ICS feeds fully support the EXDATE property. Cancelled or excluded occurrences in the source calendar (in UTC, timezone-aware, floating, or all-day formats) are imported as Exceptional Days in MEC, so they no longer appear on your calendar.
- Limitation: Scheduled Imports and Sync features are only supported for ICS URLs and are not available for CSV files.
Migrating from Third-Party Plugins
If you are migrating to MEC from Event Organiser, My Calendar, or Eventum, you should keep those plugins active during the import process. Once the migration is successfully concluded, you can deactivate and remove the old plugins without affecting your new MEC events.
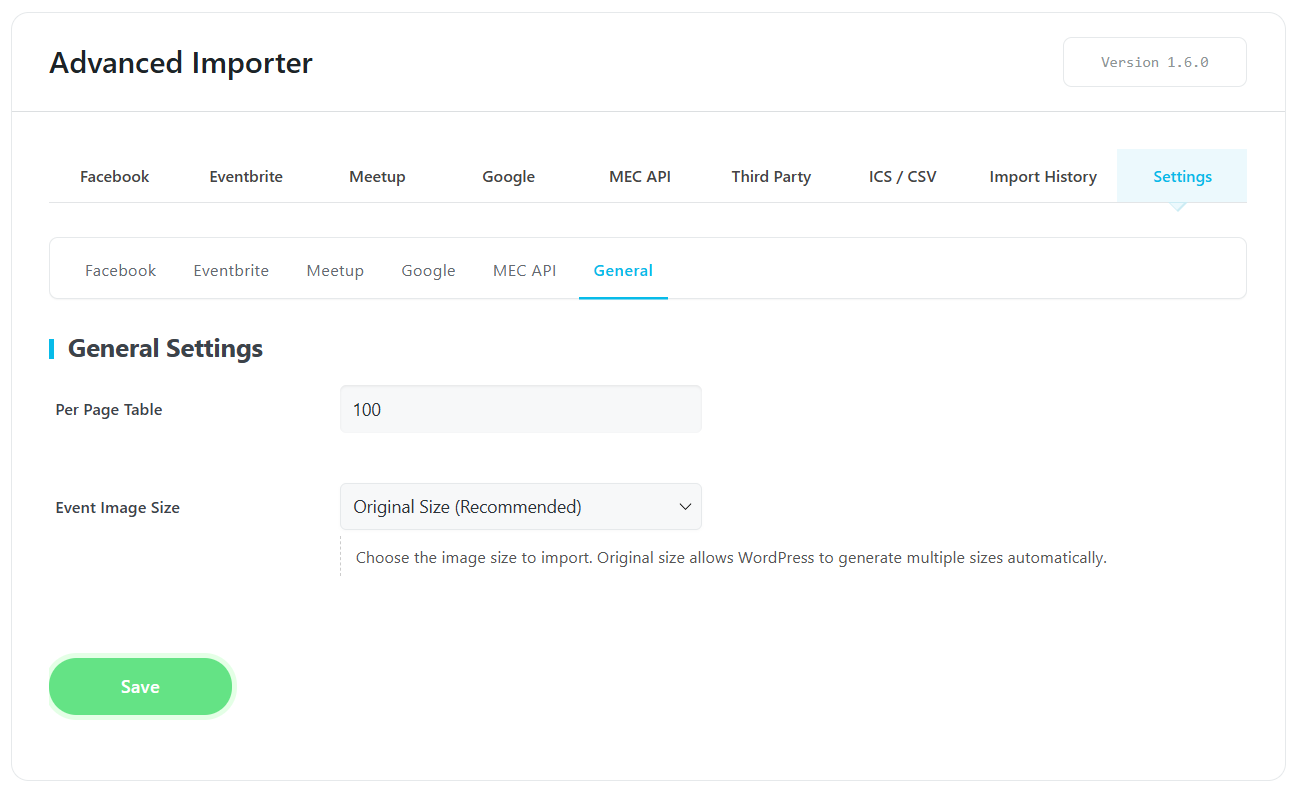
General Settings & History Management
- General Settings: General Settings: You can adjust the number of events shown on each Page Table (default is six). If you need to view more than 50 events at once, ensure your server configuration can handle the load without timing out.
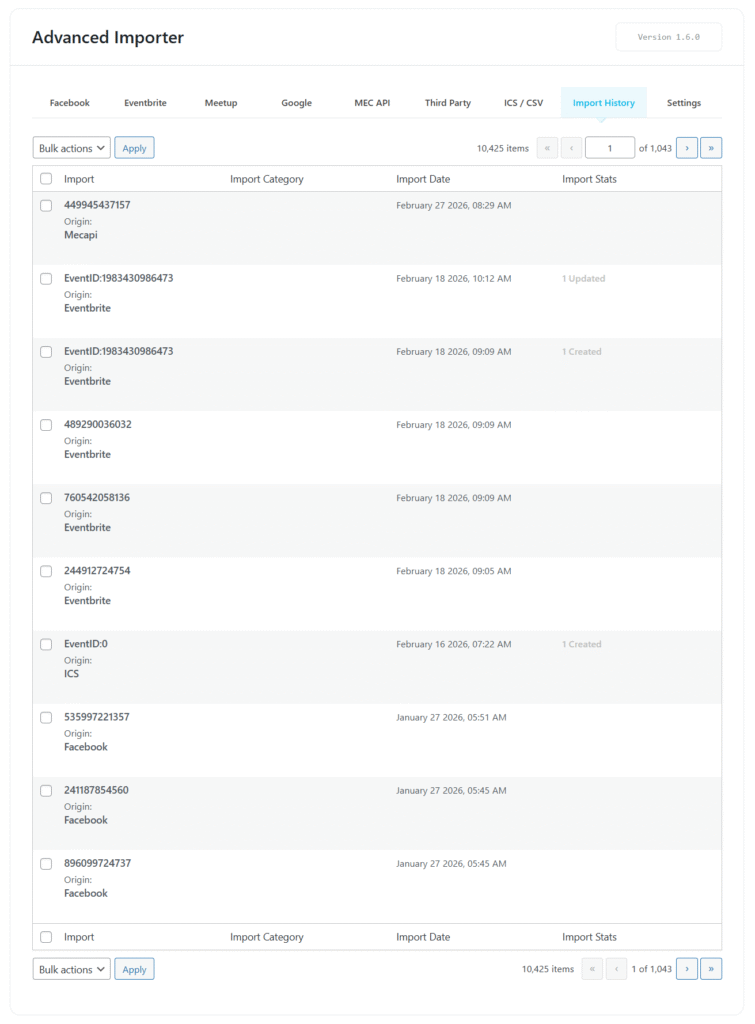
- Import History: This interface provides a complete list of all imported events. You can verify the import dates, check their assigned categories, see the current import status, and delete events individually.
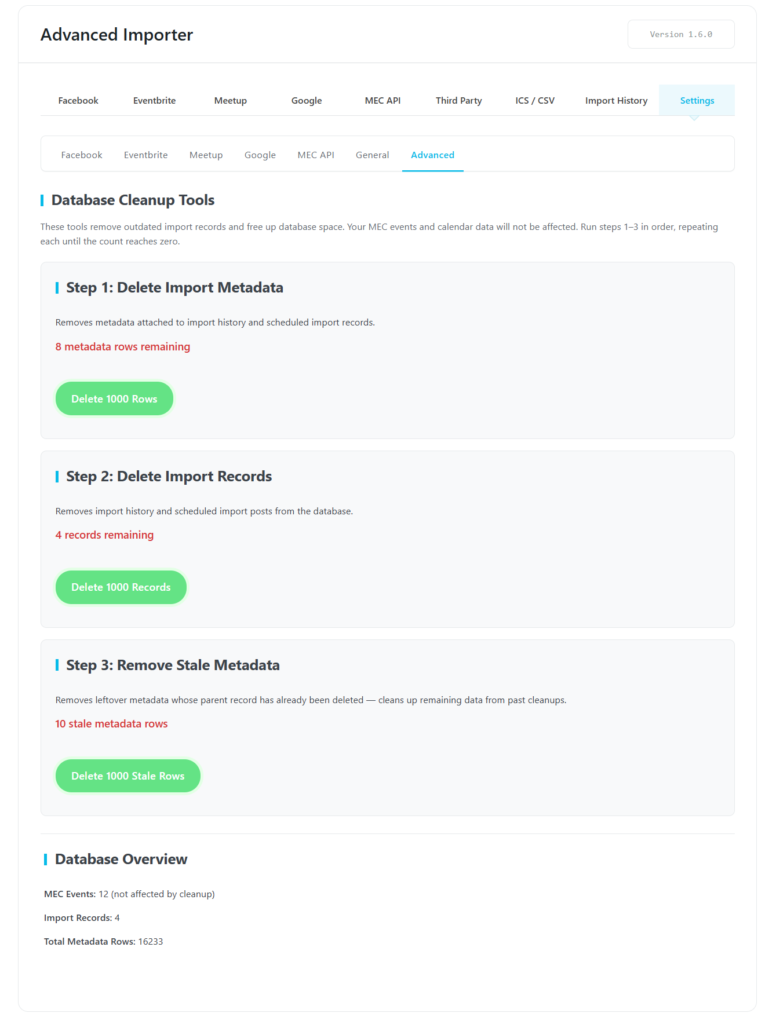
Advanced Settings
New Version introduces a new Advanced tab under Advanced Importer → Settings.
This section contains maintenance tools that help clean up old import data created by scheduled imports and synchronization jobs.
Over time, websites that perform frequent Scheduled Imports and Scheduled Syncs may accumulate a large number of import records and metadata inside the WordPress database.
Although these records are used internally by the importer, they can gradually increase database size and affect overall performance on websites that synchronize events for long periods.
The Database Cleanup Tools allow administrators to safely remove outdated import records while keeping all MEC events and calendar data intact.
Important
These cleanup tools do not delete your MEC events, categories, organizers, venues, or calendar data.
Only importer-related records and metadata are removed.
For best results, run the cleanup tools in the following order.
Step 1: Delete Import Metadata
This step removes metadata associated with:
- Import History
- Scheduled Import records
Run this step repeatedly until the remaining metadata count reaches zero.
Step 2: Delete Import Records
After metadata has been removed, delete the actual importer records stored by Advanced Importer.
This removes:
- Import History records
- Scheduled Import records
Run this step repeatedly until no records remain.
Step 3: Remove Stale Metadata
Sometimes metadata can remain in the database after its parent record has already been deleted.
This cleanup removes any remaining orphaned metadata left behind by previous imports or earlier cleanup operations.
Run this step repeatedly until no stale metadata remains.
Cleanup Limit
Each click of a cleanup button removes up to 1000 database entries.
Depending on the size of your database, you may need to click the button multiple times until the remaining count reaches zero before moving on to the next step.
Recommended Usage
The cleanup tools are particularly useful for websites that:
- Run scheduled imports for long periods
- Synchronize events frequently
- Import large numbers of events from external sources
- Want to reduce unnecessary database growth
Running these cleanup tools periodically helps keep the importer database clean without affecting any existing MEC events.
Important
Database Cleanup permanently removes import history and synchronization records. This action cannot be undone.
Scheduled Imports & Sync Management
This dedicated section handles the automation and long-term maintenance of your event data.
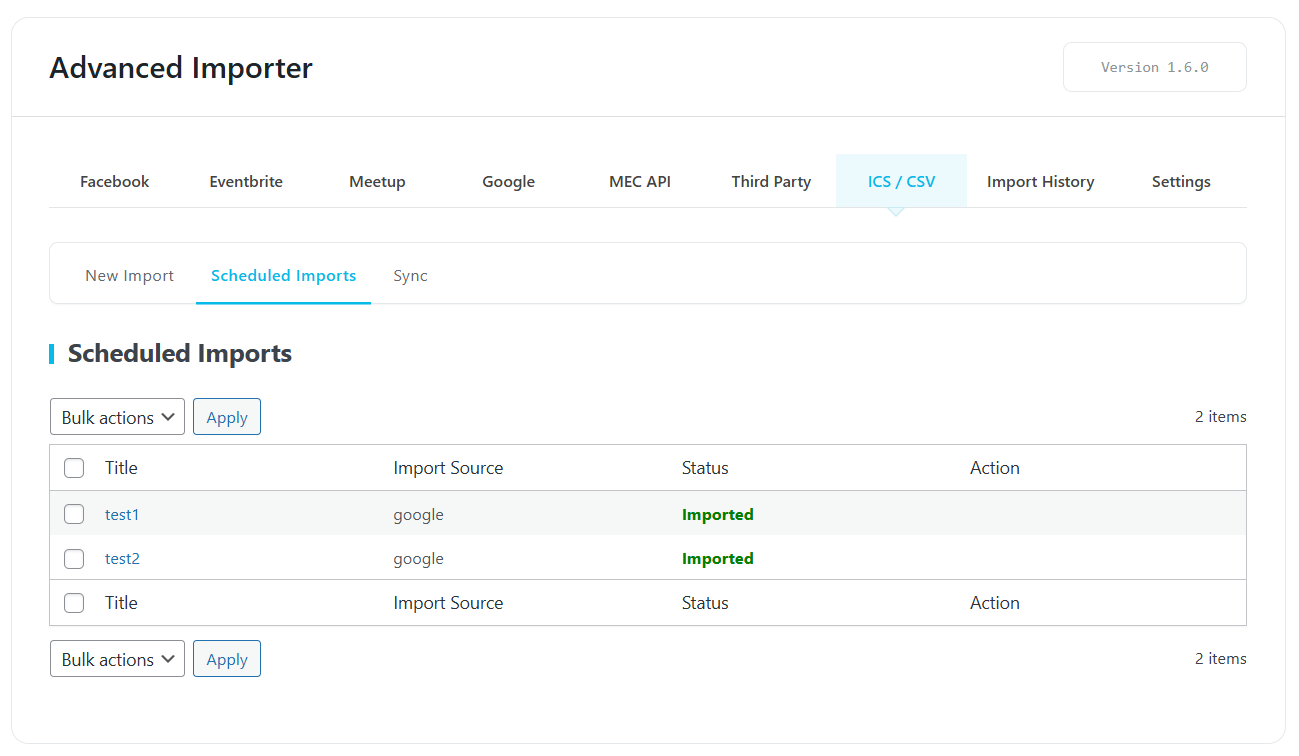
- Scheduled Imports Tab: All planned, recurring imports can be viewed and managed here. This tab serves as a central hub to monitor your automated tasks and ensure you are aware of all planned updates.
- Sync Tab: This tab manages deep, automated synchronization. When the “Add to auto sync” button is clicked for an import, the entire task is moved here. Based on the existing schedule, every time the import syncs, any changes, deletions, or additions made to the events at the source will be automatically applied to your MEC calendar for future syncs. For Eventbrite sync jobs, the configured Event Visibility filter is respected on every run.
Use Cases (When This Addon is Useful)
- Automated Social Sync: Automatically pull events from your Facebook Page or Google Calendar so you only have to update your schedule in one place.
- Platform Migration: Quickly move hundreds of events from competing plugins like Eventum or My Calendar into MEC.
- Multi-Site Synchronization: Use the MEC API setting to keep multiple WordPress event websites in sync. This requires the Advanced Importer Addon to be active on both the site you are importing from (source) and the site you are importing to (target).
Situations This Addon May Not Be Ideal
- Instant Google Updates: Changes made to a Google Calendar are applied on the next import or scheduled sync, not instantly. The connection itself no longer expires thanks to automatic token refresh, so no periodic re-authentication is needed.
- Low-Resource Servers: Fetching very large numbers of events (over 50 at once) requires appropriate server resources and may cause timeouts on weak hosting plans.
- CSV Automation: Since CSV files do not support scheduled syncing, they are only ideal for one-time manual migrations.
Troubleshooting for Beginners
- Google Connection: Access tokens are now refreshed automatically before every import and sync. If the connection fails, click Need Authentication once to re-establish it — no more re-authenticating every 30 minutes.
- Meetup Delay: If your Meetup connection isn’t working immediately, remember that the activation process for their OAuth clients can take one to two hours.
- Credentials Check: If imports fail, first verify that all API Keys and Access Tokens are entered correctly and that the necessary permissions were granted during the “Need Authentication” step.
- Missing Eventbrite Events: If unlisted (private) Eventbrite events stop appearing after upgrading, set Event Visibility to Public and Private in the Eventbrite import options.
- * *
FAQ
How do I install and activate the Advanced Importer Addon for MEC?
Ensure that both the Modern Events Calendar and the Advanced Importer Addon are installed and activated on your WordPress site. After activation, a new menu labeled “Advanced Importer” will appear under the M.E. Calendar section. Clicking on this menu will redirect you to the import page.
Which platforms can I import events from using the Advanced Importer Addon?
The addon supports importing events from Facebook, Google Calendar, Meetup, and Eventbrite. You can connect multiple accounts from these platforms for unlimited imports.
How do I authenticate my Facebook account to import events?
To authenticate your Facebook account, follow these steps:
- Create a Facebook App through the Facebook Developers portal.
- Generate a User Access Token with the necessary permissions.
- Enter the Access Token in the Advanced Importer settings under the Facebook section.
Detailed instructions are available in the MEC documentation.
How do I connect my Google Calendar to import events?
To connect your Google Calendar:
- Create a project in the Google Developers Console.
- Enable the Google Calendar API for your project.
- Obtain the necessary API credentials.
- Enter these credentials in the Google settings of the Advanced Importer Addon.
Detailed instructions are provided in the MEC documentation.
What information is required to connect my Eventbrite account?
To connect your Eventbrite account, you’ll need to obtain an API Key by:
- Logging into your Eventbrite account.
- Navigate to the API Key section.
- Generating a new API Key.
Once obtained, enter this API Key in the Eventbrite settings of the Advanced Importer Addon.
How do I obtain the necessary credentials to connect my Meetup account?
To connect your Meetup account:
- Visit the Meetup OAuth Clients page.
- Create a new OAuth Client to receive your Client ID and Client Secret.
- Enter these credentials in the Meetup settings of the Advanced Importer Addon.
Note that the activation process may take up to an hour.
How can I schedule automatic imports for my events?
The Advanced Importer Addon allows you to schedule imports by selecting the “Scheduled” option under Import Type. You can set the frequency to Once Hourly, Twice Daily, Daily, Weekly, or Monthly, depending on your requirements.
What should I do if I encounter issues during the import process?
If you experience problems during import:
– Verify that all account credentials (API Keys, Access Tokens) are correctly entered.
– Ensure that the necessary permissions are granted for each platform.
– Check your server’s performance capabilities, especially when importing a large number of events.
For further assistance, consult the MEC documentation or contact support.
Is it possible to import events from other WordPress event plugins into MEC using the Advanced Importer?
Yes, the Advanced Importer Addon allows you to import events from Event Organiser, My Calendar, or Eventum plugins. You can deactivate those plugins after the import is complete.
What is the MEC API setting in Advanced Importer?
The MEC API setting allows you to import events from another website that is using the Advanced Importer. You need to copy the URL from the source website and paste it into the target website’s Advanced Importer settings along with the API Key.
How can I set the number of events displayed during the import process?
In the General Settings of the Advanced Importer, you can adjust the number of events shown on each page table to suit your needs. The default is six, but you can increase it. Adjust this number based on your system’s performance capabilities.
How does the authentication process work for each platform?
After adding your account for a specific platform, you’ll see it listed at the bottom of its settings. Click ‘Need Authentication’ to open a new window to log in or give access to your events.
Can I import events into a specific category?
Yes, when creating a new import, you can choose a specific category from among the categories available in MEC for the imported events. As of version 1.8.0, this category is also correctly applied during Scheduled Imports and Sync jobs.
How can I view and manage the history of imported events?
You can view a list of imported events in the “Import History” interface, where you can also delete events, check their categories, import dates, and status.
Can I import events using CSV or ICS files?
Yes, you can import events directly using CSV or ICS files, and you can also use a URL for an ICS file.
What should I do if I want to import events only from a specific time range?
The Advanced Importer Addon allows you to filter events by specifying the desired time range, ensuring that only events within that range are imported.
What should I do if I make changes to my Google Calendar and they are not reflected in the import?
Changes appear the next time the import runs. For scheduled imports and syncs, wait for the next scheduled run or trigger the import manually. Thanks to automatic token refresh, an expired connection is no longer the cause; if the account was disconnected (for example, after a password change or revoked access), click Need Authentication once.
How are cancelled occurrences in recurring ICS events handled?
Version 1.8.0 fully supports the ICS EXDATE property. Occurrences excluded in the source calendar are imported as Exceptional Days in MEC and will not show on your calendar. If you imported recurring events with an older version, re-import the feed to apply the exceptions.
Why are my private (unlisted) Eventbrite events not imported after updating to 1.8.0?
Version 1.8.0 introduces the Event Visibility filter, which defaults to Public only. To import unlisted events, open your Eventbrite import settings and set Event Visibility to Public and Private, then save or re-run the import.
If you schedule an import, can you view and manage the scheduled import, and where can you access this information?
Yes, if you schedule an import, you can view and manage the designated schedule under the Scheduled Imports tab. This allows you to monitor and keep track of your planned imports.
When importing events, is there an option to import all events at once, and how does this option work for Google Calendar?
Yes, when importing events from Google Calendar, there is an option to download all events. First, you will see the number of calendars, and after clicking “Get Calendar”, you will see the number of events. Then, clicking “Get Events” allows you to see a list of the events. From there, you can either choose some events or click “Download All Events” to import all of them.
Updated on: 13/09/2026
Thank you!