Social Auto Poster Addon
The Social Auto Poster Addon is a professional tool that enables you to automatically post events published in Modern Events Calendar (MEC) to your social media platforms, including Facebook, LinkedIn, X (Twitter), Meetup, and Instagram. By integrating these platforms, you can ensure your audience is immediately notified of new events, increasing reach through automated or manual sharing.
Initial Setup
- MEC Lite or Pro: The Social Auto Poster is compatible with both the Lite and Pro versions of Modern Events Calendar.
- Installation: After purchasing, install and activate the addon through your WordPress dashboard.
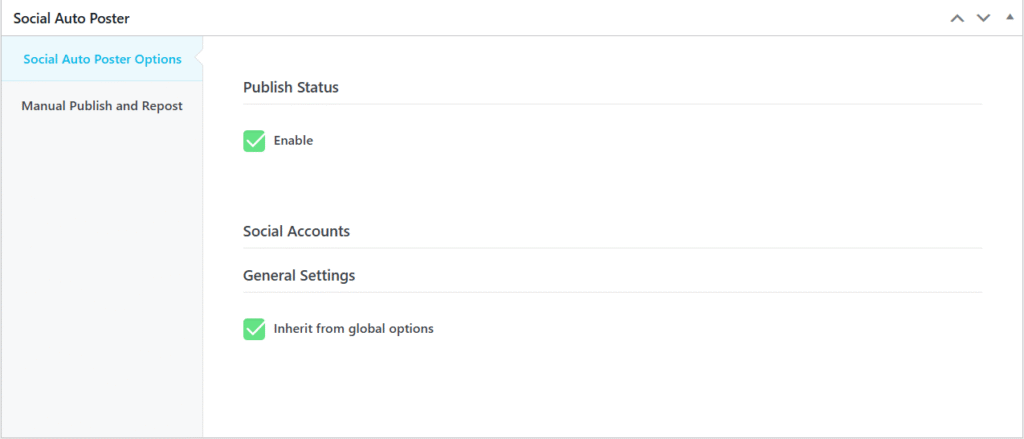
- Accessing the Menu: Upon activation, a new menu item labeled Social Poster will appear under the MEC menu. This is where you will configure global settings and specific platform integrations.
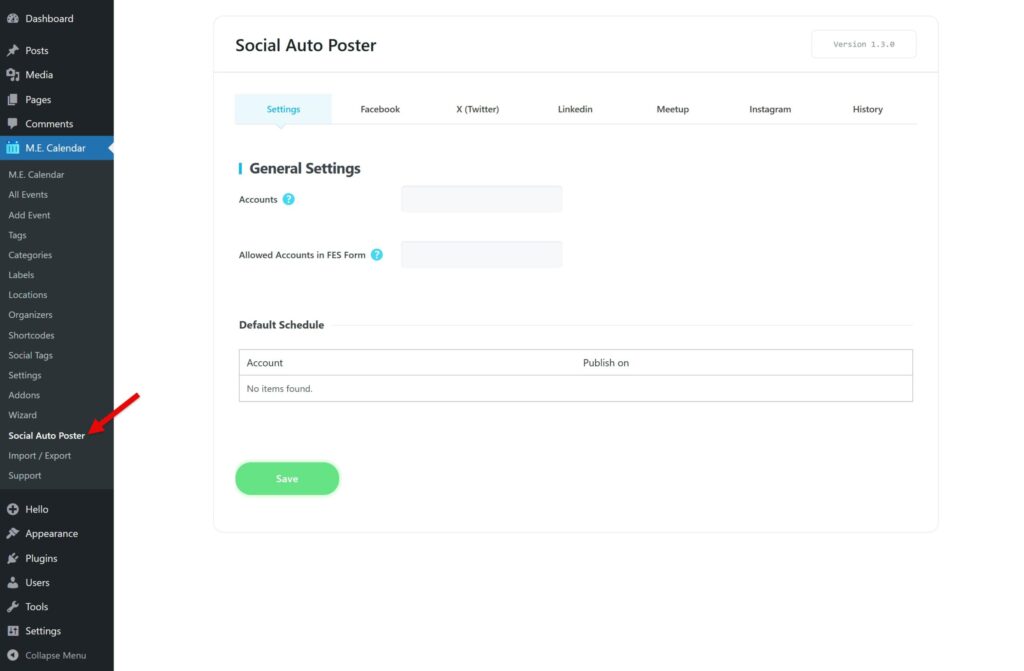
General Settings & Functioning
The addon offers global controls for how and when your events are shared across all connected accounts.
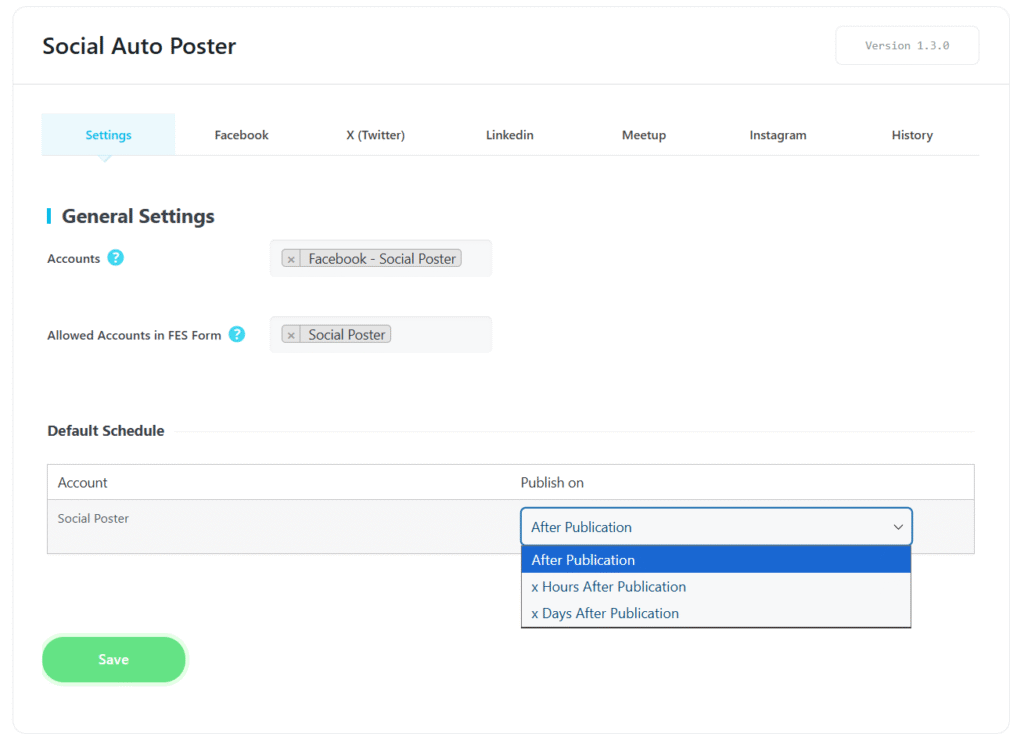
- Default Schedules: Located in the Settings tab, this allows you to determine if events are shared immediately upon publication or after a designated period.
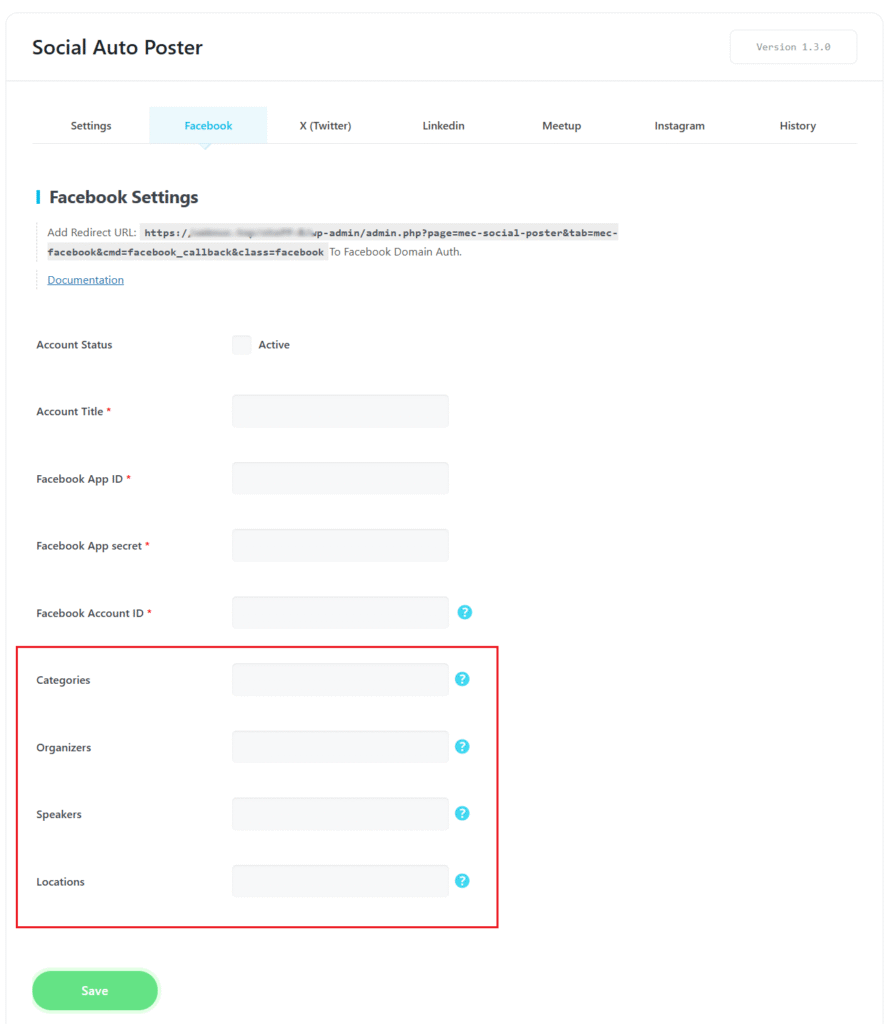
- Global Filters: You can filter which events are posted to specific accounts based on Categories, Organizers, Speakers, or Locations.
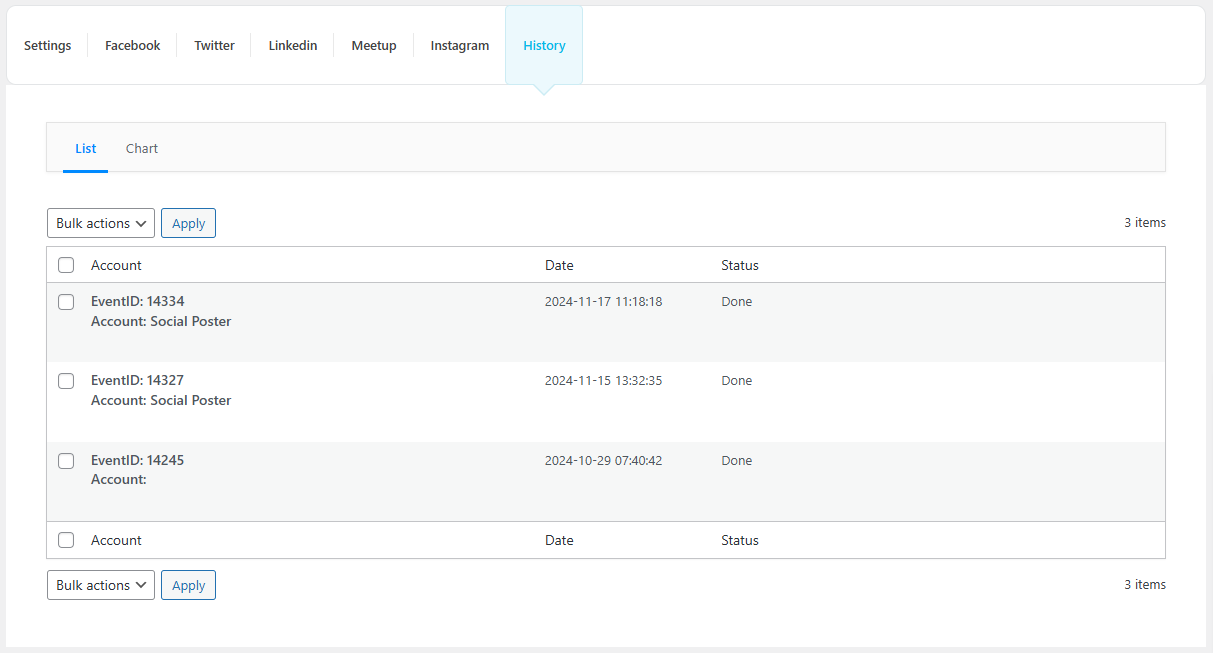
- History & Analytics: The History section provides statistics about your posted content in both list and chart views, allowing you to monitor and analyze social activity.
Platform-Specific Integration
Facebook setup is the most detailed because the addon posts only to Facebook Pages, not personal profiles.
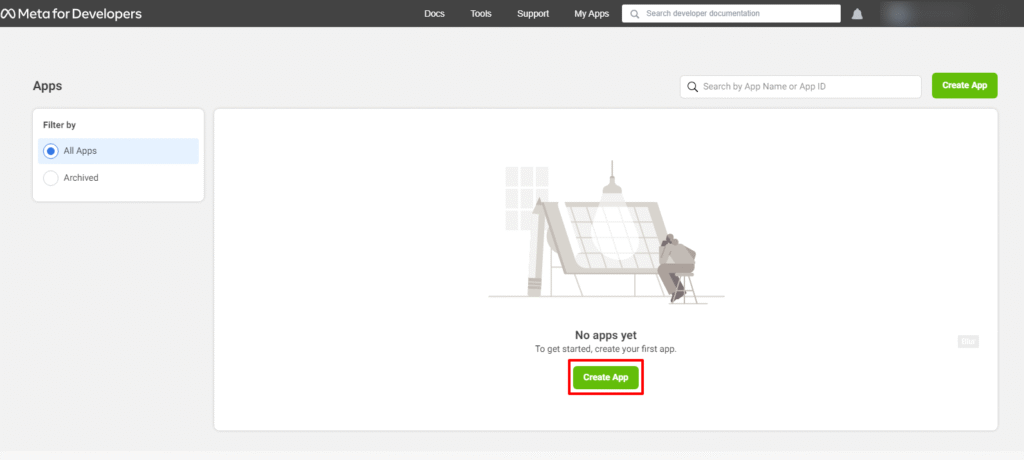
Step 1: Create a Facebook App
- Go to the Facebook Developers portal and click Create App.
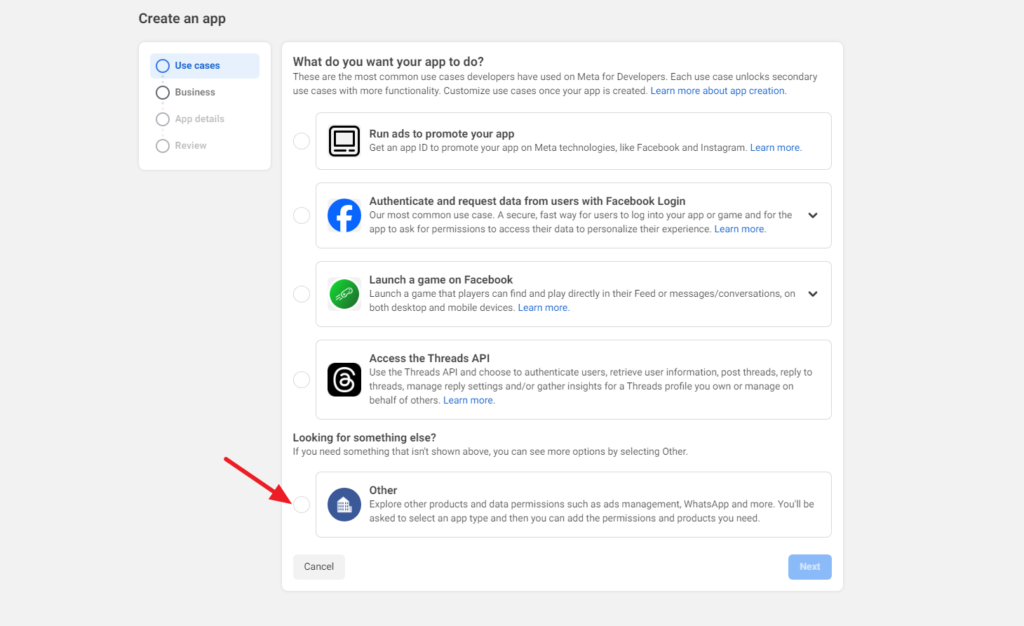
2\. Select Other as the use case and click Next.
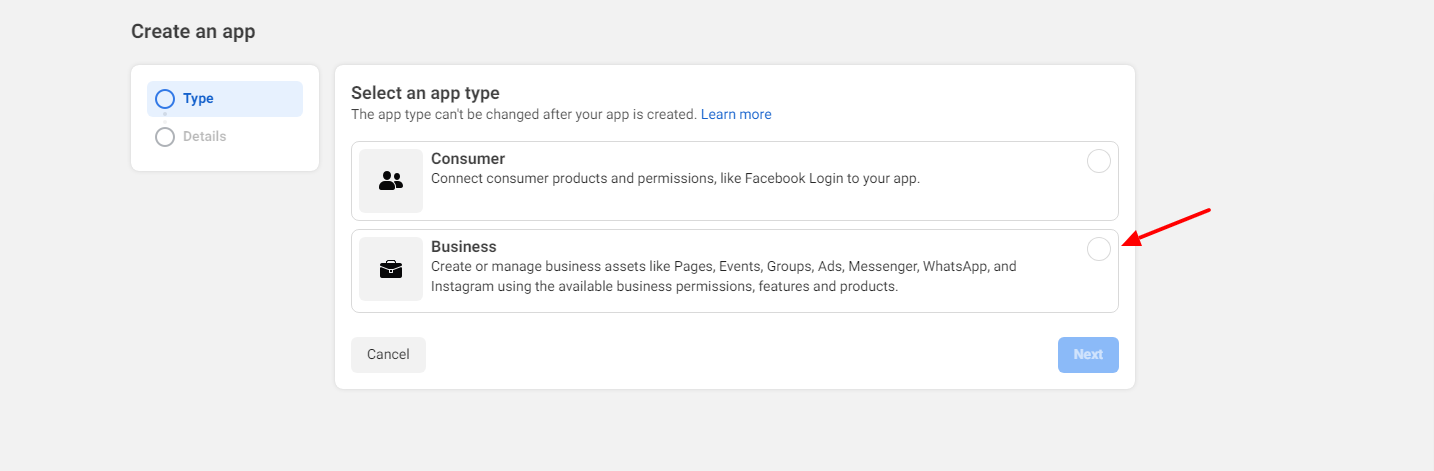
3\. Choose Business as the app type and click Next.
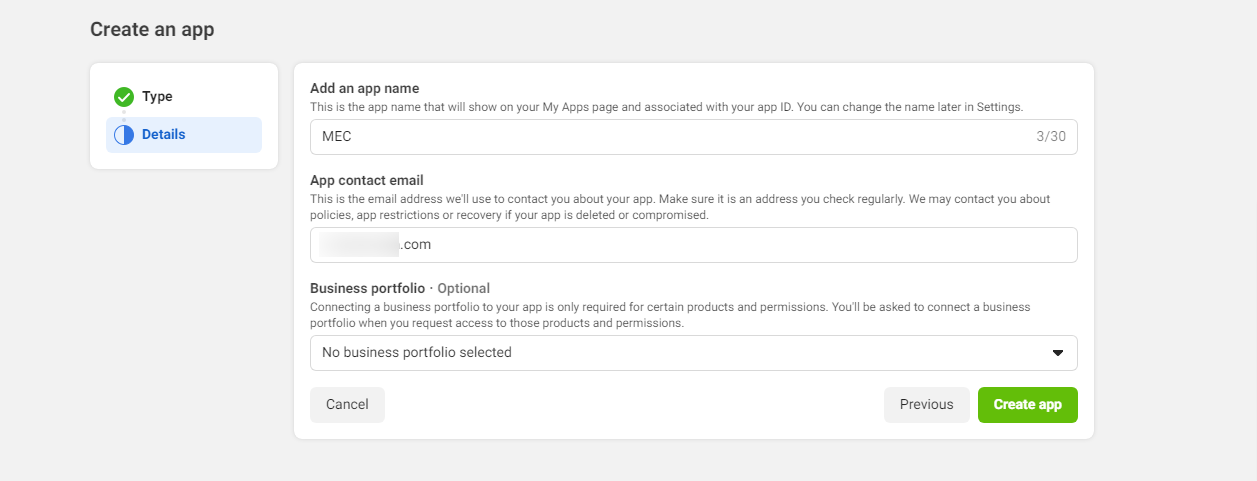
4\. Enter the required information for your app and click Create App.
After the app is created:
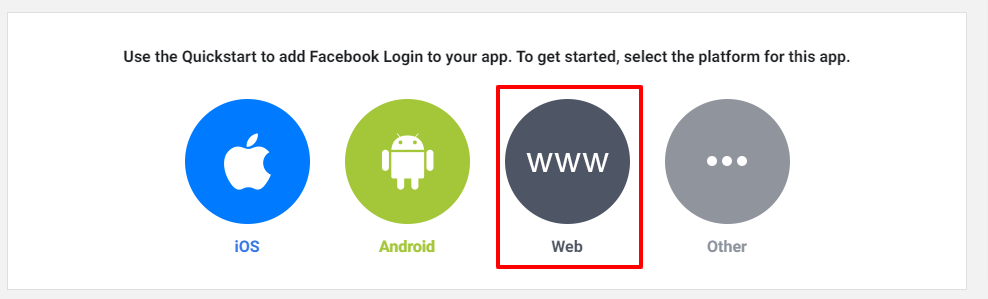
5\. Open the Add Product section.
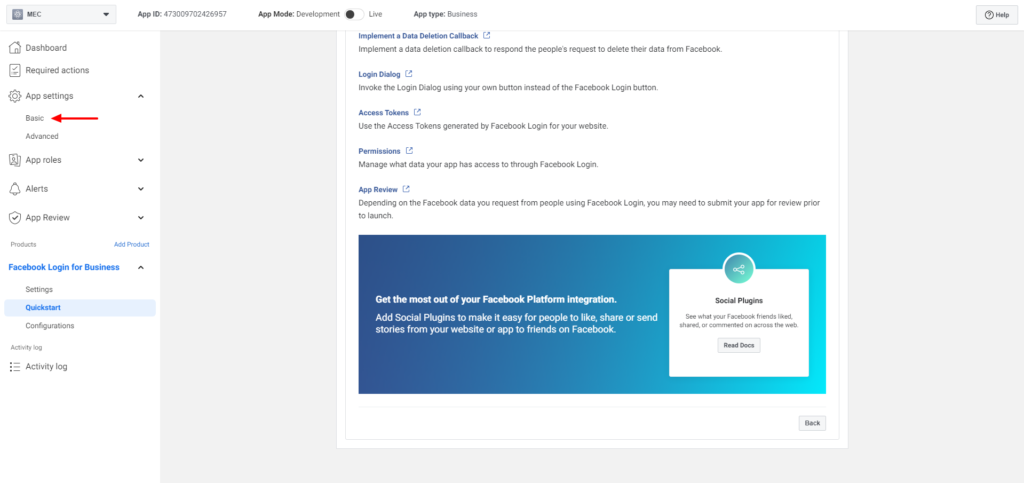
6\. Find Facebook Login for Business and click Set Up.

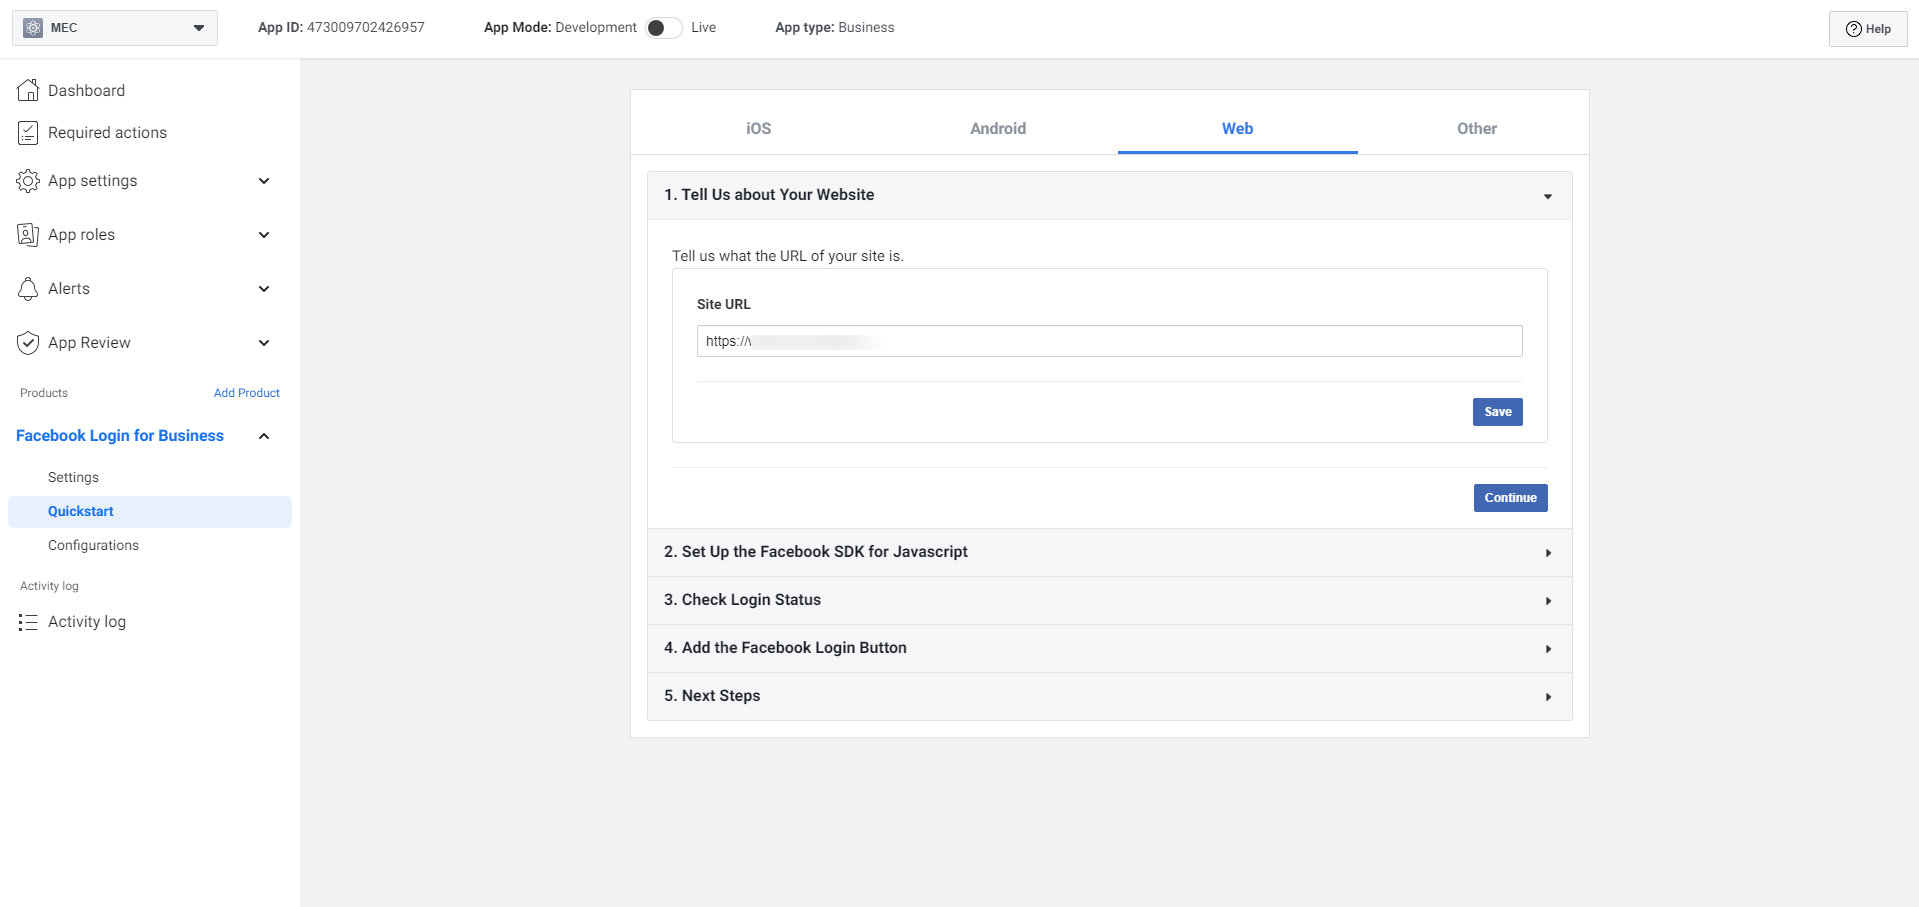
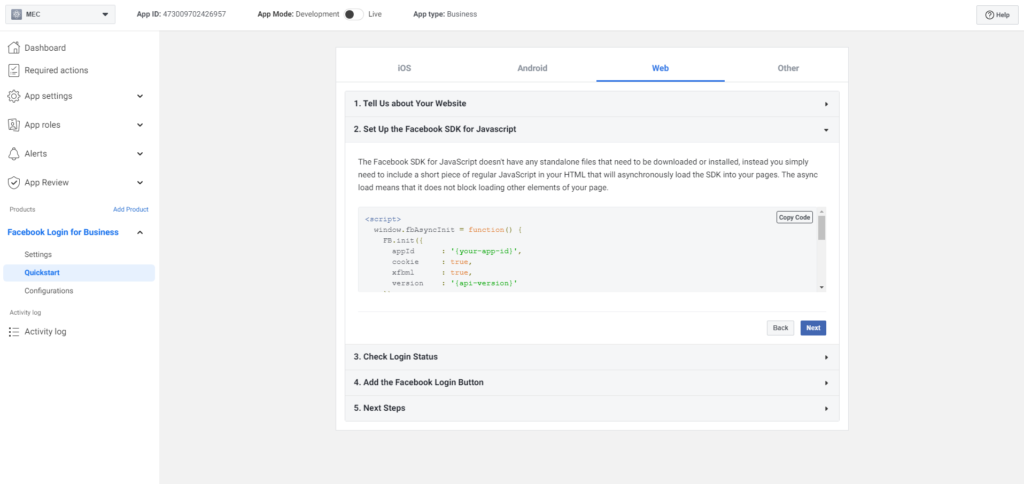
7\. In the Quick Start section, select Web as the platform.
8\. Enter your website URL and continue through the setup steps.
Next, configure your app settings:
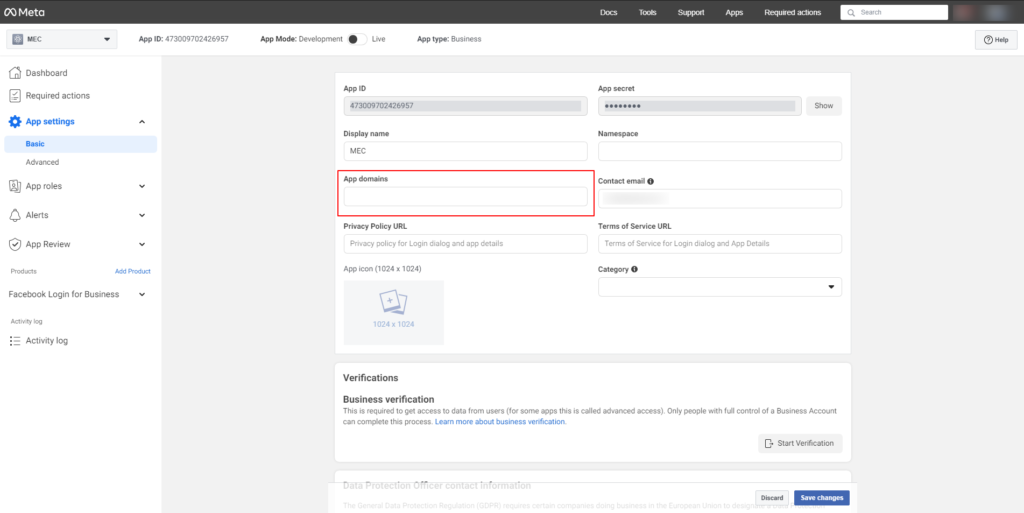
9\. Go to App Settings → Basic.
10\. Enter your website domain in the App Domains field and save the changes.
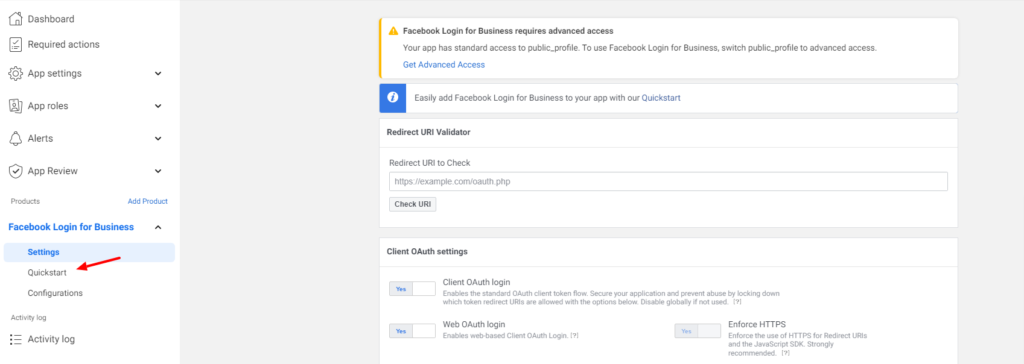
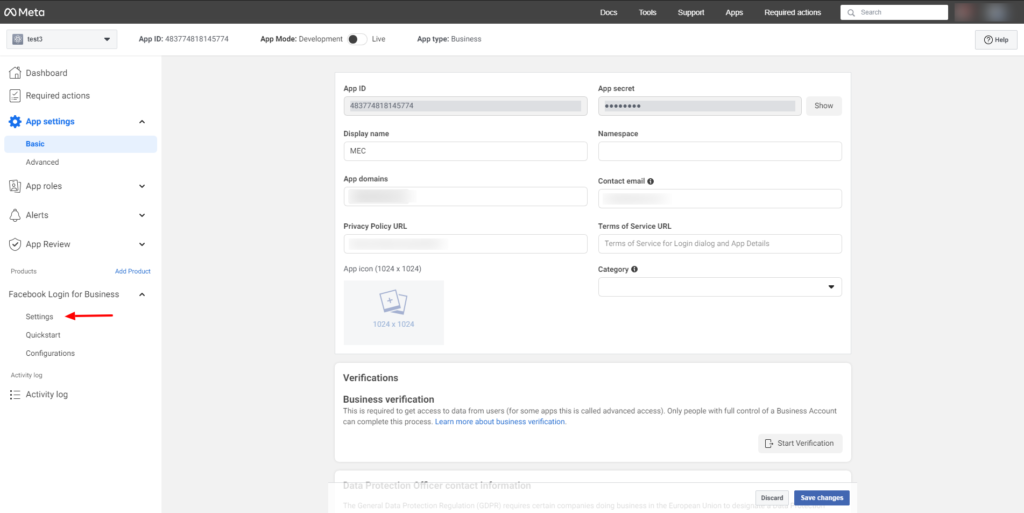
11\. From the left sidebar, open Facebook Login for Business → Settings.
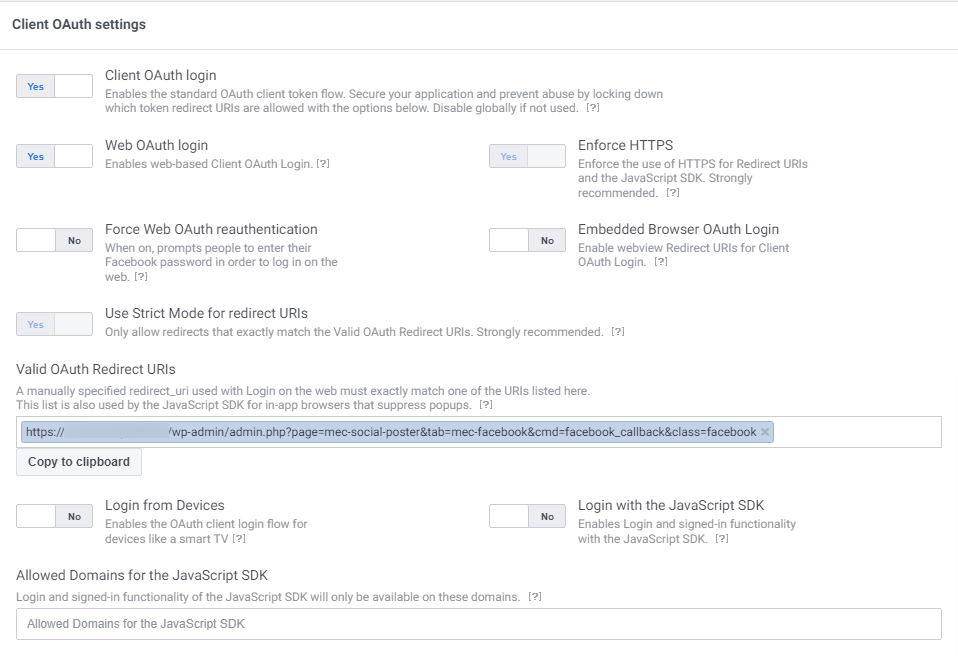
Now configure the redirect URL:
12\. Go to MEC → Social Poster → Facebook on your website.
13\. Copy the Redirect URL shown there.
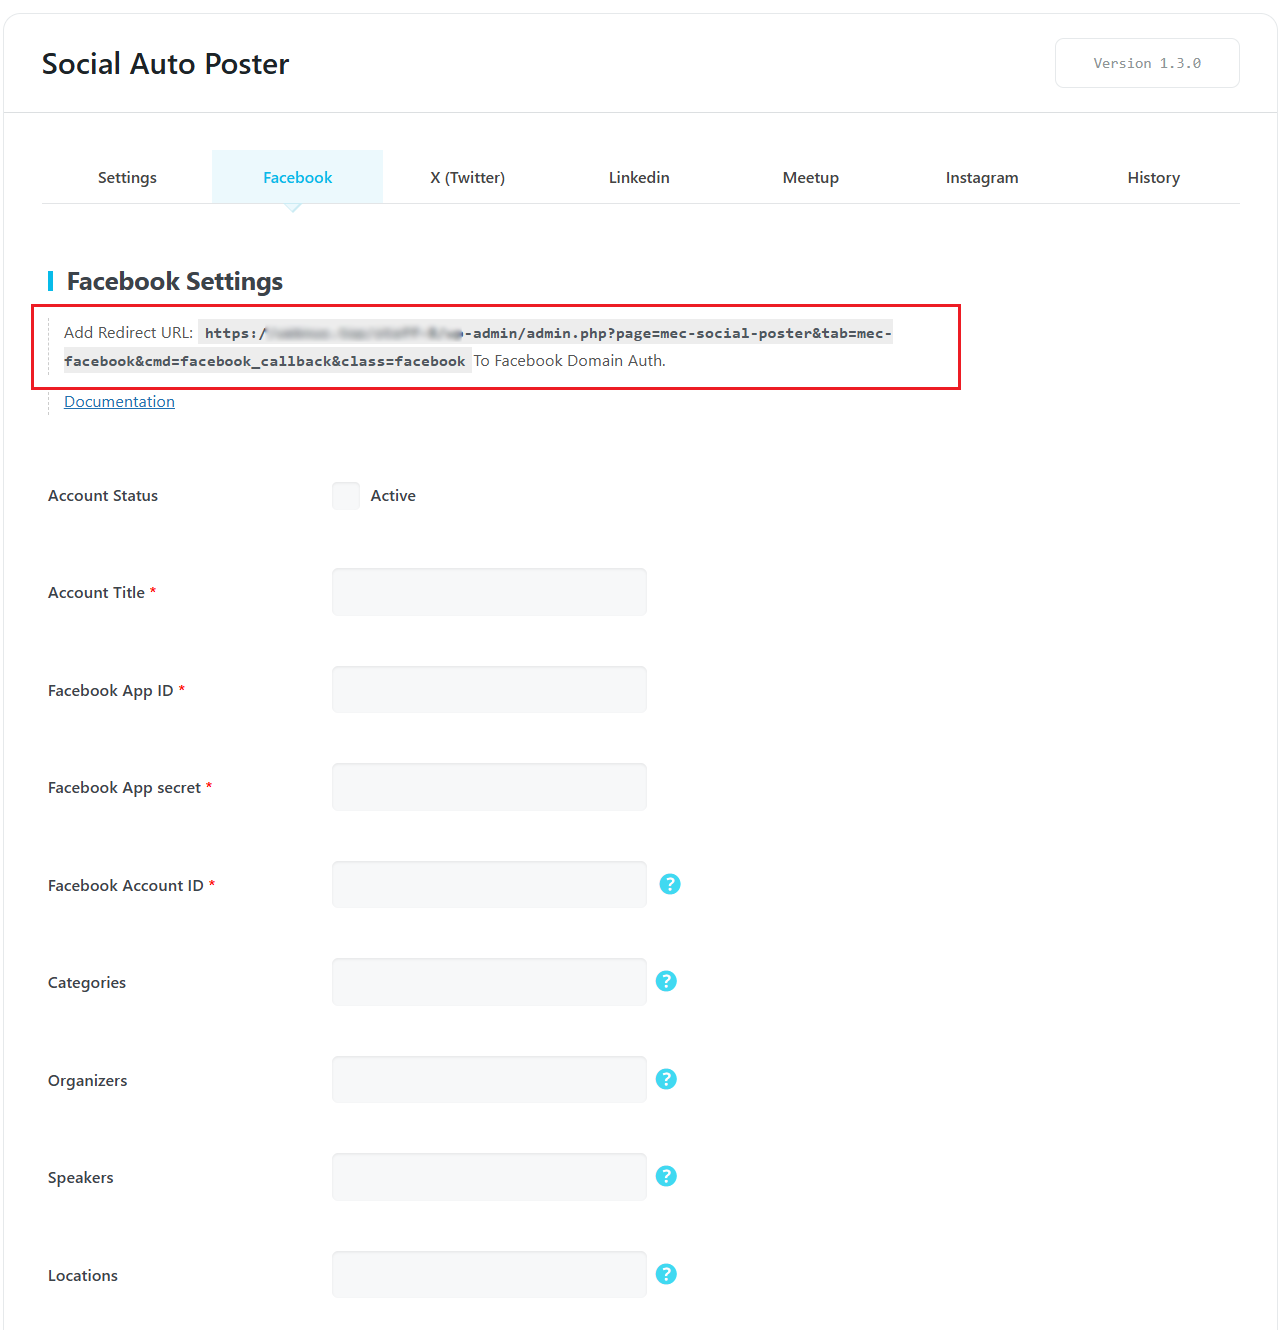
14.Paste this address into Valid OAuth Redirect URLs in the Facebook settings and save the changes.
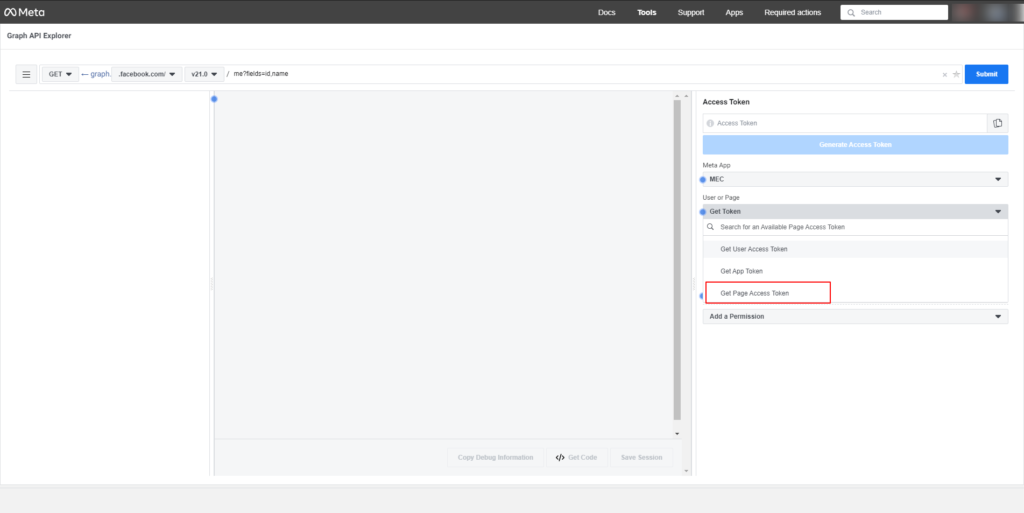
*Step 2: Generate the Access Token*
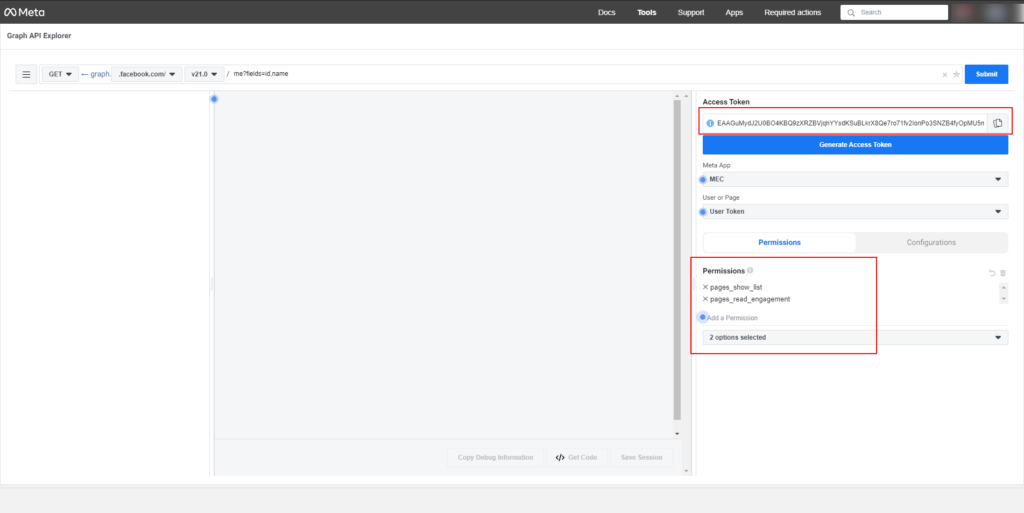
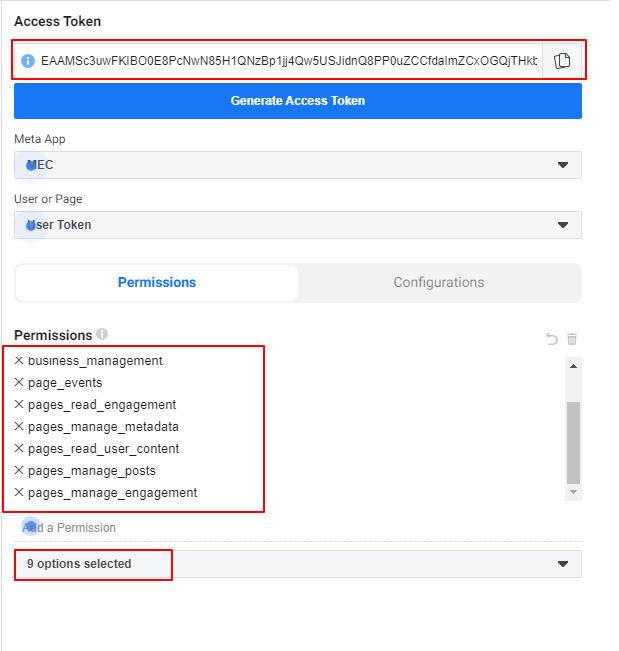
- Open the Graph API Explorer in the Facebook Developer tools.
- Select your created application from the Meta App dropdown menu.
- Click Get Token → Get Page Access Token.
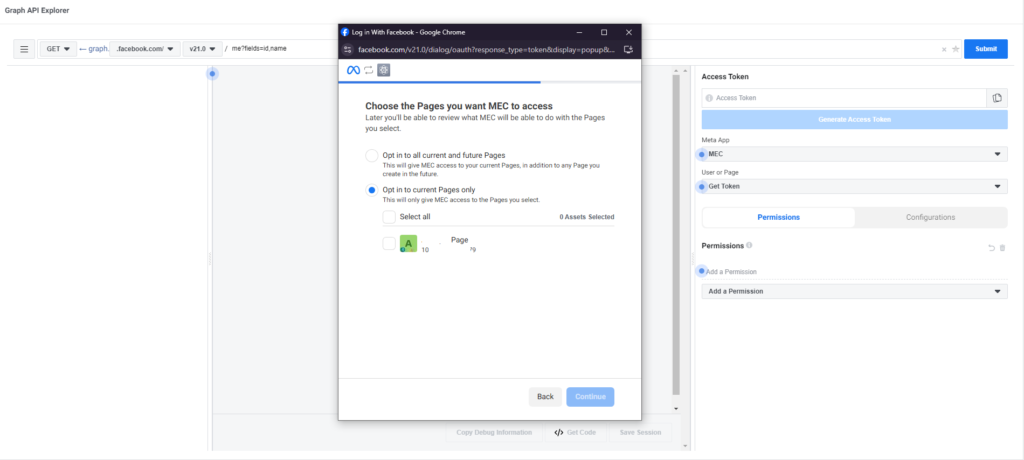
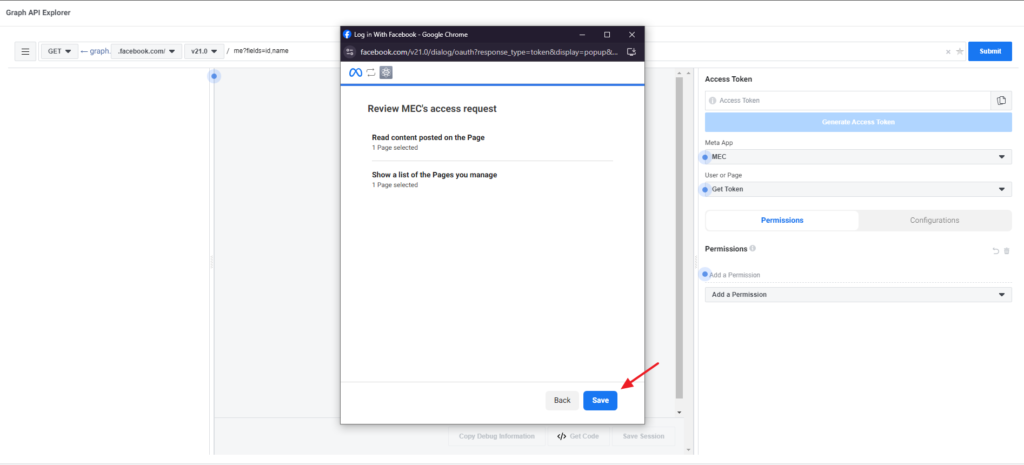
A permission window will appear:
- Select the Facebook Pages you want the app to access.
- Click Continue, then Save, and finally Got it.

After this step, a temporary access token will be generated.
Note: Events can only be published to Facebook Pages, not to personal profiles. Make sure your Facebook account has at least one Page created; otherwise, you will not be able to generate a Page Access Token.
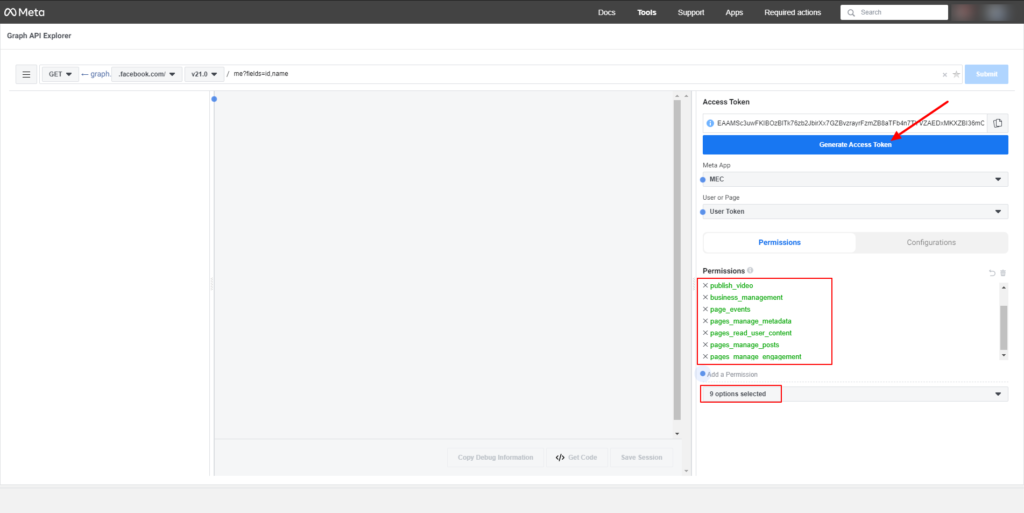
Step 3: Add Required Permissions
For proper functionality, ensure the following permissions are included:
- publish_video
- business_management
- page_events
- pages_manage_metadata
- pages_read_user_content
- pages_manage_posts
- pages_manage_engagement
If any permission is missing:
- Click Add a Permission in Graph API Explorer.
- Select the required permission.
- Click Generate Access Token again.
Step 4: Extend the Token (Two-Month Token)
The initial access token is temporary and typically expires within one hour.
To extend it:
- Copy the temporary token.
- Open the Access Token Debugger tool.
- Paste the token and click Debug.

4\. Click Extend Access Token to convert it into a long-lived token (valid for about two months).
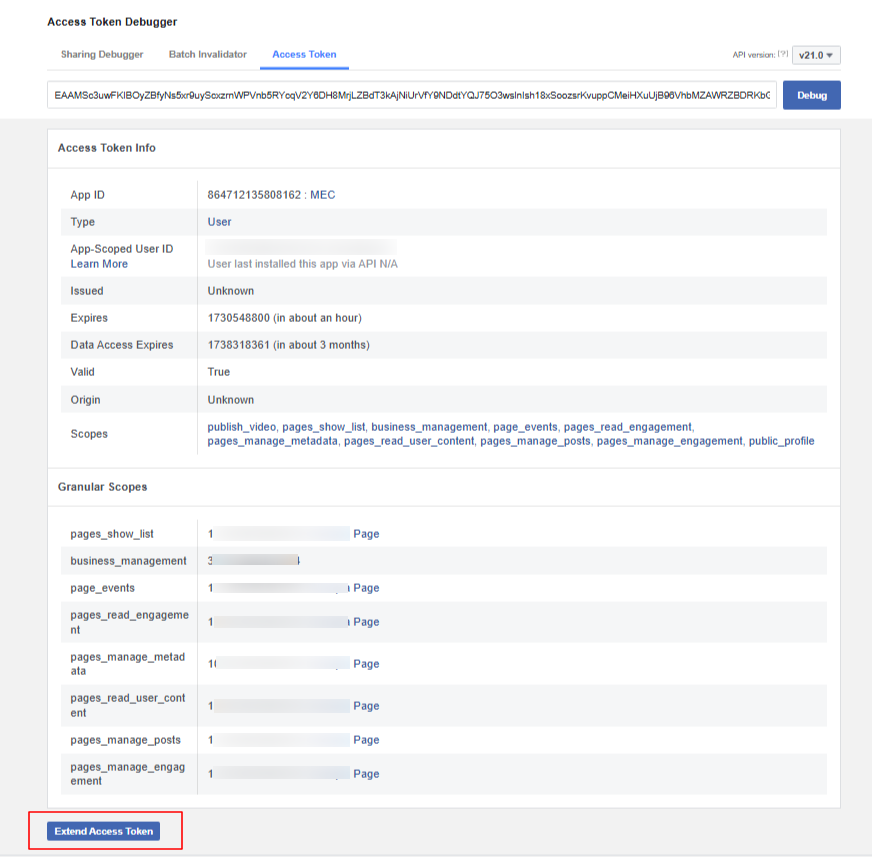
Copy the extended token.

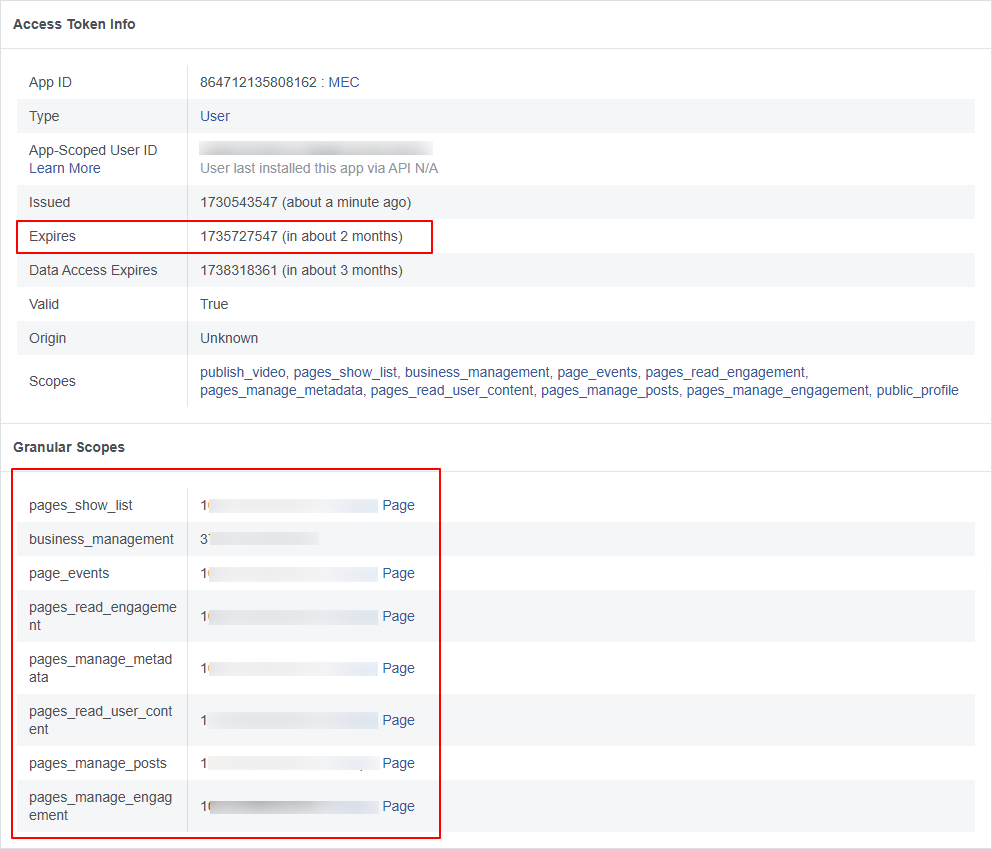
Step 5: Generate the Permanent Page Access Token
- Return to the Graph API Explorer.
- Paste the two-month token into the Access Token field.
- Ensure the previously selected permissions are still present.
Important: Do not click Generate Access Token again at this stage, as it may replace the token with a temporary one.
Step 6: Finalize MEC Settings
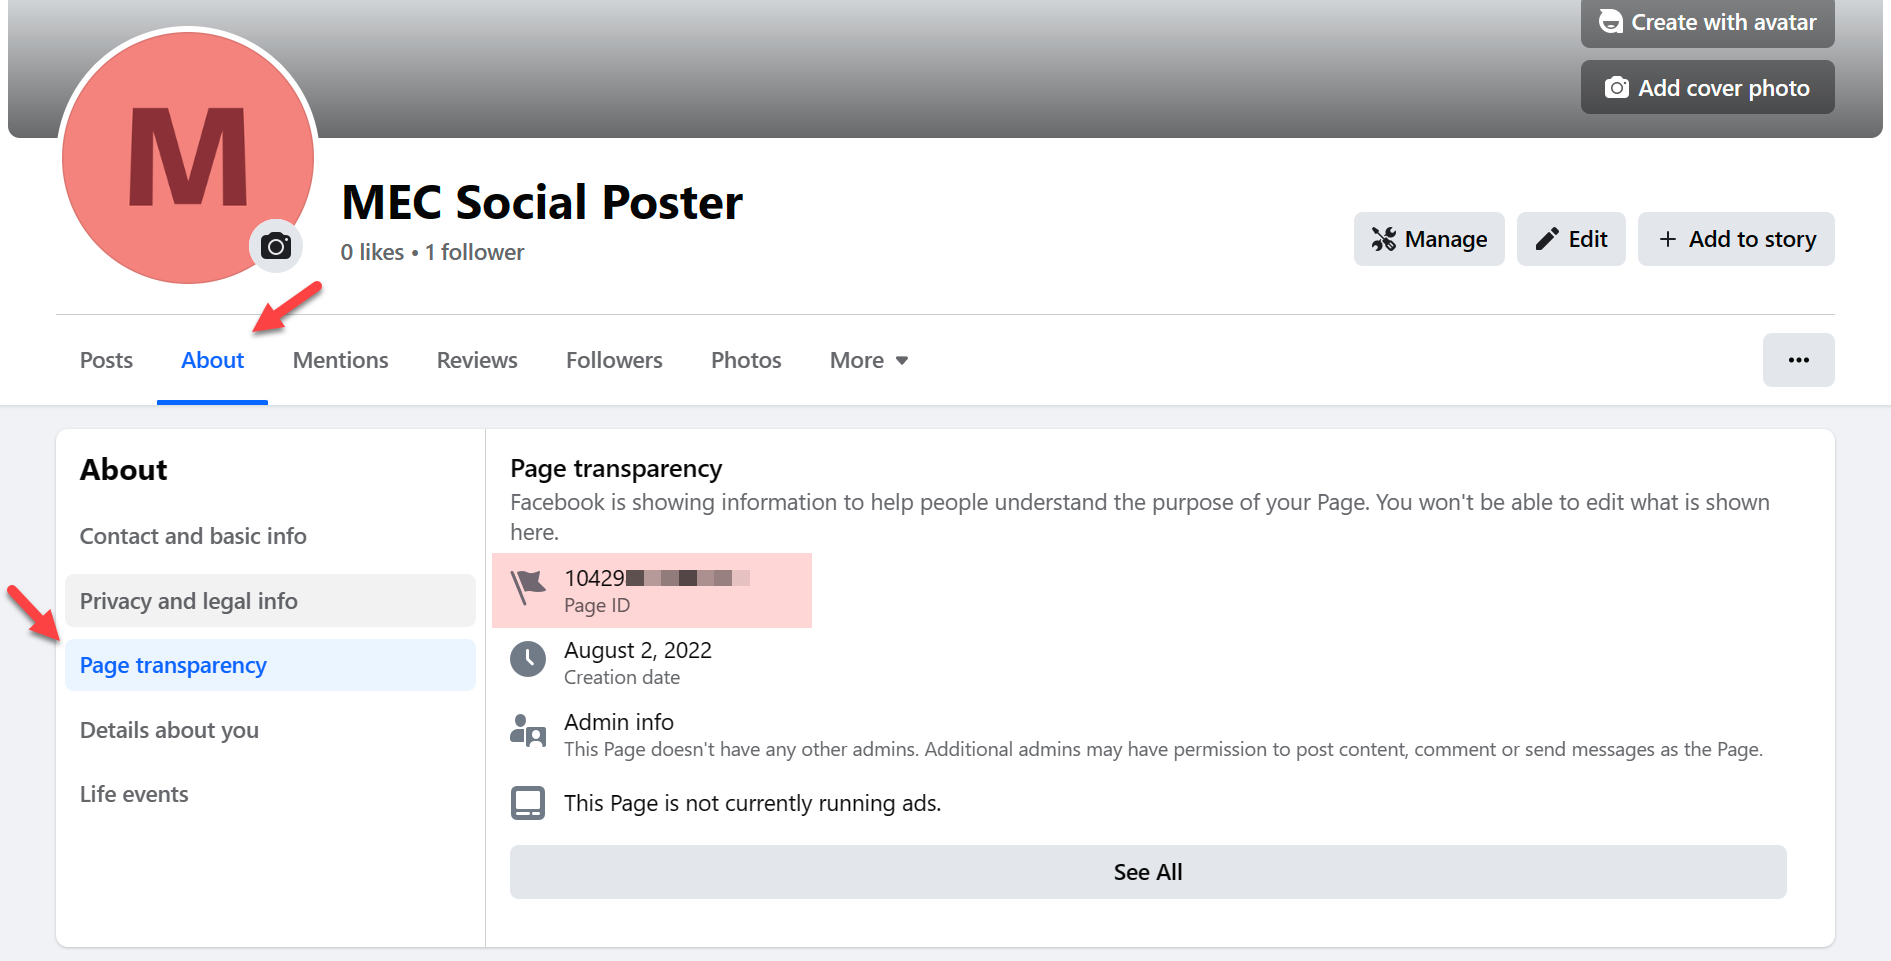
- Open your Facebook Page.
- Go to the About tab.
- Select Page Transparency to find your Page ID.
Finally:
- Return to MEC → Social Poster → Facebook.
- Enter the following information:
- App ID
- App Secret
- Page ID
- Save the settings to complete the Facebook integration.

To post events to Instagram, you must use an Instagram Business account that is connected to a Facebook Page.
Linking the Accounts
- Convert your Instagram account to a Business or Creator account if it is not already.
- In your Facebook Page settings, connect your Instagram account to the page.
How the Integration Works
The Social Auto Poster addon uses the Facebook Graph API connection to publish posts to Instagram. This means the Instagram connection depends on the Facebook configuration being completed successfully.
If the Facebook integration is not configured correctly, Instagram posting will also fail.
Configuration in MEC
- Open MEC → Social Poster → Instagram.
- Select the appropriate account type.
- Save the settings.
Once configured, newly published events can automatically be shared to your Instagram feed.
Read Also:
How to connect Facebook to Instagram?
X (Twitter)
To connect X, you must create a developer application in the X Developer Portal and configure OAuth authentication for your website.
Step 1: Create a Developer Account
- Log in to your X account and go to the X Developer Portal.
- Click Sign Up and apply for a Developer account.
- Complete the registration process and verify your email address if required.
Official Documentation:
[Official X Developer API Docs
](https://developer.x.com/en/docs/twitter-api)Developer Account Setup FAQ
Step 2: Create a Project and App
- In the Developer Portal dashboard, open Projects & Apps.
- Click Create Project.
- Choose an appropriate use case.
- Enter a project name and description.
Visual Guide:
Step‑by‑Step X Developer Portal Setup (third-party)
Step 3: Configure OAuth Authentication
- In the app settings, go to User Authentication Settings → Set Up / Edit.
- Enable OAuth 2.0 authentication.
- Set App permissions to Read and Write.
- Set the Type of App to Web App.
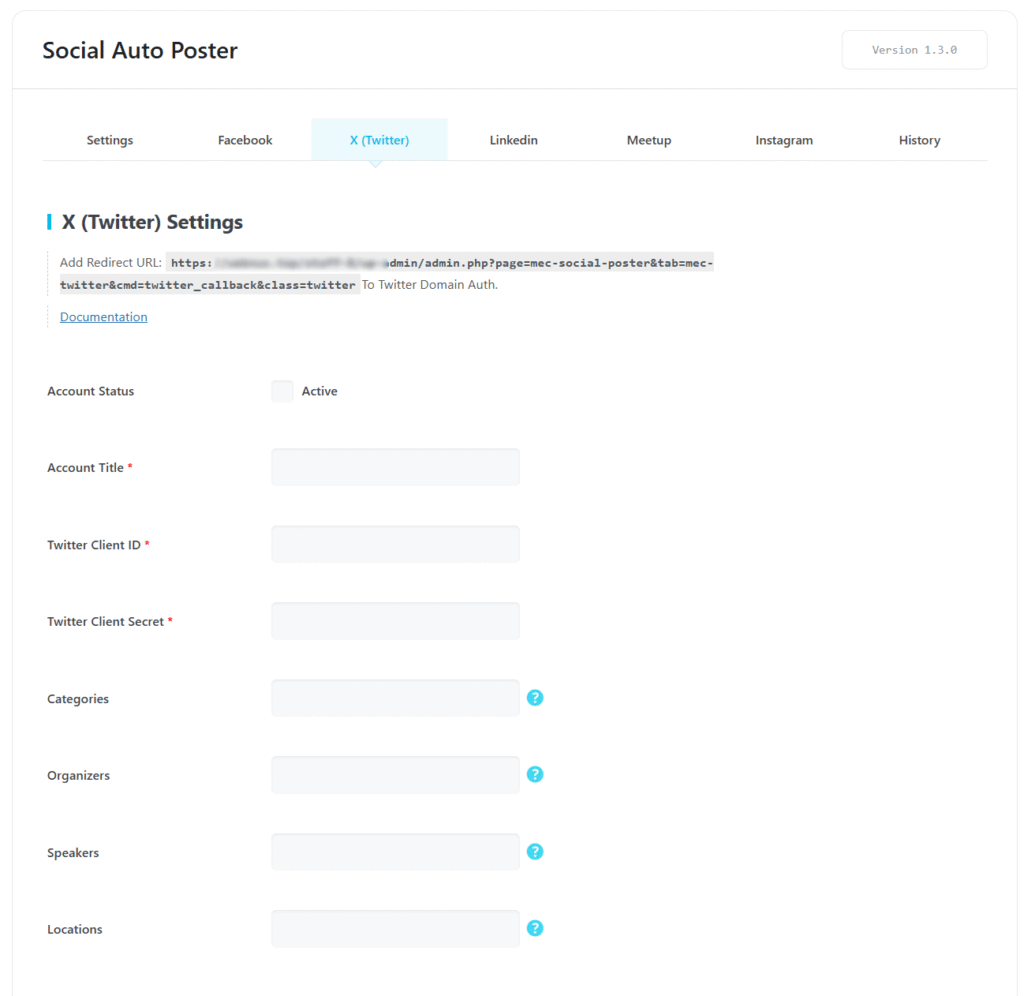
- Copy the Redirect URL from MEC → Social Poster → X on your website.
- Paste this URL into the Callback URI / Redirect URL field in the X Developer Portal.
- Enter your website address in the Website URL field.
- Save the configuration.
Step 4: Connect X to MEC
- Go to the Keys and Tokens section of your app.
- Copy the required credentials (such as Client ID, Client Secret, or API Keys).
- Return to MEC → Social Poster → X in your WordPress dashboard.
- Enter the credentials and complete the authentication process.
Once connected, the X account will appear in the list of available social accounts.

Limitation
Currently, event images cannot be posted through the X integration. The addon shares text content and event links only.
To publish events on LinkedIn using the Social Auto Poster addon, you must have a LinkedIn account and a LinkedIn Business Page connected to your personal account.
Step 1: Create a LinkedIn App
- Go to the LinkedIn Developer Portal.
- Click My apps and then Create App.
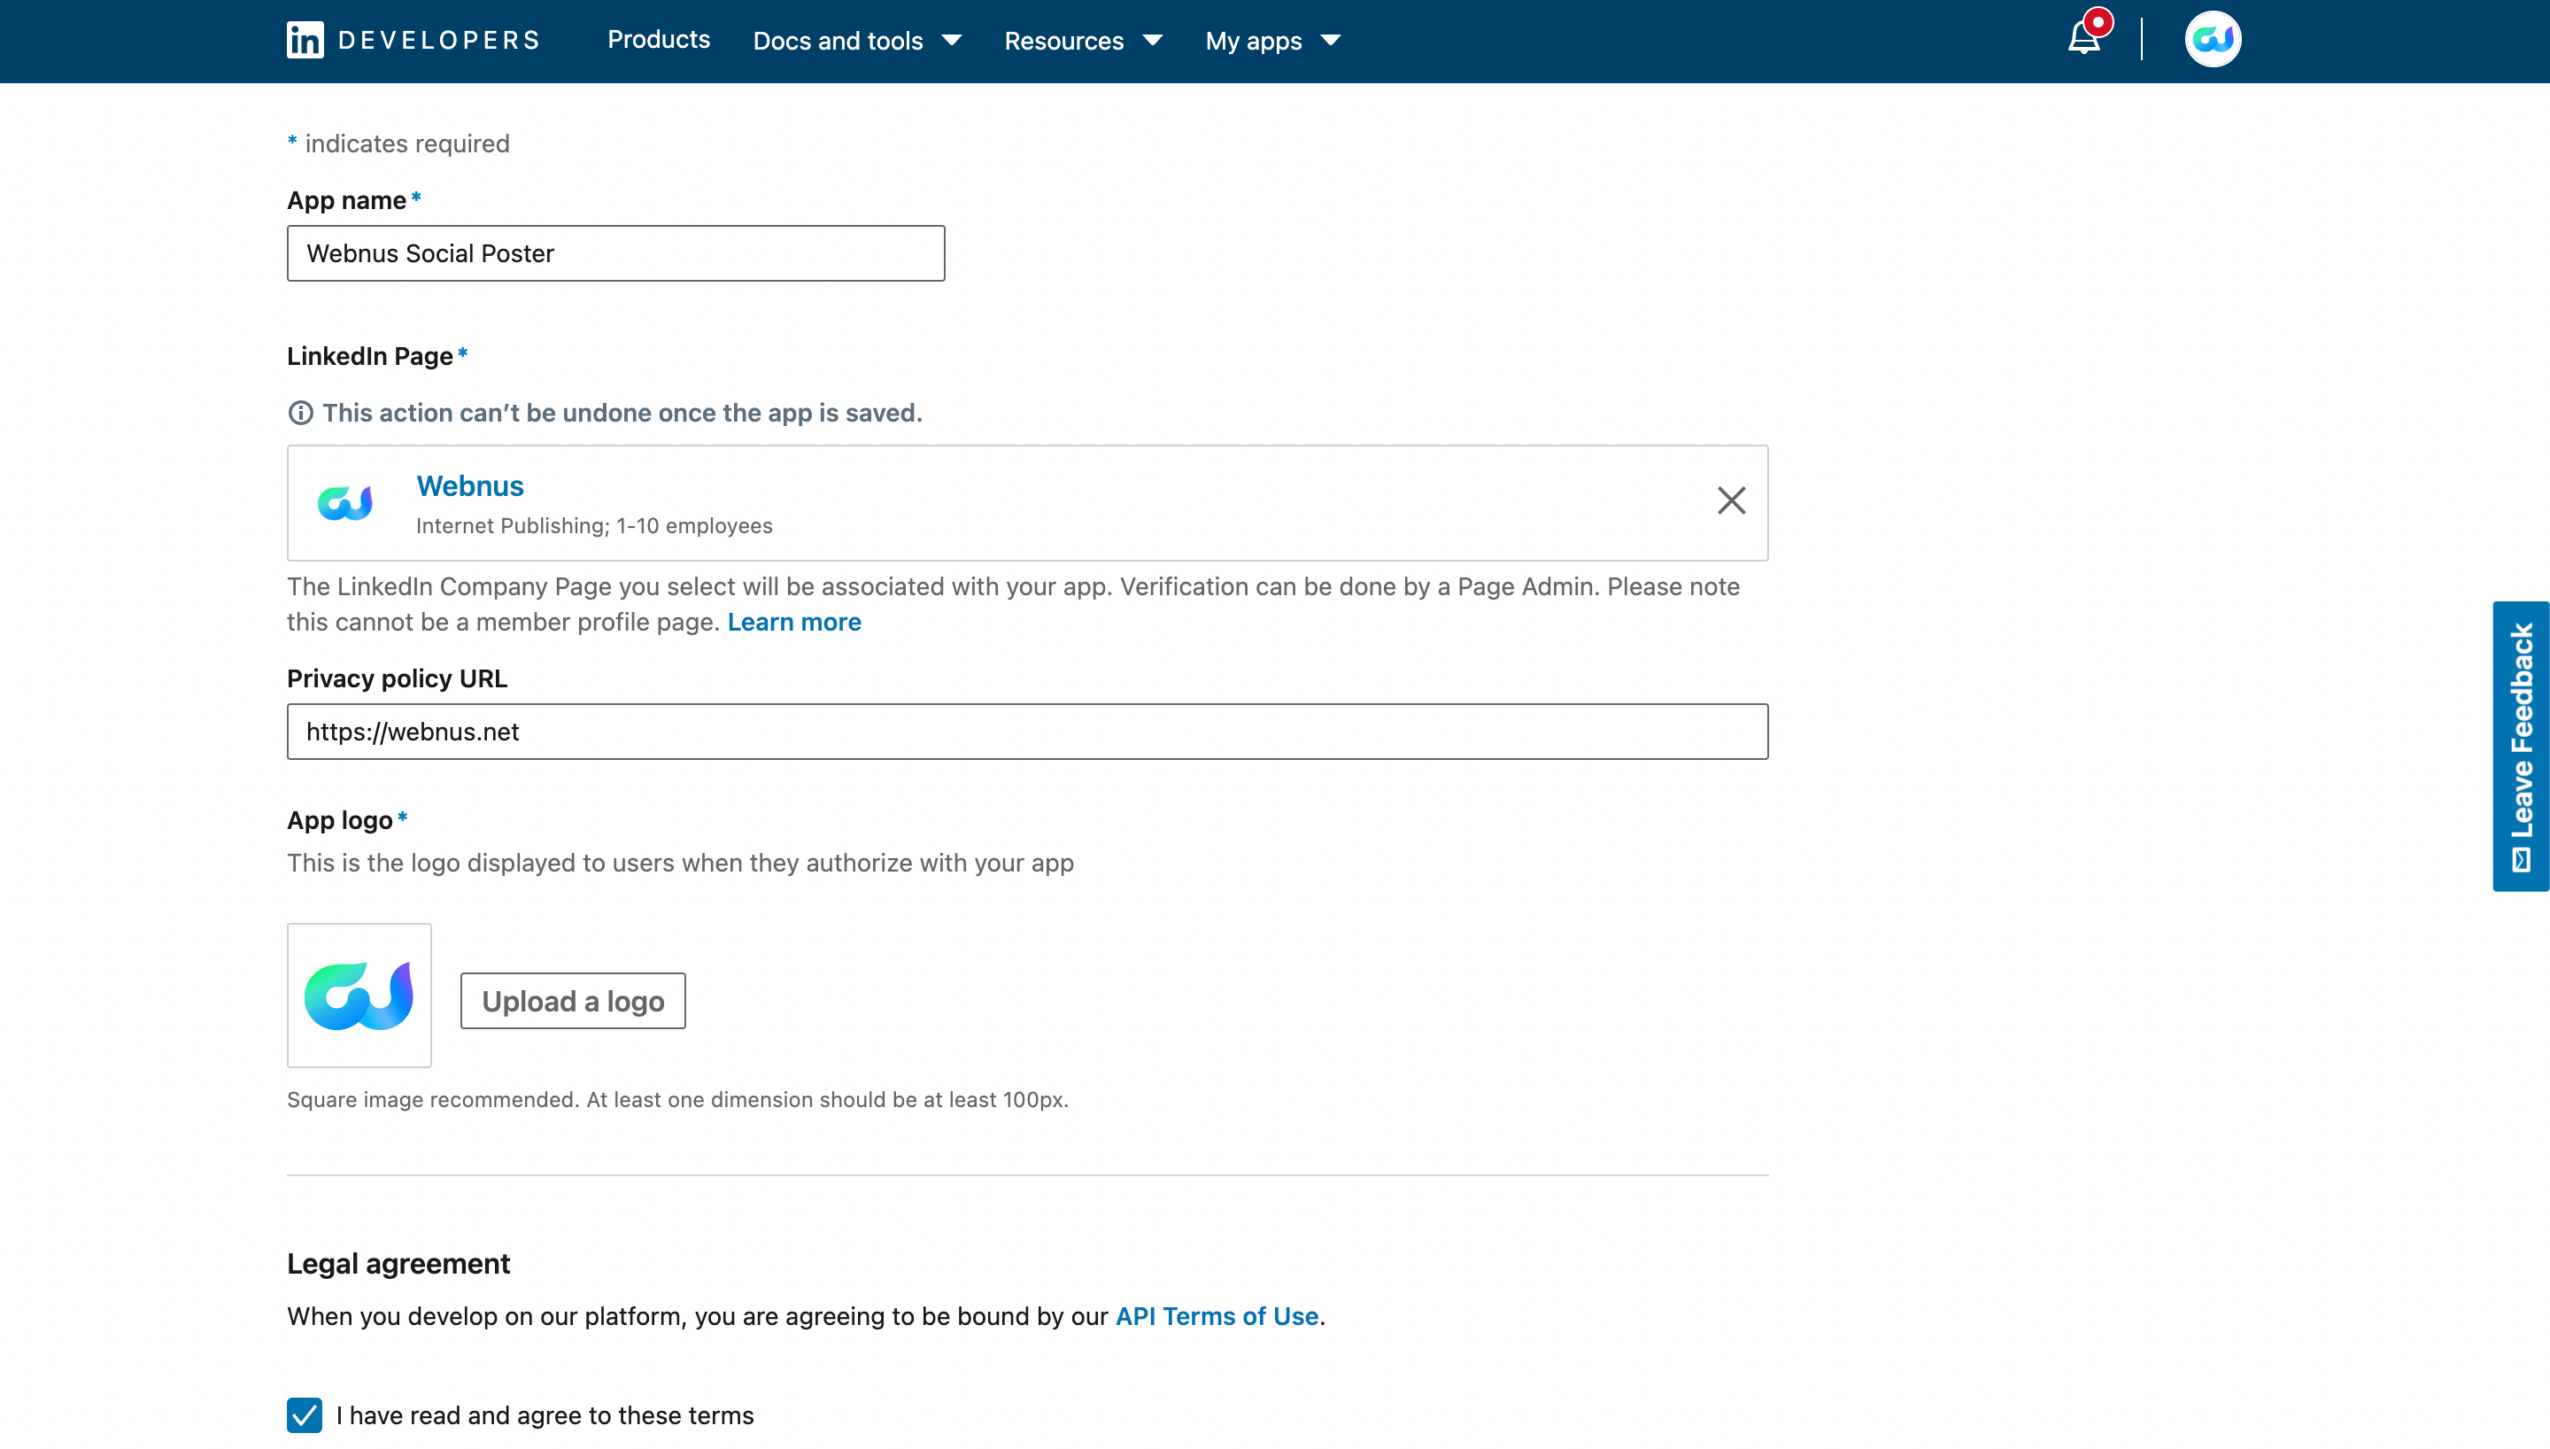
- Fill in the required information:
- App Name
- LinkedIn Page (Business Page)
- App Logo
- Privacy Policy URL
- Accept the terms and click Create App.
Step 2: Add Required Products
- Open your LinkedIn App dashboard.
- Go to the Products section.
- Enable the following products:
- Share on LinkedIn
- Sign in with LinkedIn
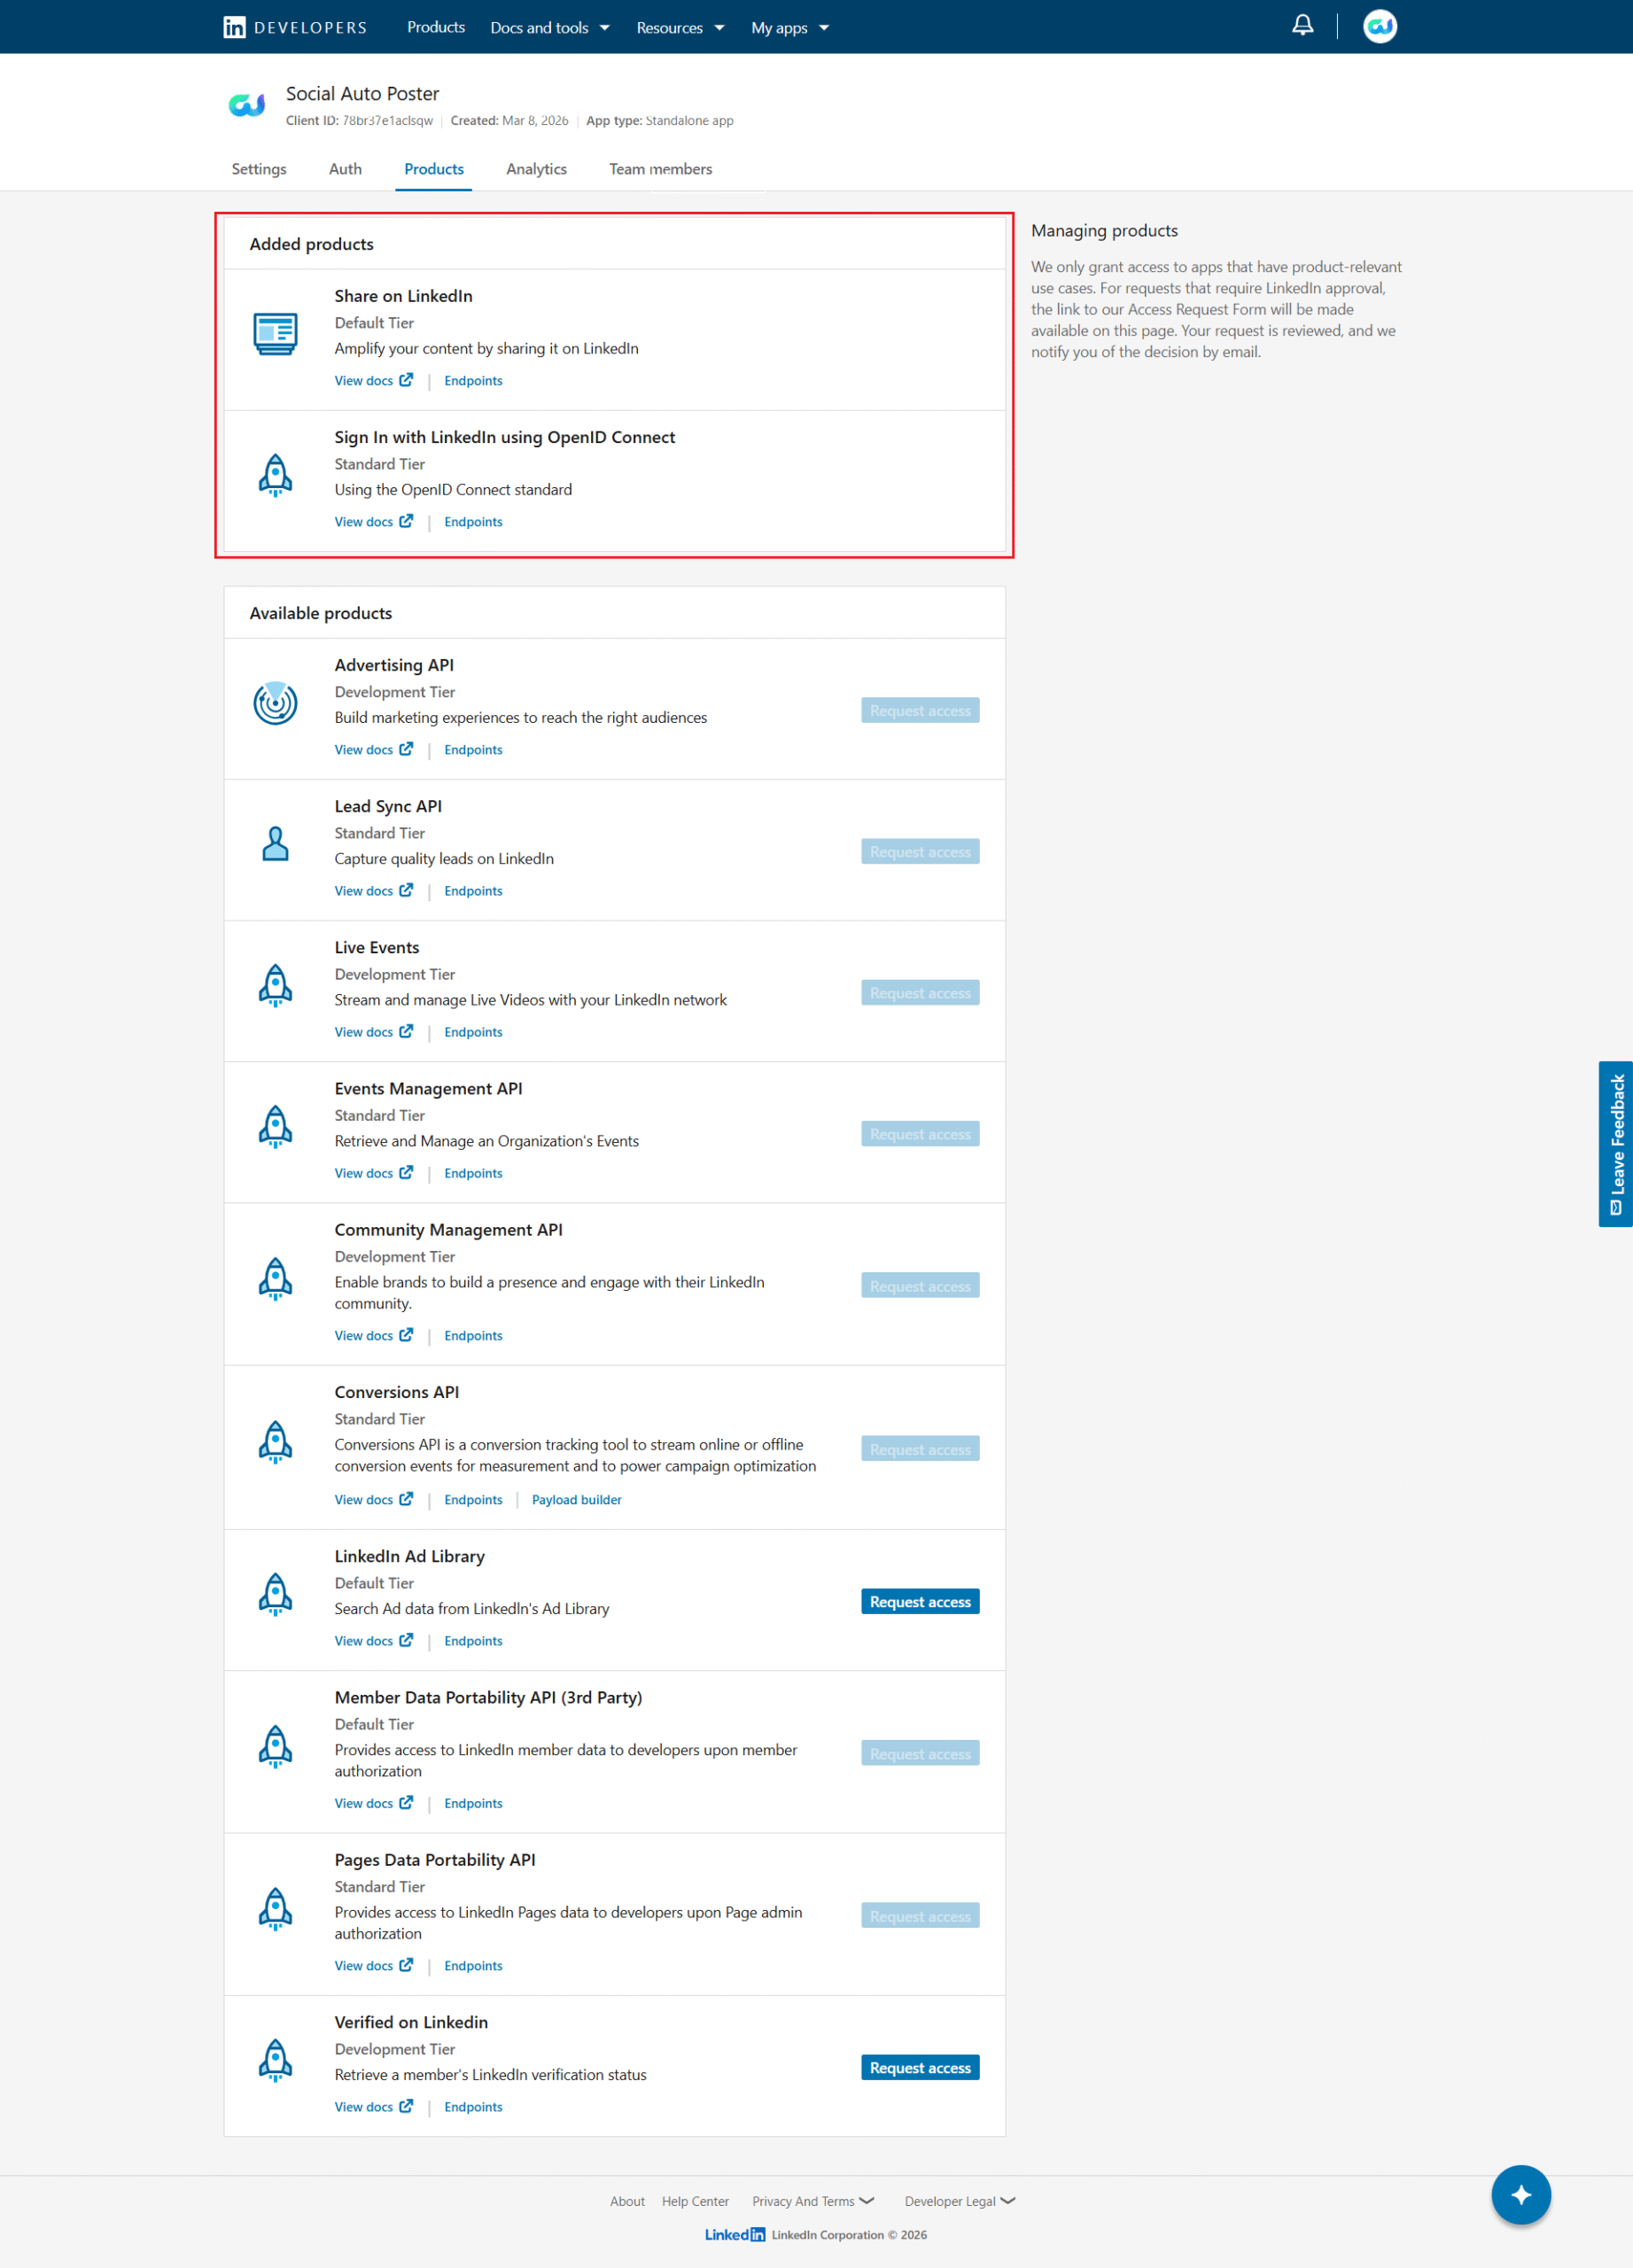
These products allow MEC to authenticate with LinkedIn and publish posts to your LinkedIn page.
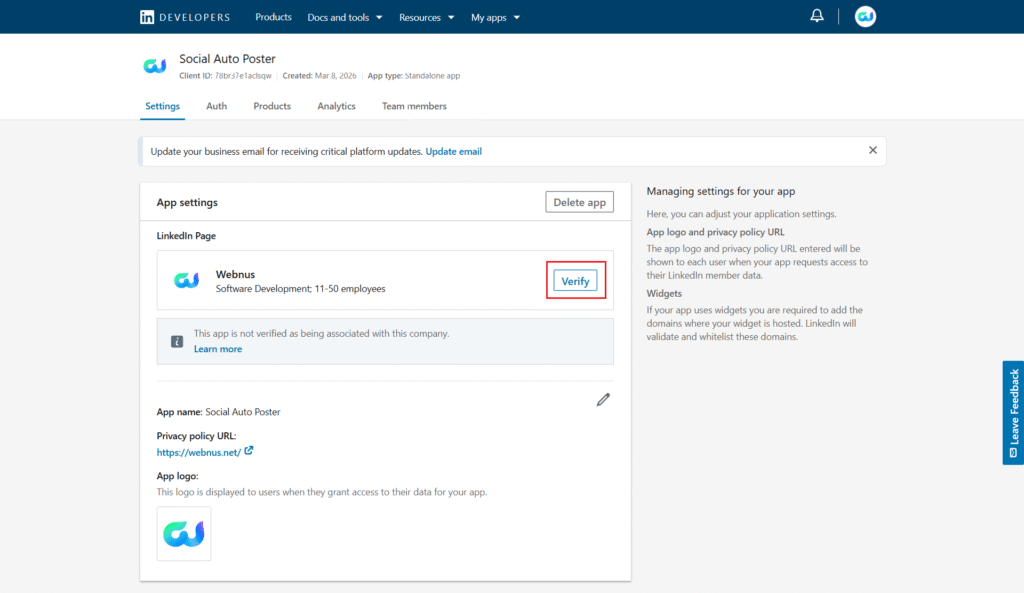
Step 3: verify the LinkedIn page
- In your LinkedIn app dashboard, open the Settings tab.
- verify the LinkedIn page.
Step 4: Configure OAuth Authentication
- In your LinkedIn app dashboard, open the Auth tab.
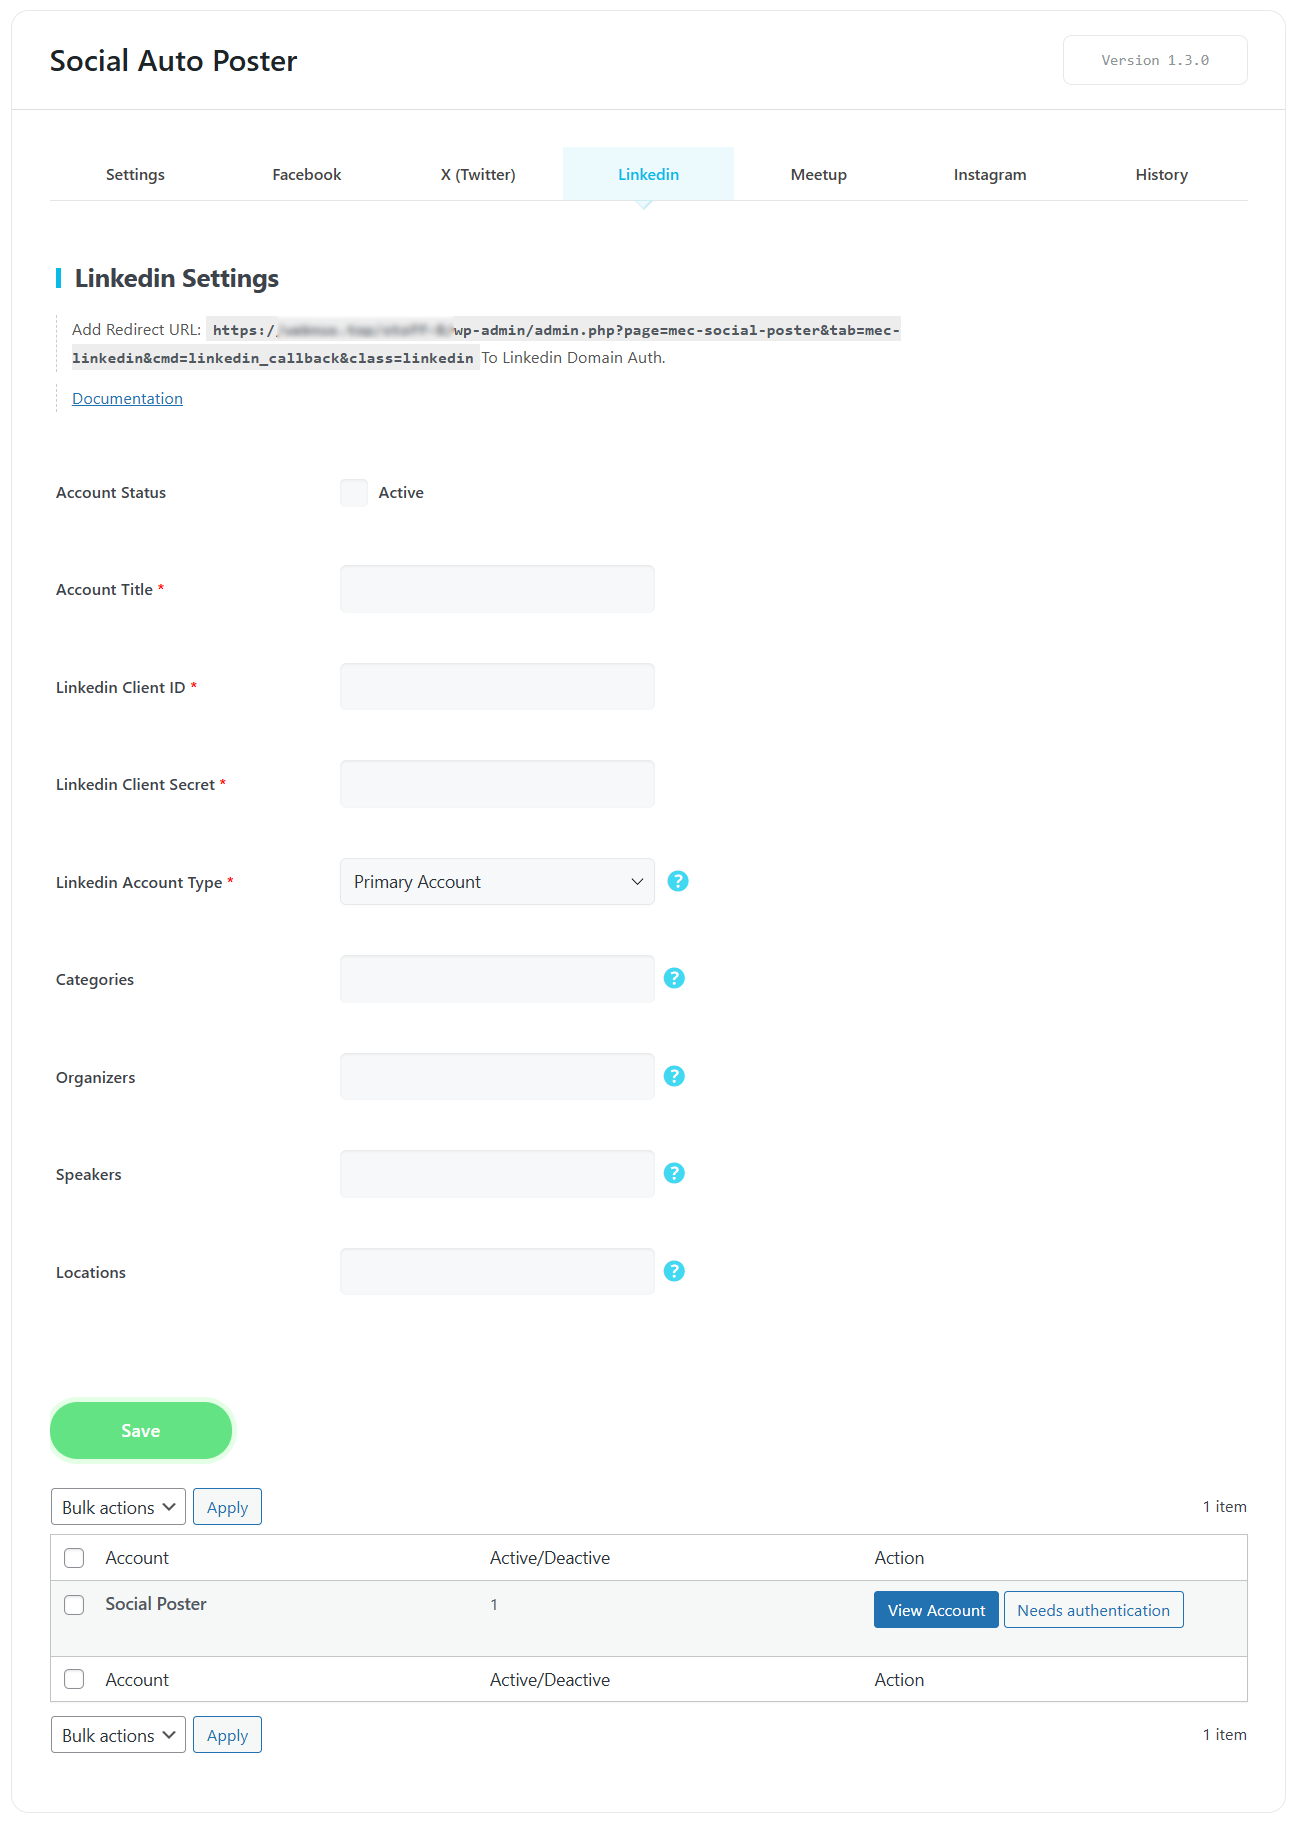
- From your website dashboard go to MEC → Social Poster → LinkedIn.
- Copy the Redirect URL displayed there.
- Paste this address into the Authorized Redirect URLs field in the LinkedIn app.
- Save the changes.
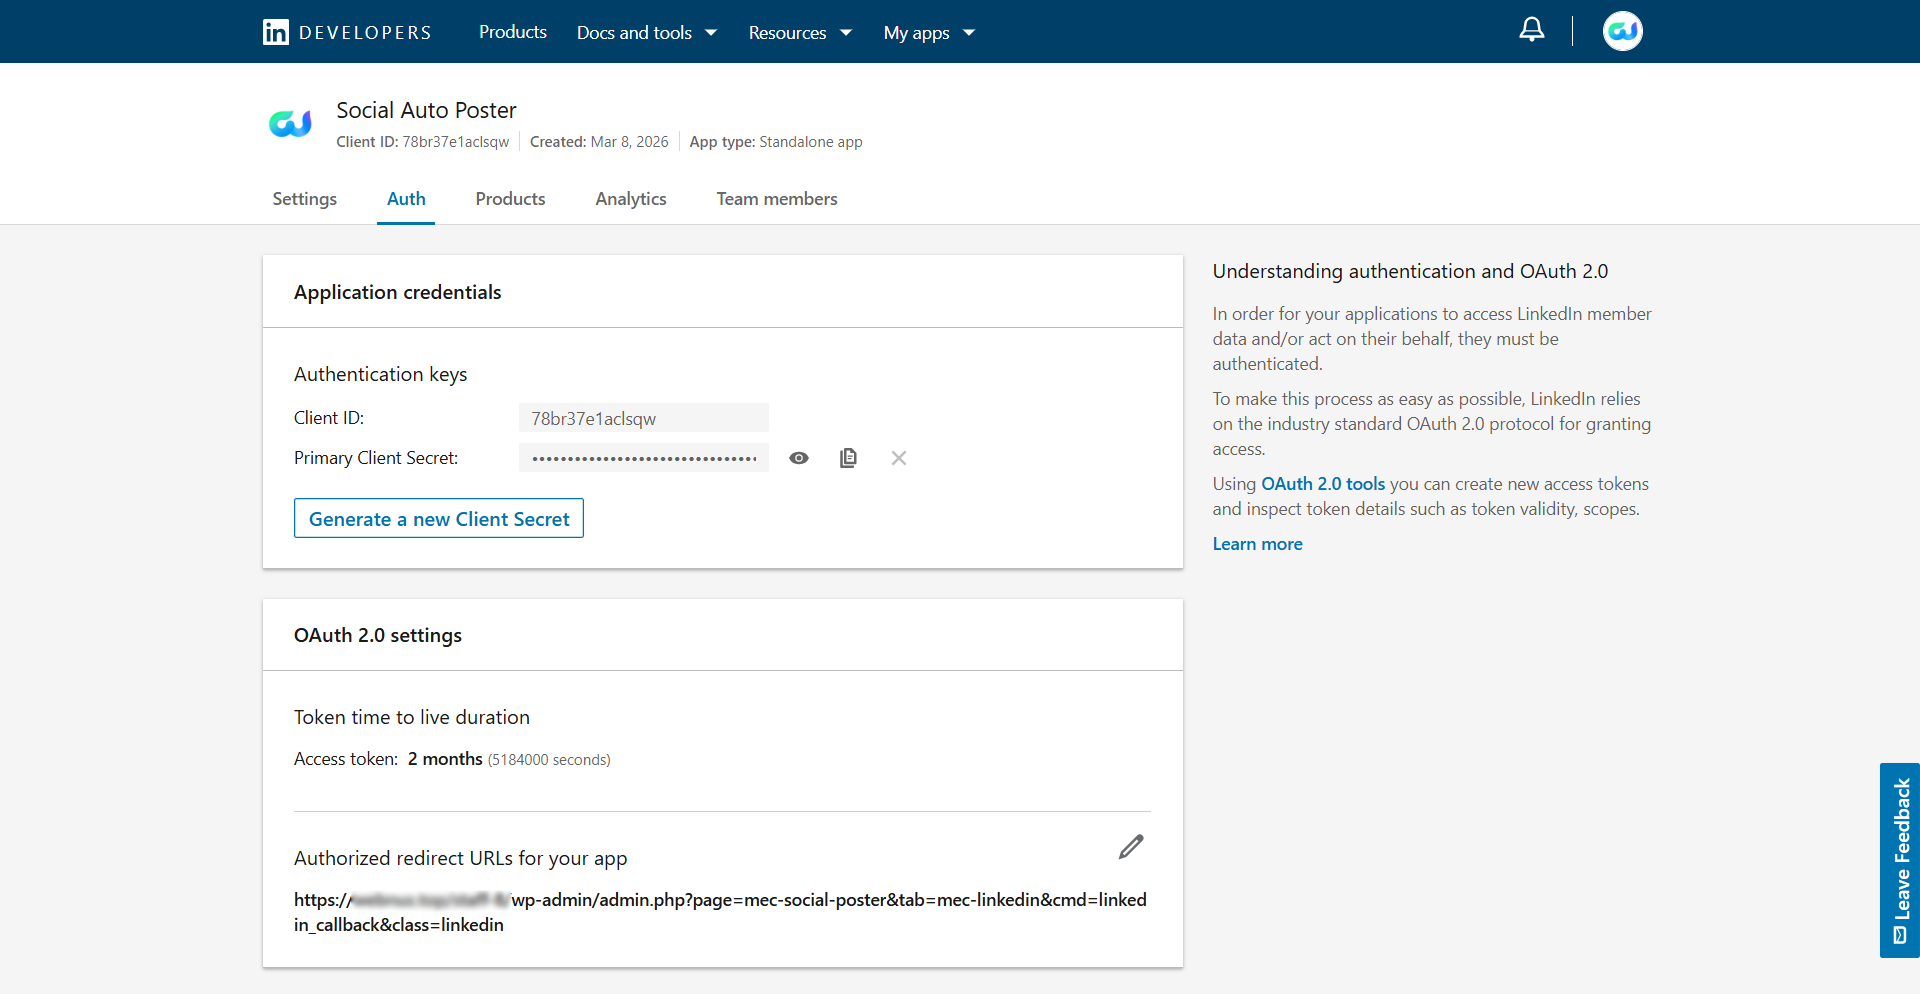
Step 5: Connect LinkedIn to MEC
- In the LinkedIn Developer dashboard, copy the following credentials:
- Client ID
- Client Secret
- Go to your WordPress dashboard: MEC → Social Poster → LinkedIn.
- Enter the credentials.
- Click Needs Authentication to authorize the connection.
Meetup
To enable the Social Auto Poster addon for Meetup, you must create an OAuth client in the Meetup developer portal.
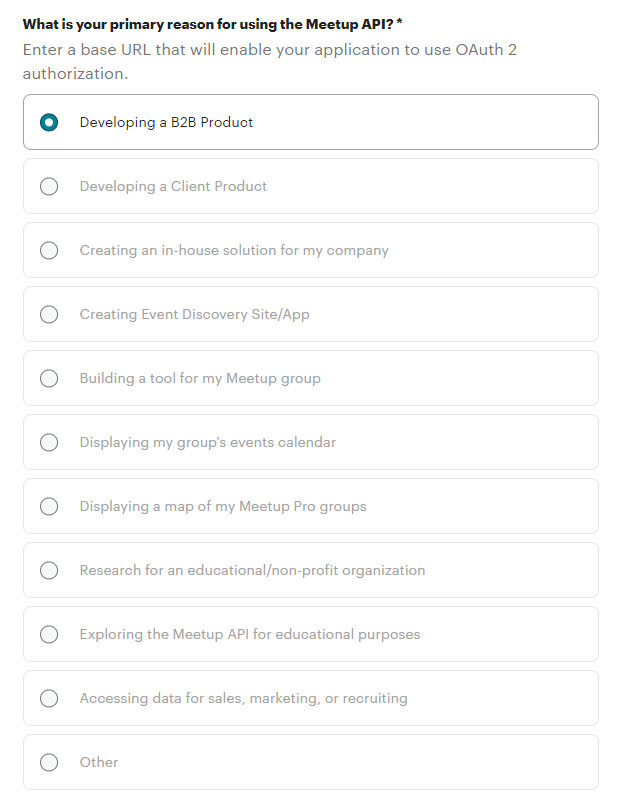
Step 1: Create an OAuth Client
- Go to the Meetup OAuth Clients page.
- Click Create New Client.
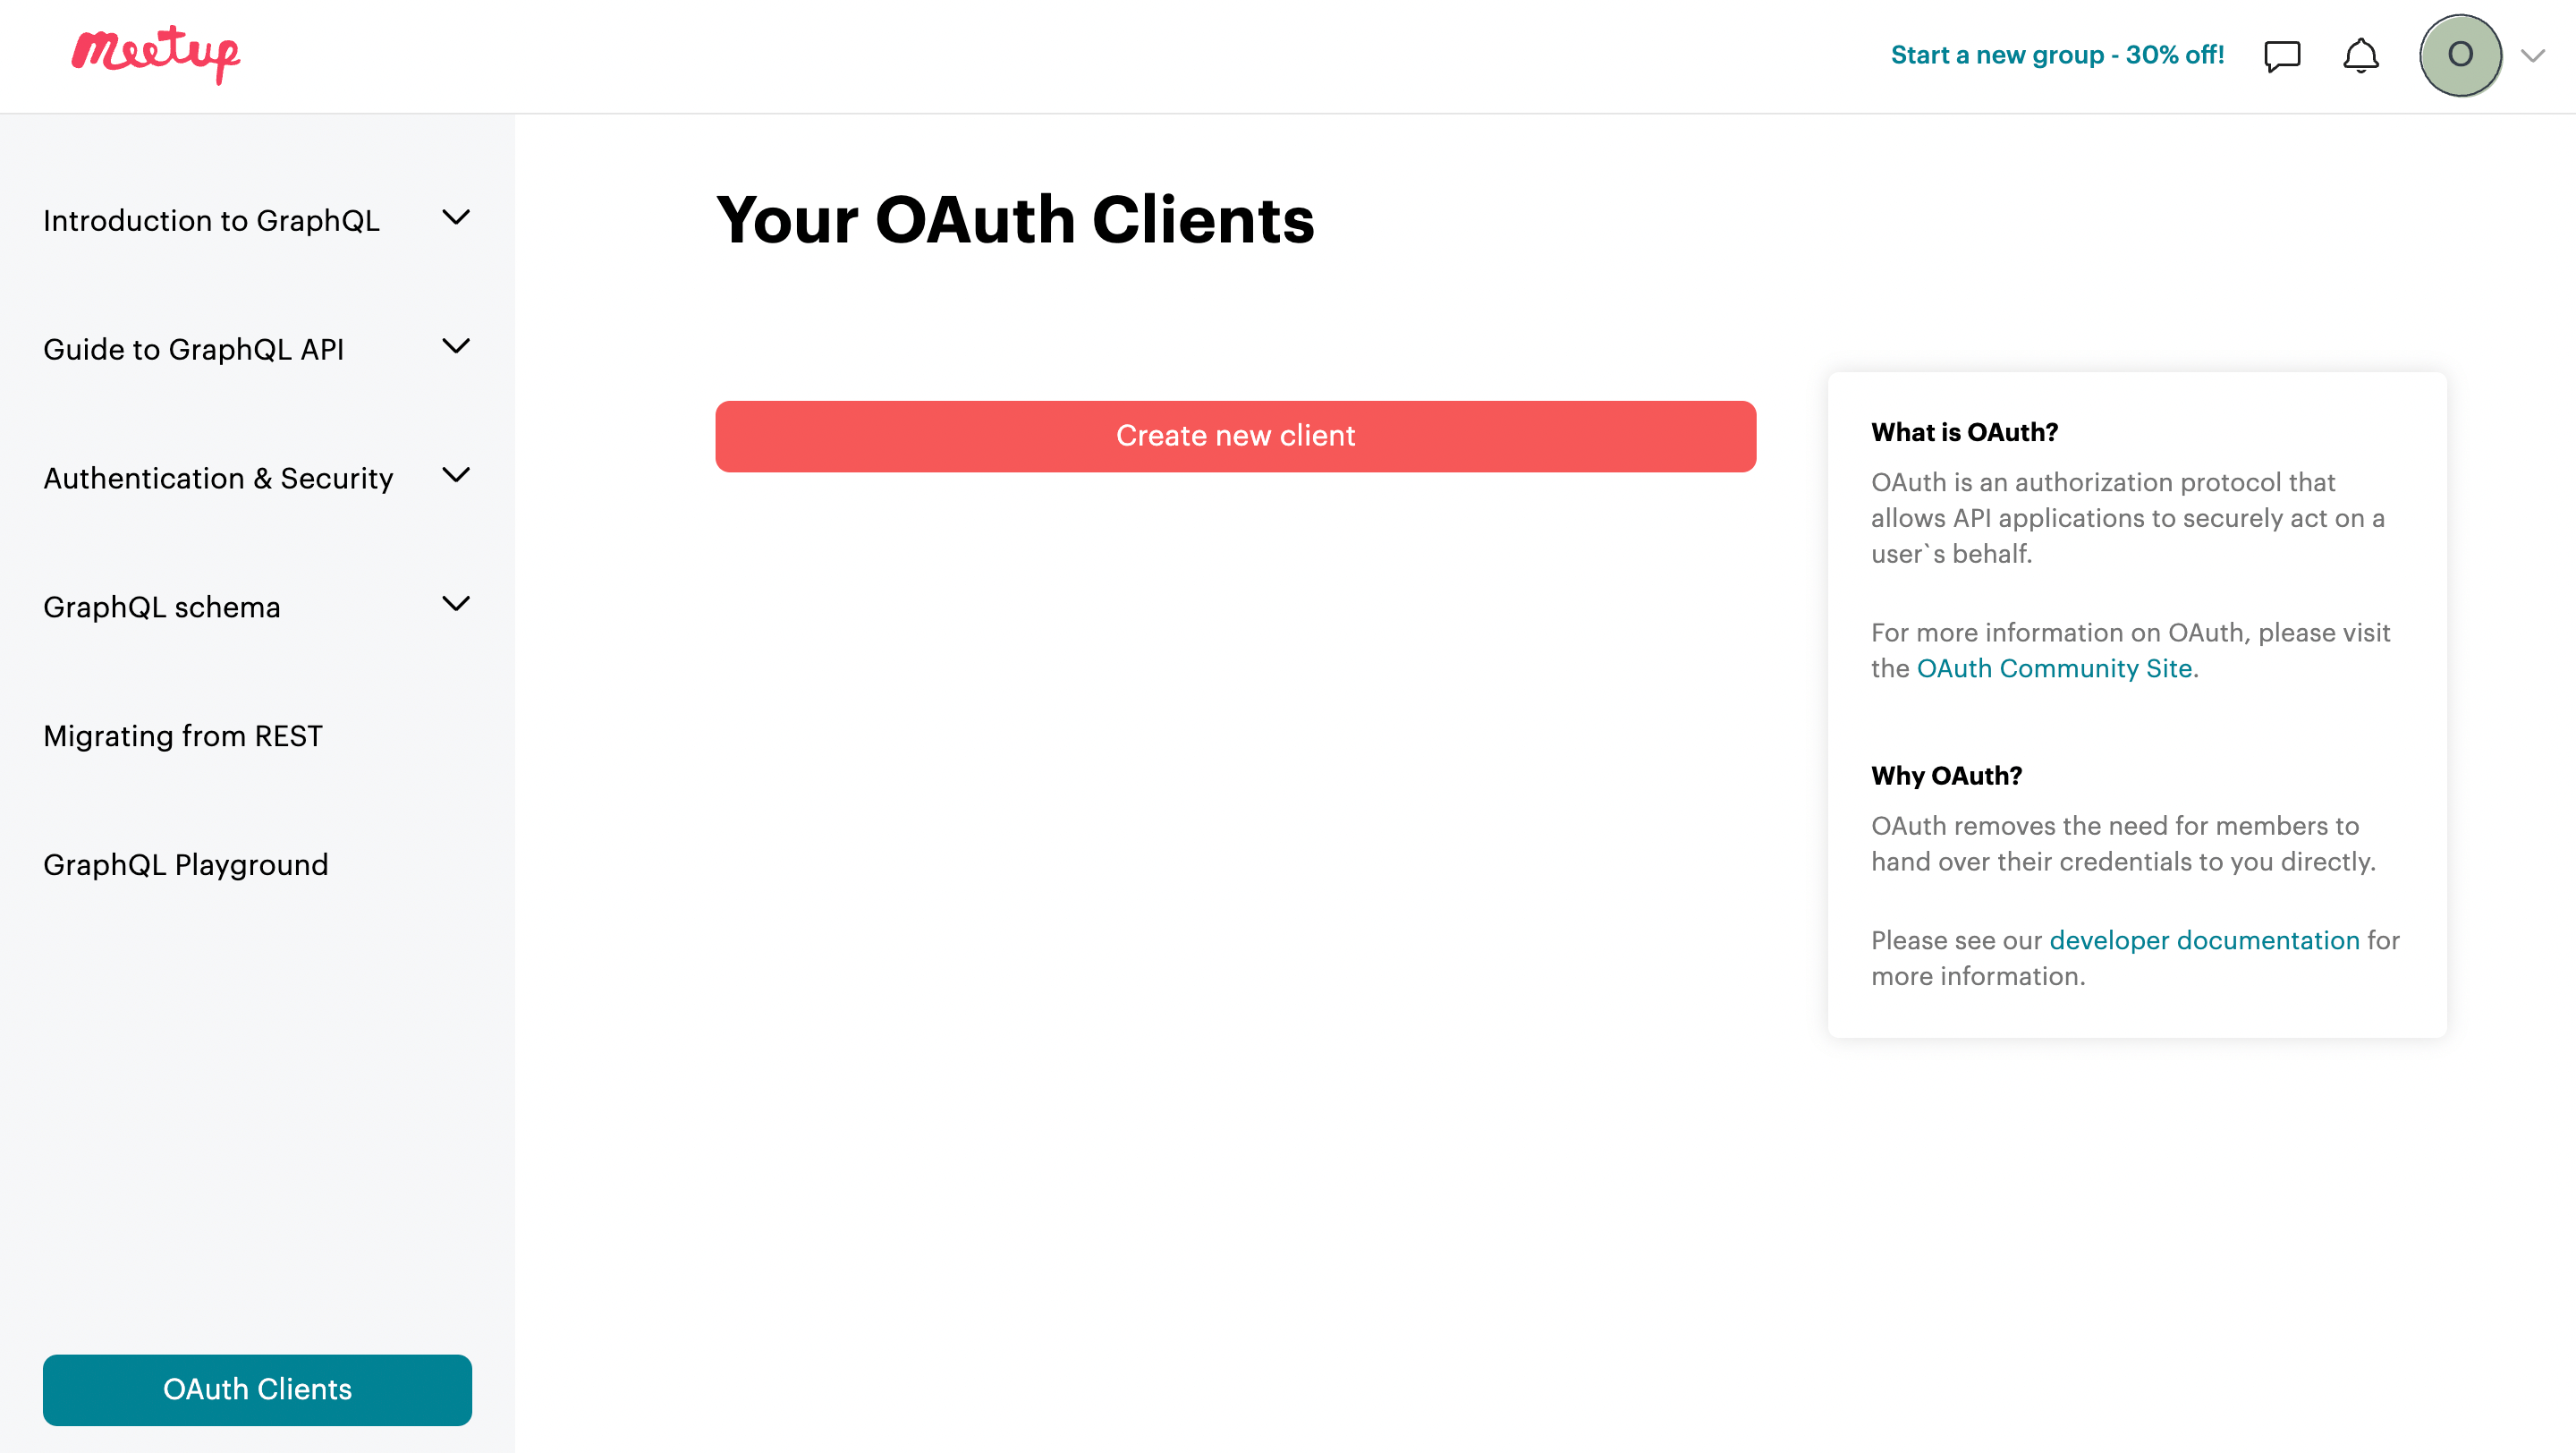
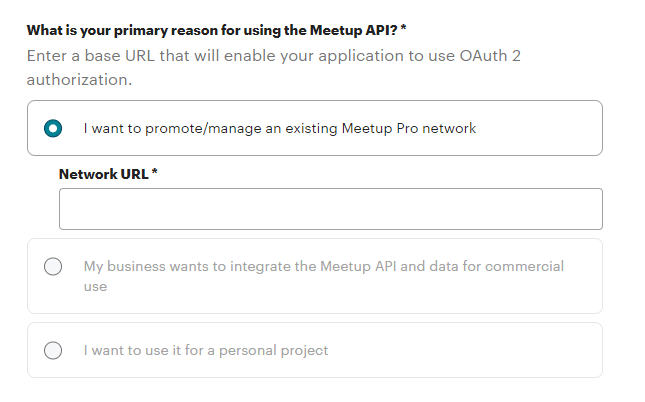
3\. Fill out the required information for your application.
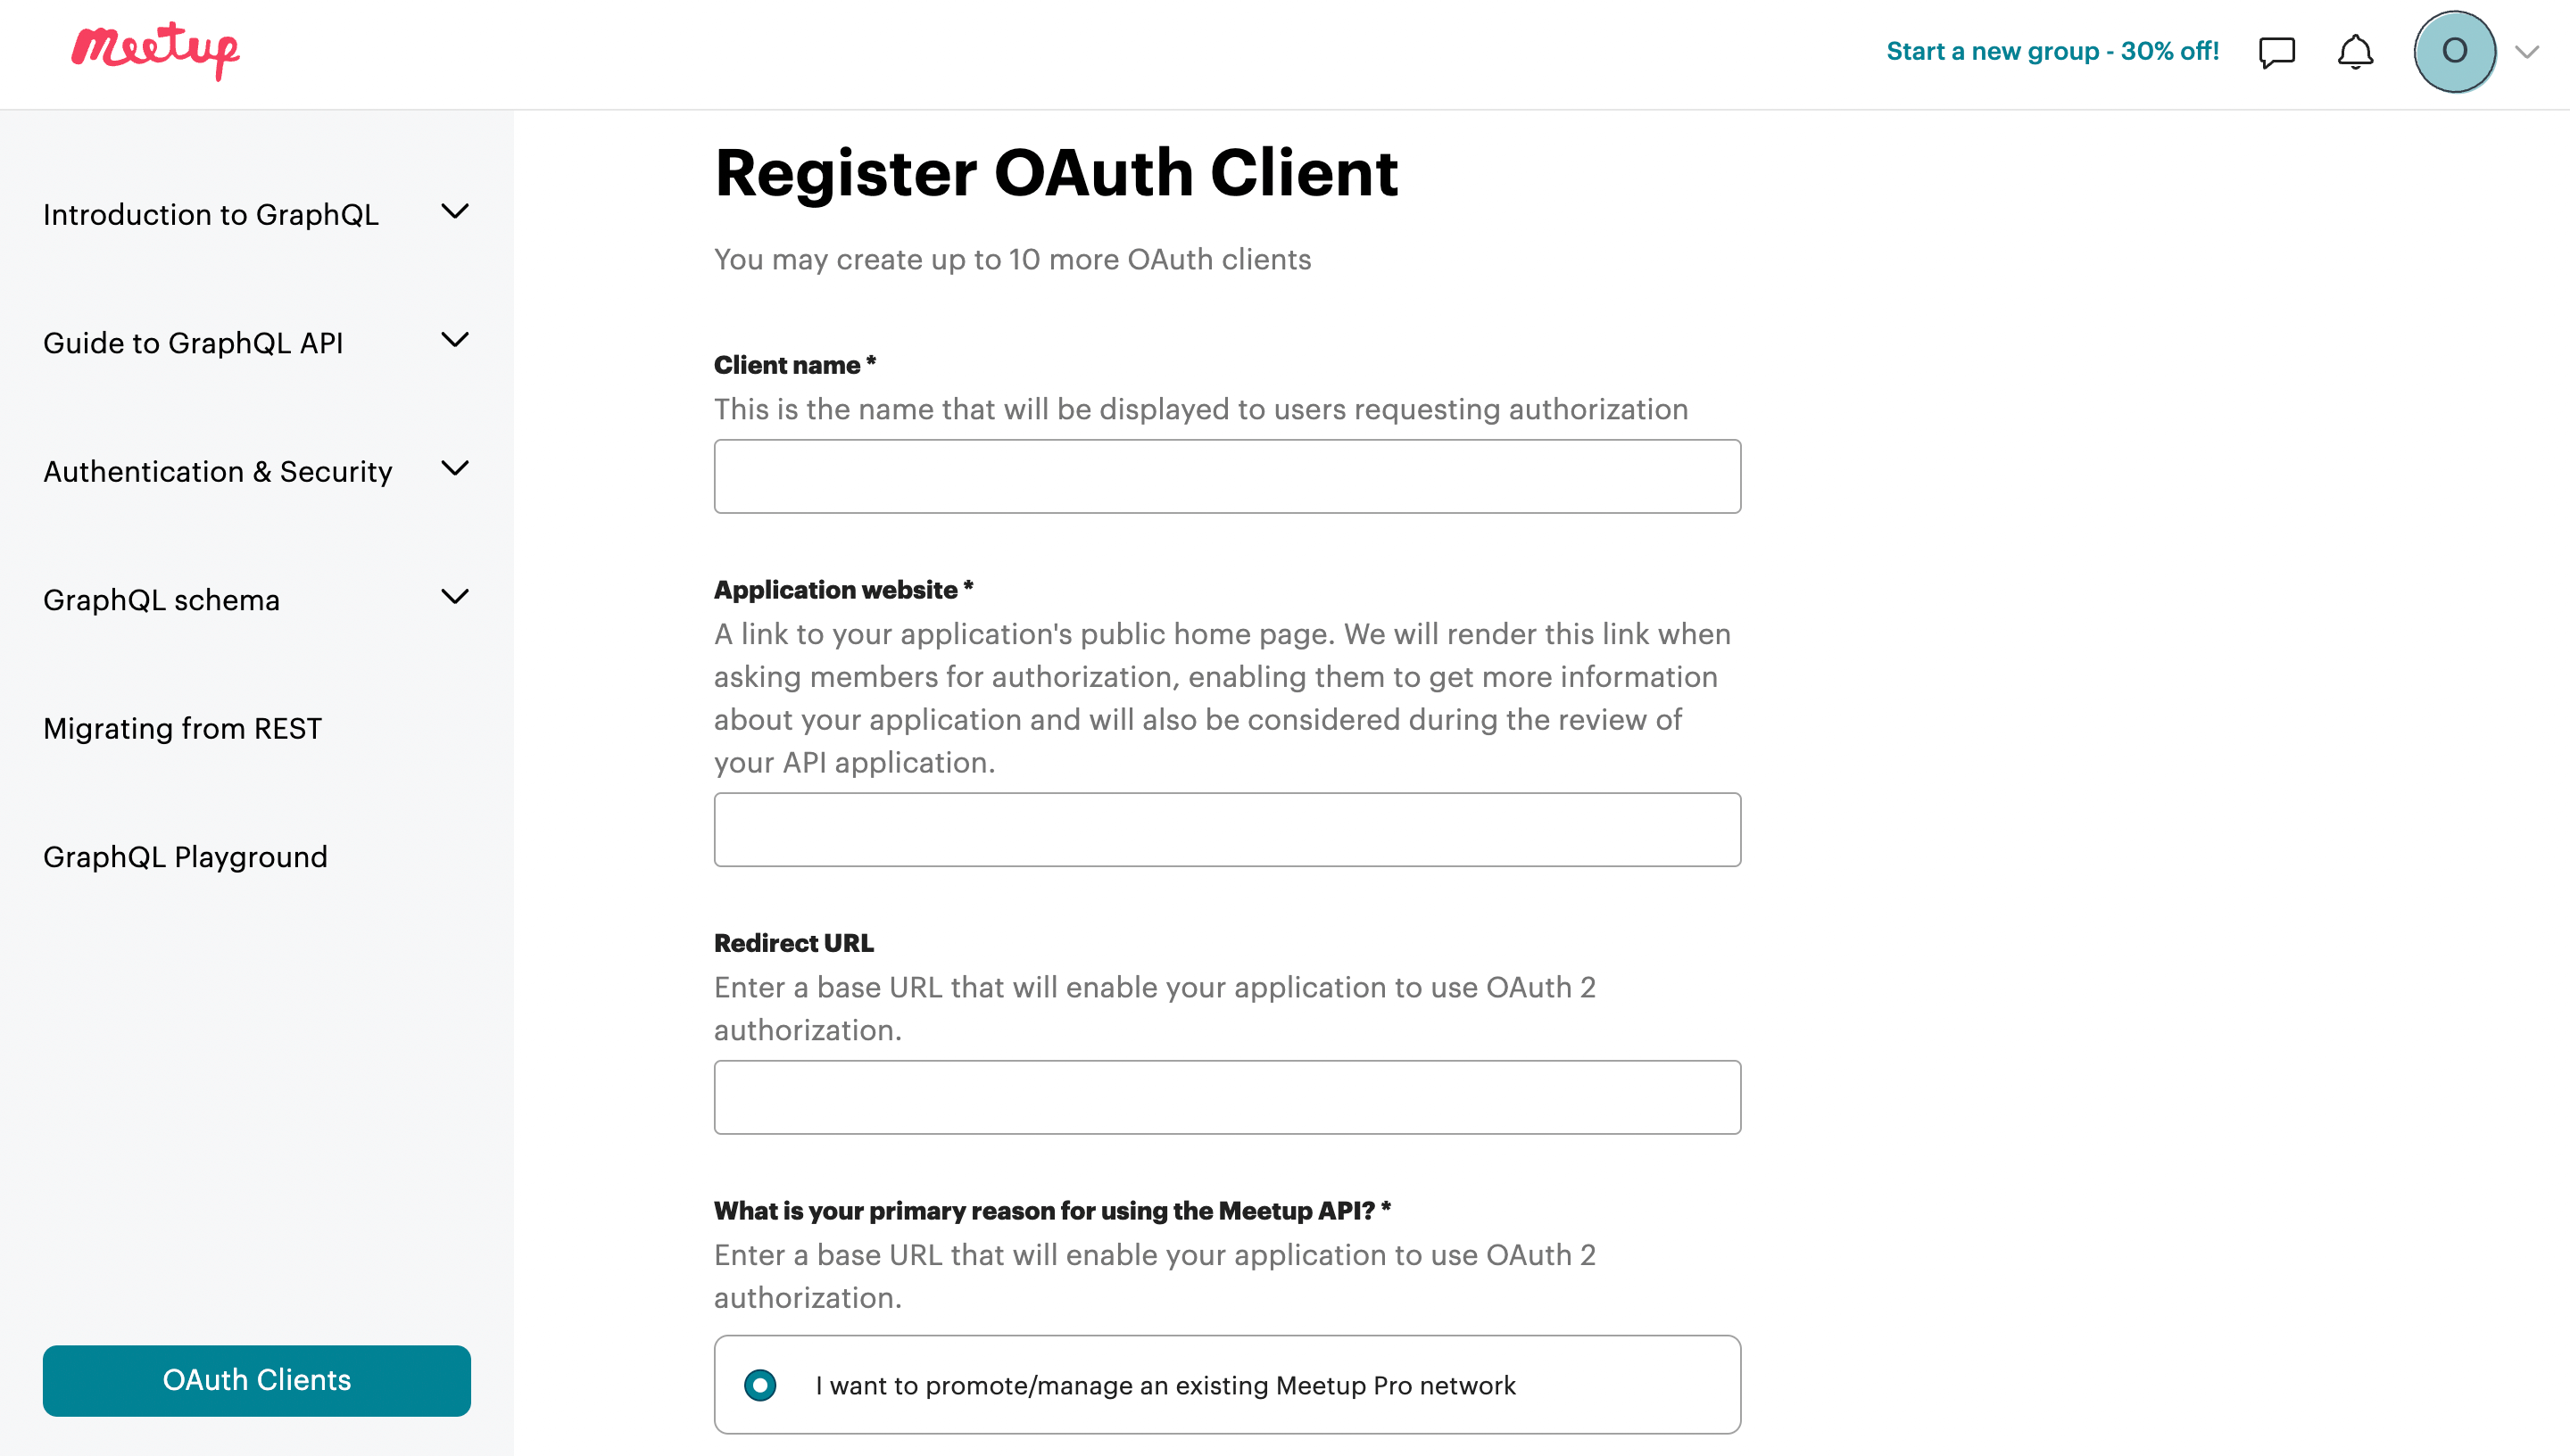
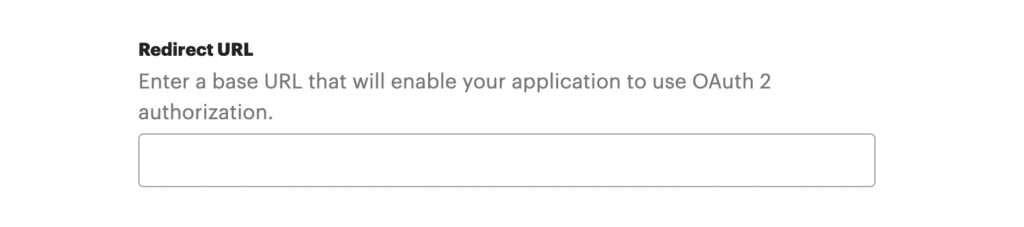
Step 2: Configure the Redirect URL
- From your website dashboard navigate to MEC → Social Poster → Meetup.
- Copy the Redirect URL displayed there.
- Paste this URL into the Redirect URI field when creating the OAuth client in Meetup.
- Save the configuration.
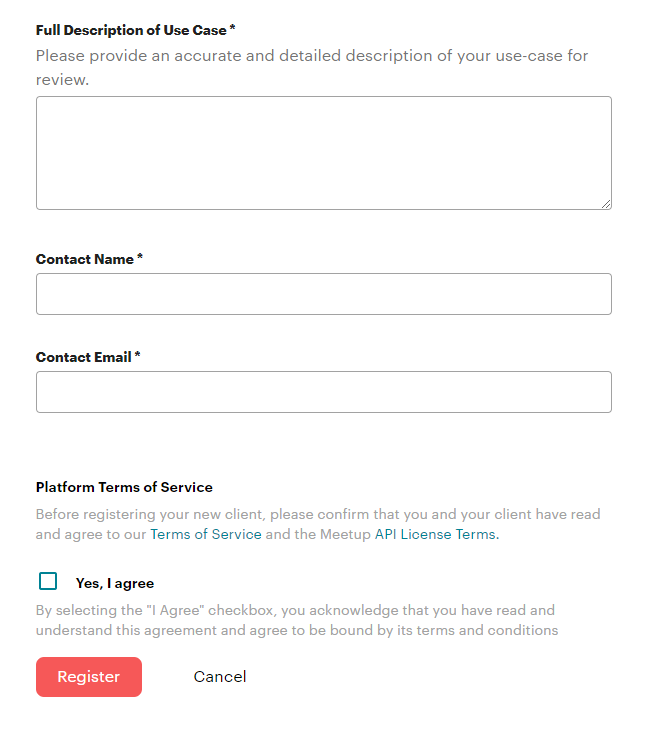
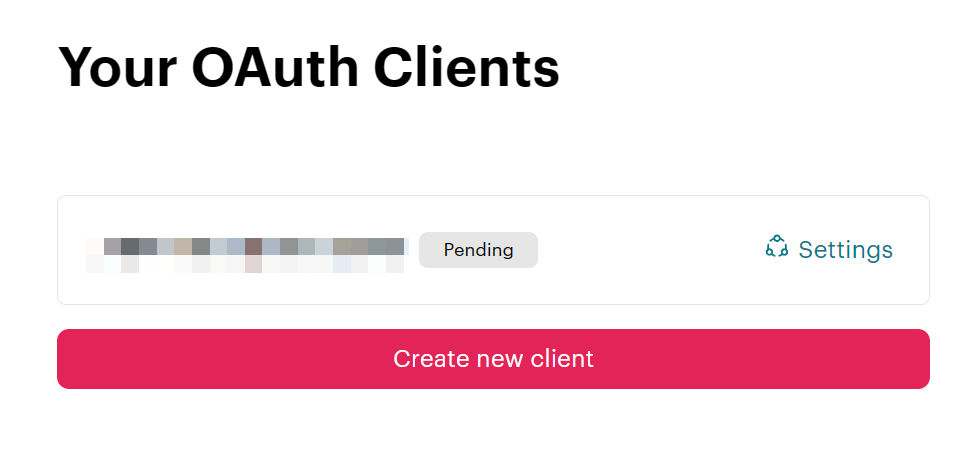
Step 3: Wait for API Approval
After submitting your OAuth client, Meetup may require API verification.
Once your application is approved, the following credentials will be available in the developer dashboard:
- Client ID
- Secret Key
Step 4: Find Your Group Slug
Each Meetup group has a unique slug in its URL.
Example group URL:
https://www.meetup.com/mec-wordpress-plugins-group
The group slug is:
mec-wordpress-plugins-group
Step 5: Connect Meetup to MEC
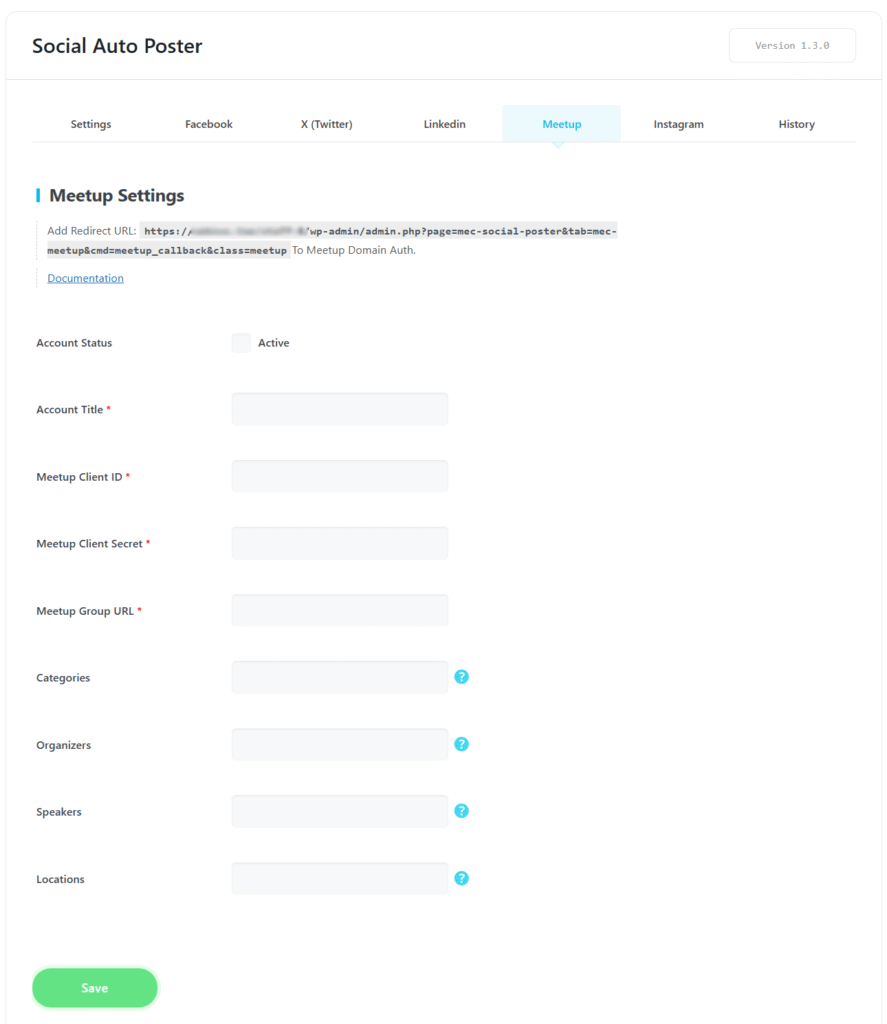
- Go to your WordPress dashboard: MEC → Social Poster → Meetup.
- Enter the following information:
- Client ID
- Secret Key
- Group Slug
- Save the settings and verify the account.
After verification, the Meetup account will appear in the connected social accounts list.

Individual Event Management
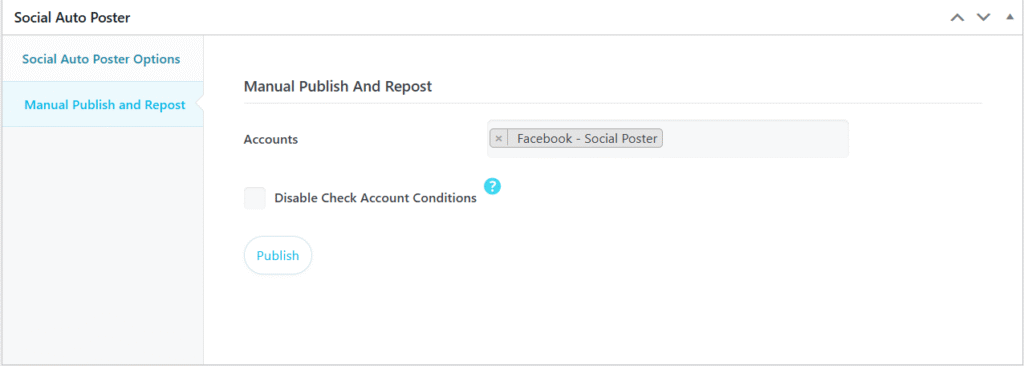
For granular control, you can manage settings for each event on the Edit Event page.
- Social Poster Tab: Use this to activate or override global settings for a specific event.
- Manual Publishing: The addon provides a manual publish option on the event page, allowing you to share events at your discretion.
Use Cases (When This Addon is Useful)
- Automated Social Marketing: Ideal for organizations that want to ensure every new event is instantly promoted on Facebook, LinkedIn, and Instagram without manual entry.
- Targeted Audience Engagement: Useful for businesses with multiple social accounts; for example, using filters to post “Business” categories to LinkedIn and “Entertainment” to Facebook.
- Delayed Announcements: Perfect for timing social media “drops” by using the Default Schedules feature to post events several hours after they are published on the site.
Situations This Addon May Not Be Ideal
- Personal Branding on Facebook: This addon will not work for users who want to post events to a personal Facebook profile, as it only supports Facebook Pages.
- Visual-Heavy X (Twitter) Feeds: If your X strategy relies on event images, this addon is not ideal as it cannot share images on X.
- Immediate Meetup Syncing: Because Meetup requires manual API verification, this addon is not suitable for users needing an “out-of-the-box” instant setup for that platform.
- Non-WordPress Environments: This tool only functions within the Modern Events Calendar ecosystem on WordPress.
Troubleshooting for Beginners
- Events Not Posting: Verify that all API credentials are accurate and that the specific permissions (e.g., page_events) were granted during setup.
- Token Expiry: If Facebook posts stop appearing, you likely need to refresh your token using the Access Token Debugger to extend it back to two months or permanent status.
- X (Twitter) Images: If images are missing on X, remember this is a known limitation of the current version.
FAQ
How do I install and activate the Social Auto Poster Addon in MEC?
After purchasing the Social Auto Poster Addon, install and activate it through your WordPress dashboard. Upon activation, a new “Social Poster” feature will appear in the MEC menu, allowing you to configure your social media integrations.
What is the Social Auto Poster Addon for MEC?
The Social Auto Poster Addon is a tool that enables you to automatically post events published in the Modern Events Calendar (MEC) to your social media platforms.
Which social media platforms are supported by the Social Auto Poster Addon?
The addon supports integration with Facebook, LinkedIn, Twitter, Meetup, and Instagram, enabling automatic event posting to these platforms.
Can I connect multiple accounts from the same social media platform?
Yes, the addon allows you to link multiple accounts from each supported platform, providing flexibility in managing event promotions across various profiles.
Is it possible to schedule event posts to be published at a specific time?
Yes, in the Default Schedules section of the General tab, you can specify whether events are posted on social media immediately upon publication or after a designated period.
How do I manually publish an event to social media using the addon?
If you prefer manual control over event postings, the addon provides a manual publish option on the Edit Event page, allowing you to select and share events on social media at your discretion.
Can I assign specific event categories to be auto-posted on social media?
Yes, the addon offers category-based auto-posting, enabling you to configure certain event categories to be automatically shared on your connected social media accounts.
Can I filter which events are posted on social media?
Yes, you can filter posts based on categories, organizers, speakers, and locations.
How can I view the history and performance of my event posts on social media?
The addon includes a History section where you can access statistics about your posted content, presented in both list and chart views, to monitor and analyze your social media activity.
Can I control which events are automatically posted to social media?
Yes, you can manage auto-posting settings by selecting specific event categories for automatic sharing or opting for manual publishing to have full control over which events are posted.
How do I set up Facebook integration with the Social Auto Poster Addon?
To integrate Facebook, create a Facebook app by logging into your Facebook account and navigating to the Facebook Developers page. Follow the prompts to set up the app, configure the Facebook Login product, and enter your website’s URL in the Social Poster settings within MEC, select the Facebook API you’ve created to complete the integration.
Can I post events to my personal Facebook profile using this addon?
No, events can only be published on Facebook pages, not personal profiles.
What is a temporary access token, and how do I get one for Facebook?
A temporary access token is a short-lived token needed to connect to Facebook’s API. It can be generated through the Facebook Graph API Explorer.
How do I upgrade my Facebook access token to a longer-lasting one?
You can upgrade your temporary access token to a two-month user access token by using the Access Token Debugger Tool.
What permissions are required for the Facebook app to work with the Social Auto Poster Addon?
The Facebook app requires permissions such as `publish_video`, `business_management`, `page_events`, `pages_manage_metadata`, `pages_read_user_content`, `pages_manage_posts`, and `pages_manage_engagement`.
How do I find my Facebook Page ID for use with the plugin?
Your Facebook Page ID is located in the “Page Transparency” section of the “About” tab on your Facebook page.
How do I set up Instagram integration with the addon?
To integrate Instagram, connect your Instagram Business Account to your Facebook Page. Then, in the Social Poster settings within MEC, configure the Instagram tab by selecting the appropriate account type and entering the required credentials.
How do I integrate Twitter with the Social Auto Poster Addon?
To connect to Twitter, create a developer account on Twitter, set up a project, and configure the necessary API settings. Then, enter your Twitter API credentials in the Social Poster settings within MEC to enable automatic event posting to Twitter.
Can I share event images on Twitter using this addon?
No, it is not possible to show event images on Twitter.
How do I integrate LinkedIn with the Social Auto Poster Addon?
To connect to LinkedIn, create a LinkedIn app and verify your page. Then, in the Social Poster settings within MEC, configure the LinkedIn tab by entering the necessary app credentials to enable event posting to LinkedIn.
How do I integrate Meetup with the Social Auto Poster Addon?
To integrate Meetup with the Social Auto Poster Addon, you need to create a Meetup API key and connect your Meetup account within the addon’s settings. Navigate to the Social Poster section in MEC, select the Meetup tab, and enter the required API credentials. Once configured, your events can be automatically shared on your Meetup groups.
Where can I manage the social posting settings for an individual event?
You can manage the settings for individual events from the “Social Poster” tab on the Edit Event page.
What should I do if my events are not posted to social media as expected?
Ensure that all social media accounts are correctly connected and that the necessary API credentials are accurately entered. Verify that auto-publish settings are configured appropriately and check for any platform-specific requirements or restrictions that may affect posting.
Updated on: 08/03/2026
Thank you!