Event Seat Addon
The MEC Event Seat Addon is a powerful tool designed for events where guests need to select their specific spots within a venue. Whether you are managing a theater with multiple rows, a seminar with classroom seating, or a gala with circular tables, this addon provides a seamless, real-time booking experience for your attendees.
Additionally, you can create a customized venue plan and select from a variety of ready-made layouts to simplify the process even further. Provide your guests with a seamless booking experience using MEC Event.
Initial Setup & Requirements
Before you begin, ensure your environment meets the following requirements:
- MEC Pro: This addon requires the Pro version of Modern Events Calendar to function.
- Booking Module: Navigate to MEC Settings > Booking and ensure the Booking Module is enabled. You must save changes for these settings to take effect.
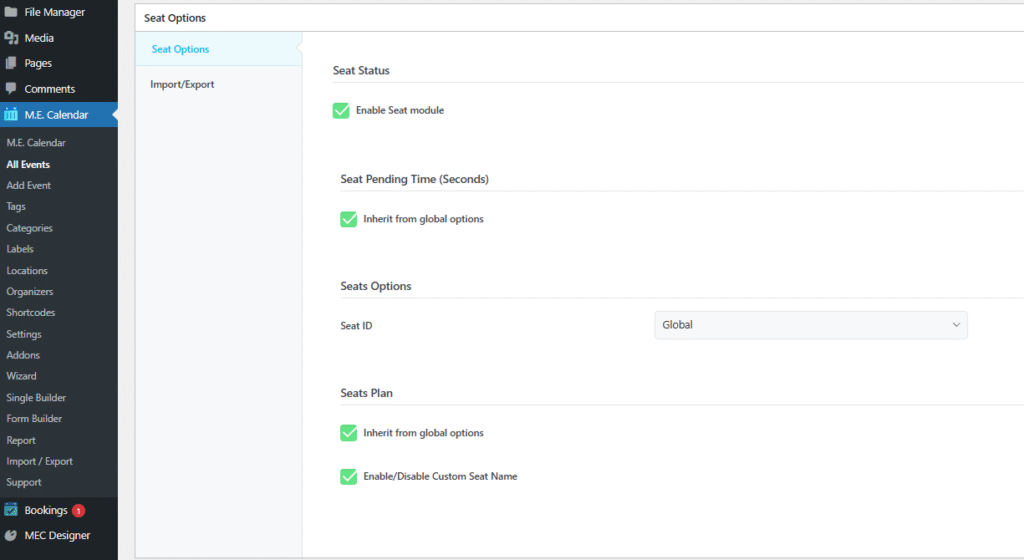
- Enable Seat Module: Go to WordPress Dashboard > M.E. Calendar > Settings > Seat. Toggle the seat module to enabled, save your changes, and reload the page to reveal the configuration options.
Global Configuration
After enabling the seat module, you can define the core behavior of your seating system in the Seat settings tab:
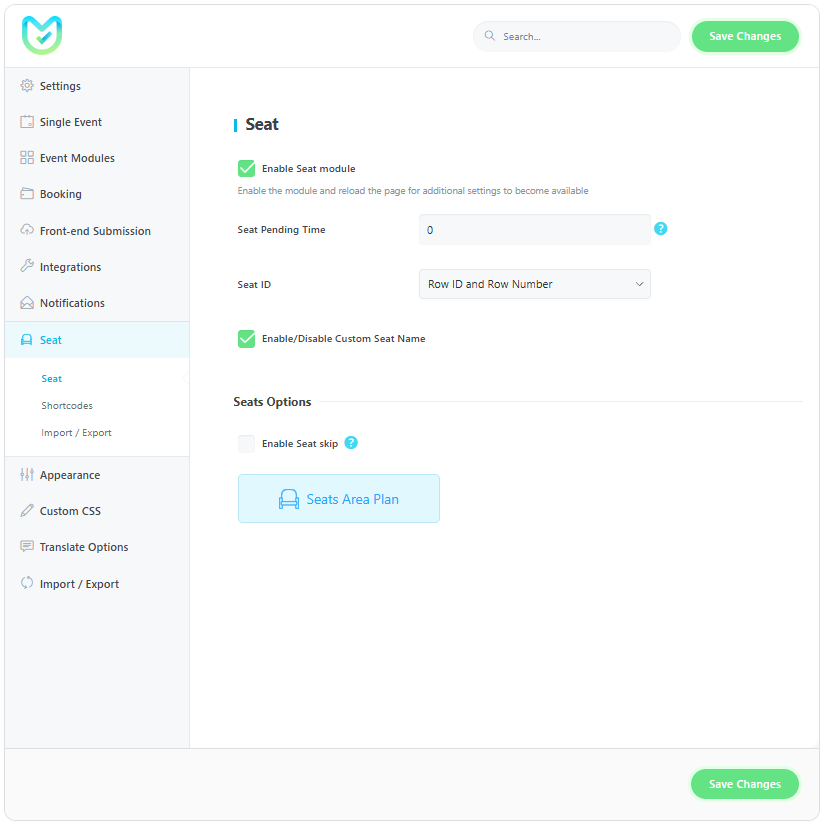
- Seat Pending Time: Set a duration (in seconds) that a seat remains “reserved” while a user is completing their booking. Setting this to zero disables the feature.
- Seat ID: Choose the display format for how seats are identified to the user.
- Enable/Disable Custom Seat Name: Grants the ability to manually edit and name each individual seat for better clarity.
- Enable Seat Skip: When enabled, users can bypass the seat selection process and register without a specific spot.
Creating the Seats Area Plan
The Seats Area Plan is the visual engine of the addon. Click the Seats Area Plan button to open the builder pop-up.

Defining the Layout
- Rows: Enter the number of rows of your venue.
- Seats: Enter the number of seats in a row.
- Area Title: Name the area that you are creating (e.g., “VIP Section”).
- Description: Provide a brief description for the attendees.
- Area Plan (Visual Styles): Select from various ready-made layouts, including Square, Circle, multiple Chairs styles (1-7), Kiosk, Tent, Parking, Tickets, and Table
- Aisle Configuration: Use Row Aisles (horizontal) and Column Aisles (vertical) to create empty walking spaces. Also, you can adjust the Aisle Width based on seat units.
Also, the Aisle Width option is for the width of the aisle in number of seat spaces.
- Book Status: Manually define if an entire area is currently available or booked.
- Handicap Accessible: Toggle this to confirm if seats are designed for people with disabilities, helping you meet crucial accessibility standards.
- Selected Seat Color: Set a custom color for the selected seats in an area plan.
- Not Selected Seat Color: Set a custom color for the not-selected seat in an area plan.
- Seat Description: Enter the seat description to note the users.
Pro Tip: Use the Add Area button after configuring each section to see a live preview on the left side before saving.
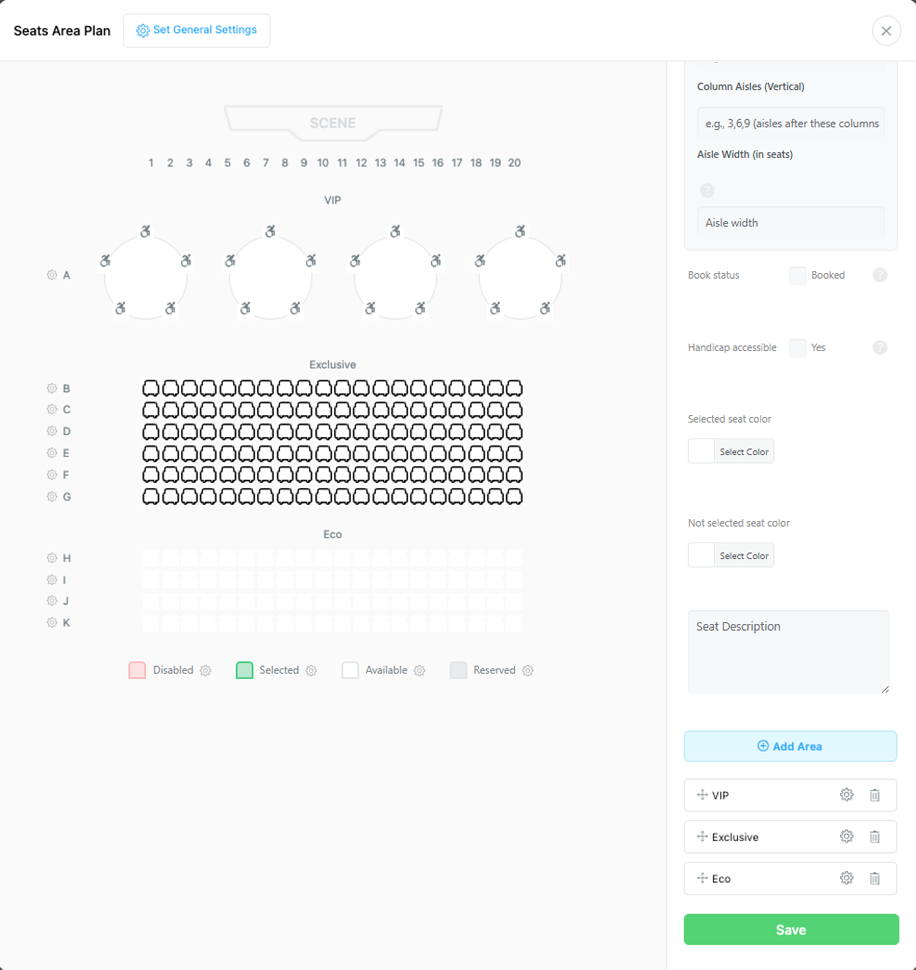
Walkthrough: Building a Multi-Zone Venue
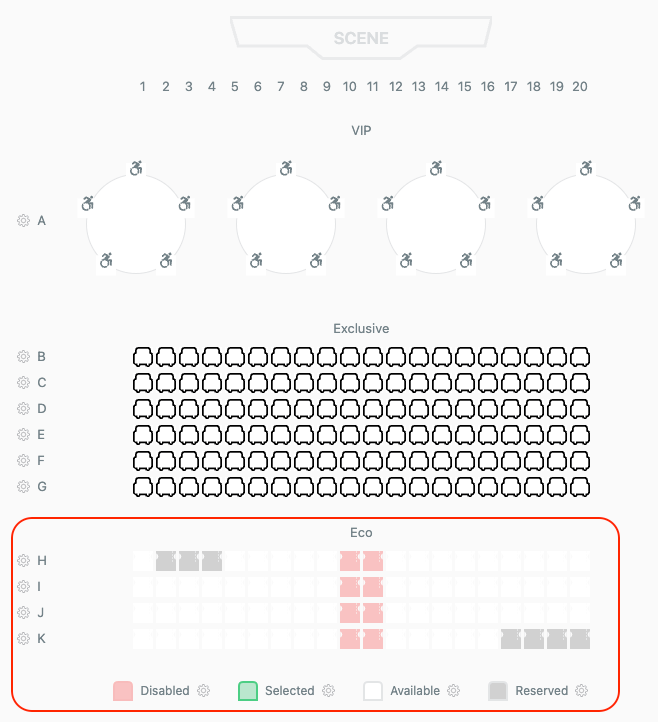
Let’s collaborate to create a seating plan for an event featuring three distinct areas. To design an event with diverse seating options, follow this three-area configuration:
- VIP Area: Select the Table plan. Configure four tables, each containing five seats.
- Exclusive Area: Select the Chair area plan. Configure six rows with 20 seats in each row.
- Eco Area: Configure four rows with 20 seats in each row.
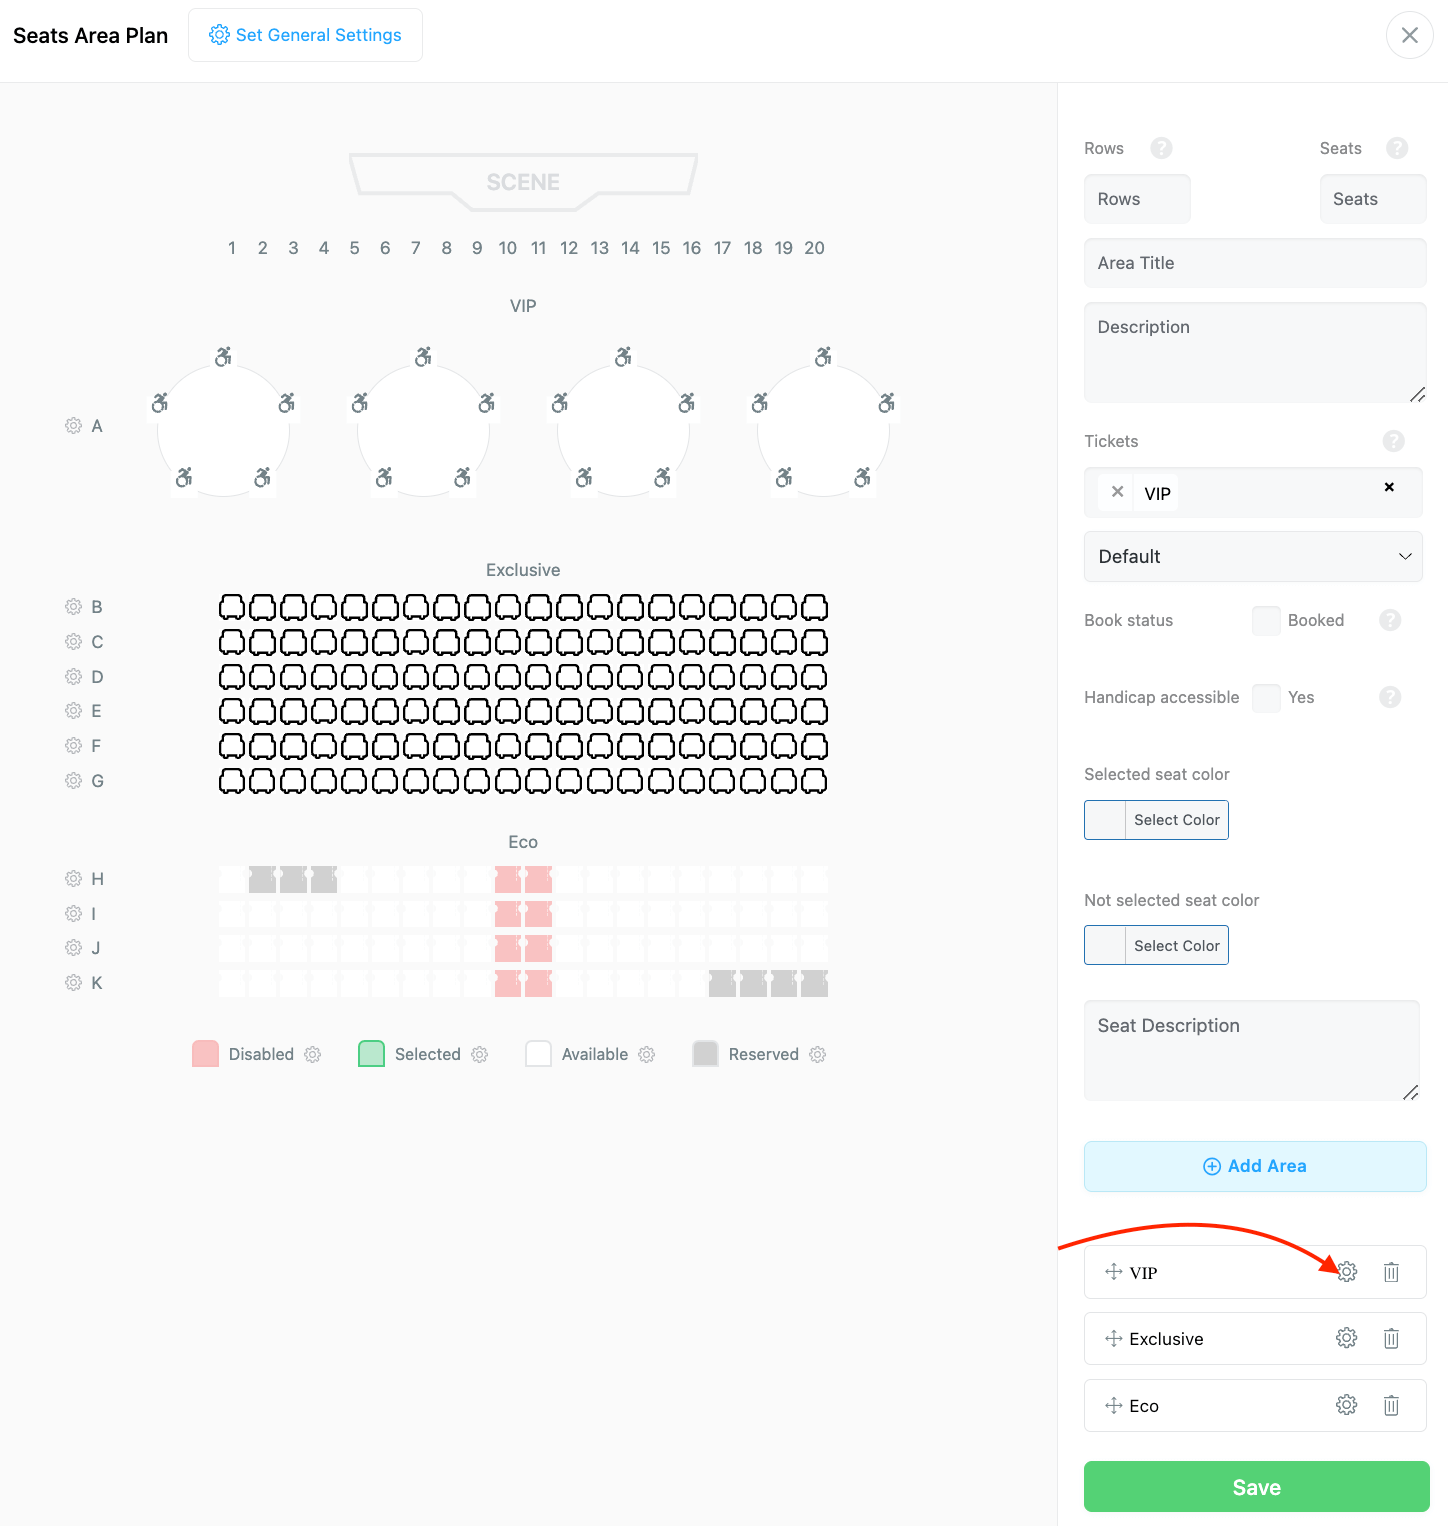
Here is a preview of the area plan.
Advanced Management & Customization
Our plan’s overall structure is complete, but configuring your venue’s seating arrangement may be challenging. You might need to remove certain seats or consider reservations made by other participants. To customize each seat individually, simply click on it to access its settings.
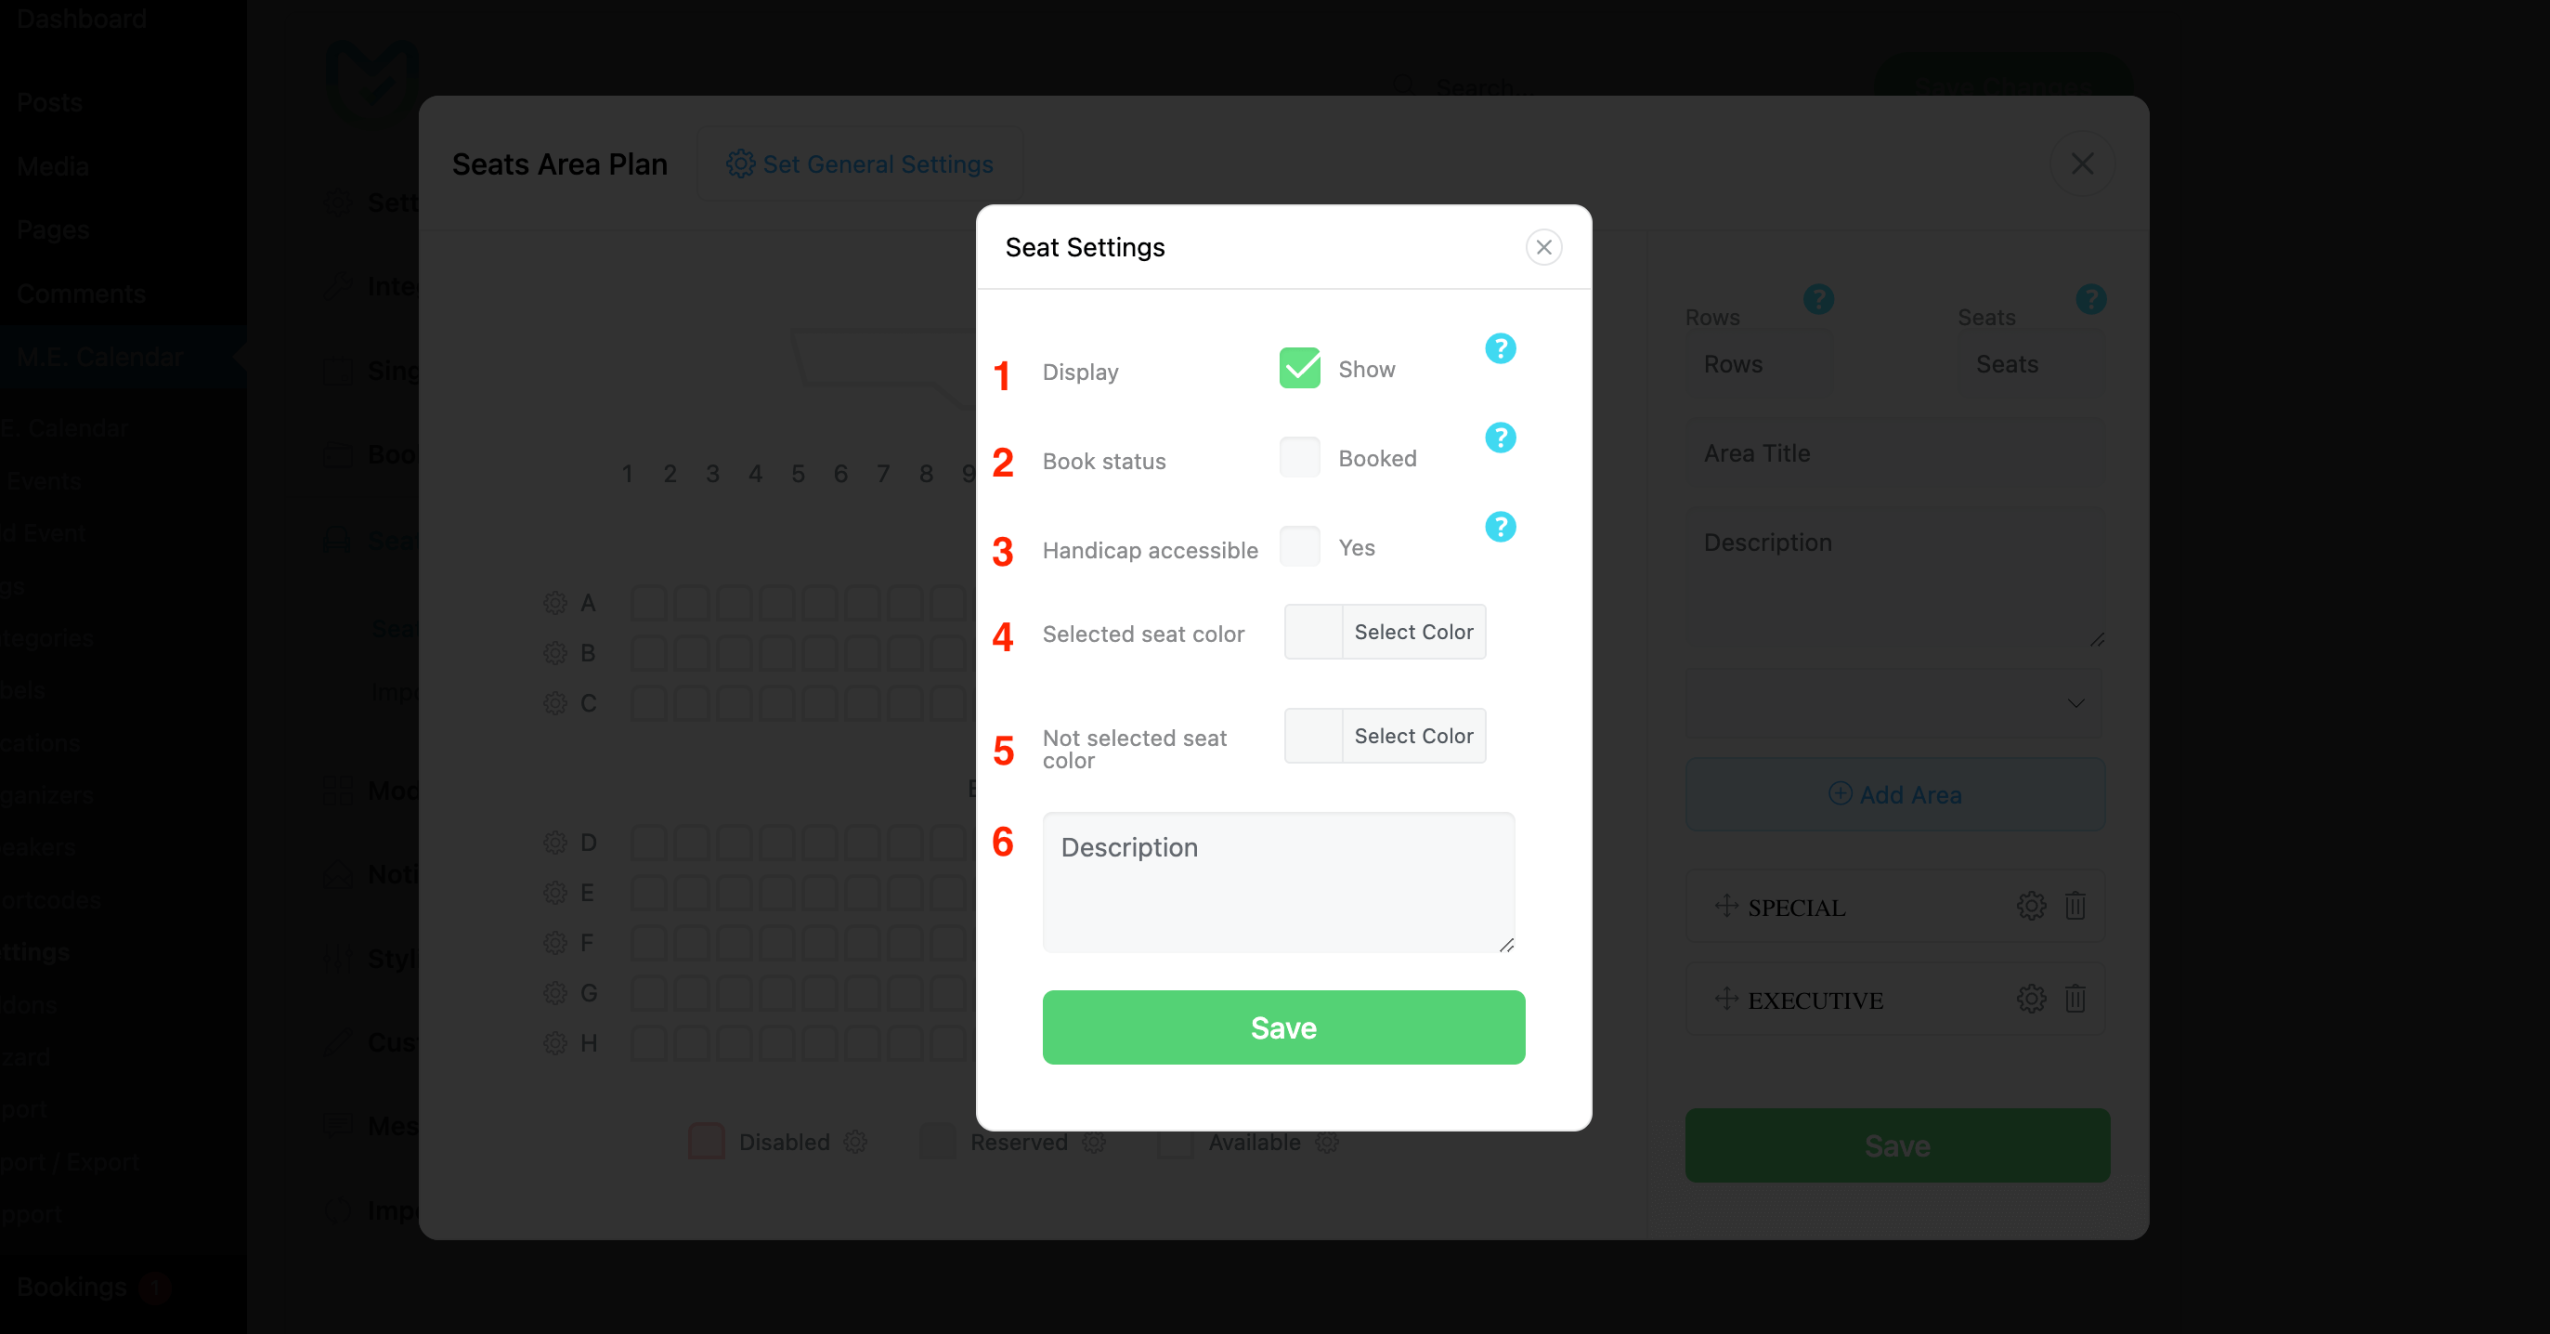
- Display: Either show or hide this particular seat.
- Book status: Check if this seat is booked.
- Handicap Accessible: Whether this Seat is accessible for individuals with disabilities.
- Selected Seat Color: Set a custom color for the selected particular seat
- Note Selected Seat Color: Set a custom color for the not selected particular seat.
- Description: Enter the seat description to note the users.
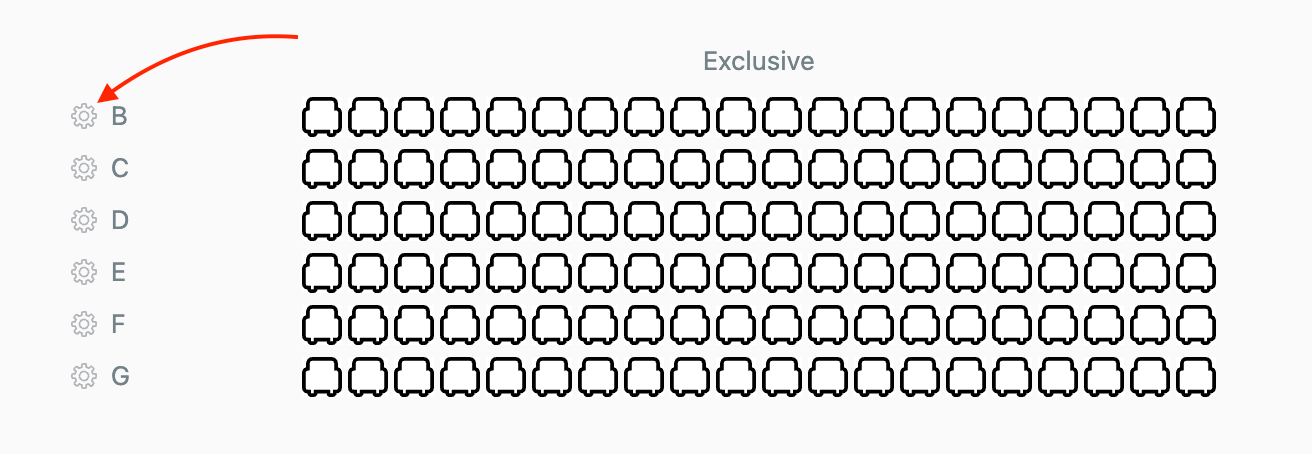
The same options are available for each entire Row. You need to click on the gear icon next to each row to configure it.
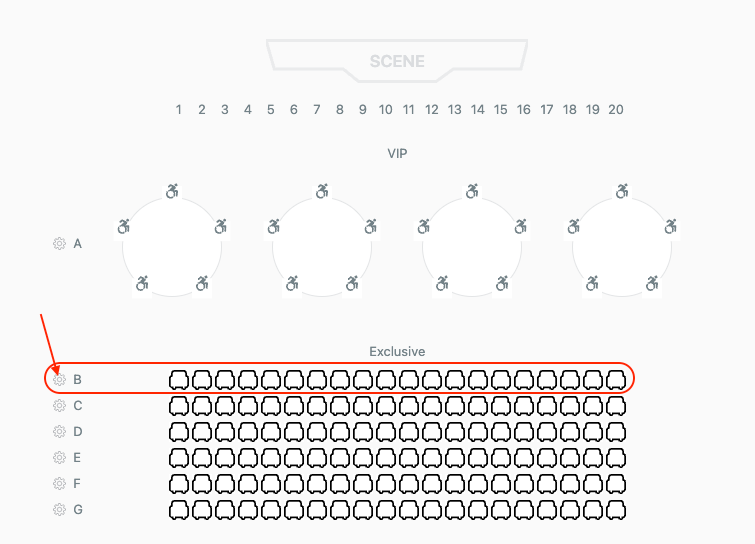
In the seating plan, the red area is currently inaccessible, and some seats (grey ones) are already reserved. The seating arrangement has been finalized as follows:
Important Note: After finalizing the design for your seating arrangements, it’s important to save your settings and enable the seat module for every single event. You can opt for the default seating pattern or create a unique design tailored to each event.
Event-Specific Seats Area Plan
To create a unique layout for just one event, go to the event’s edit page, navigate to Seat Options, and uncheck Inherit from global options.
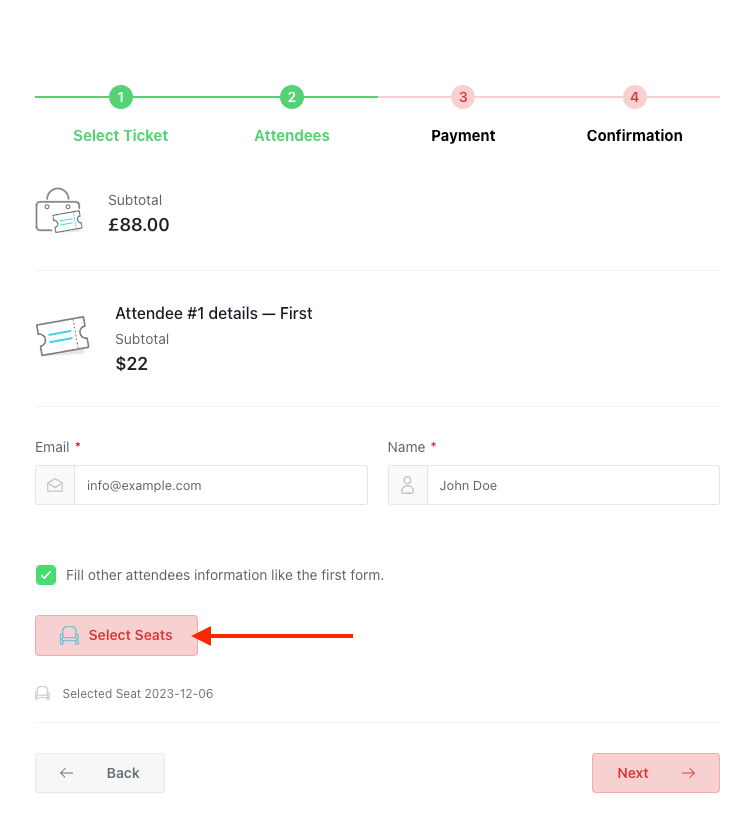
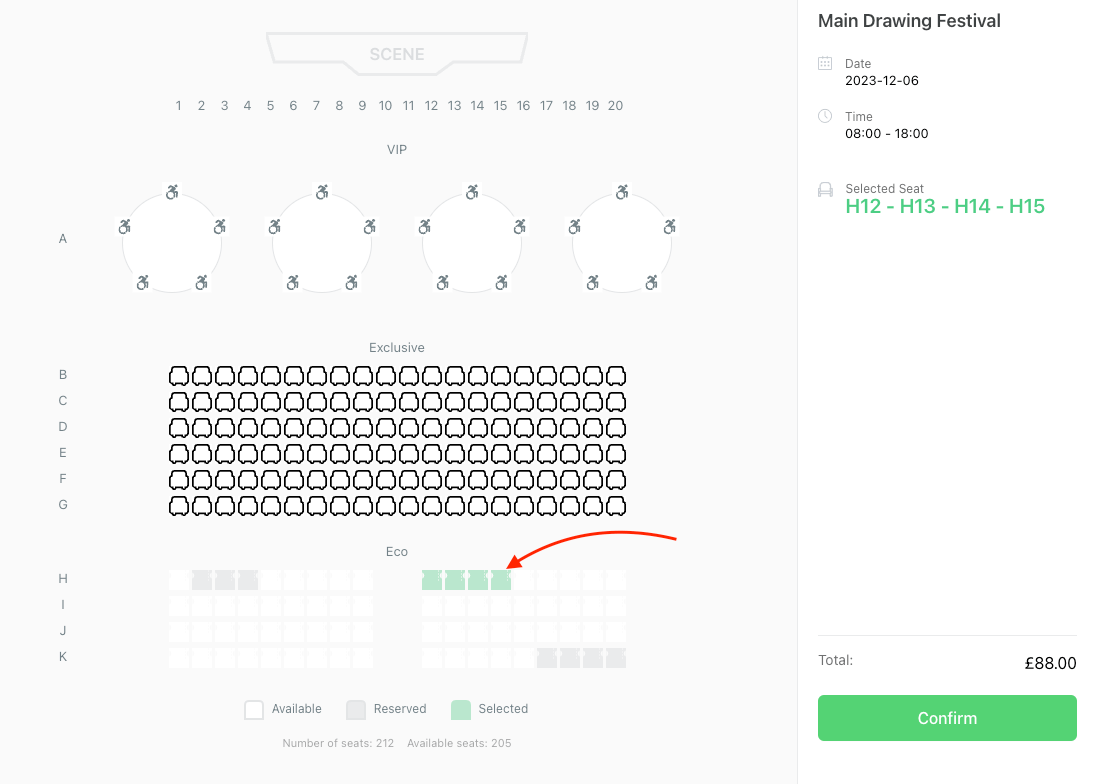
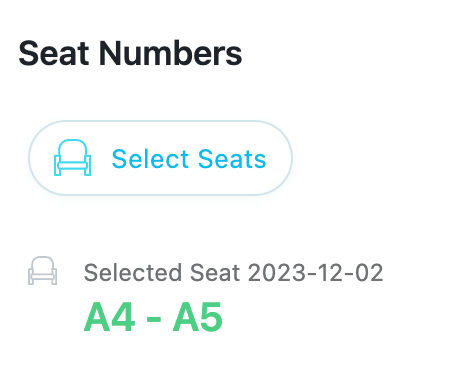
The plan will now be accessible to users, allowing them to choose their preferred seat during the booking procedure.
Assigning Tickets to Seats
By default, the first event ticket applies to the whole plan. If your event has tiered pricing (e.g., VIP vs. Standard), you can assign specific tickets to individual seats, rows, or entire areas.
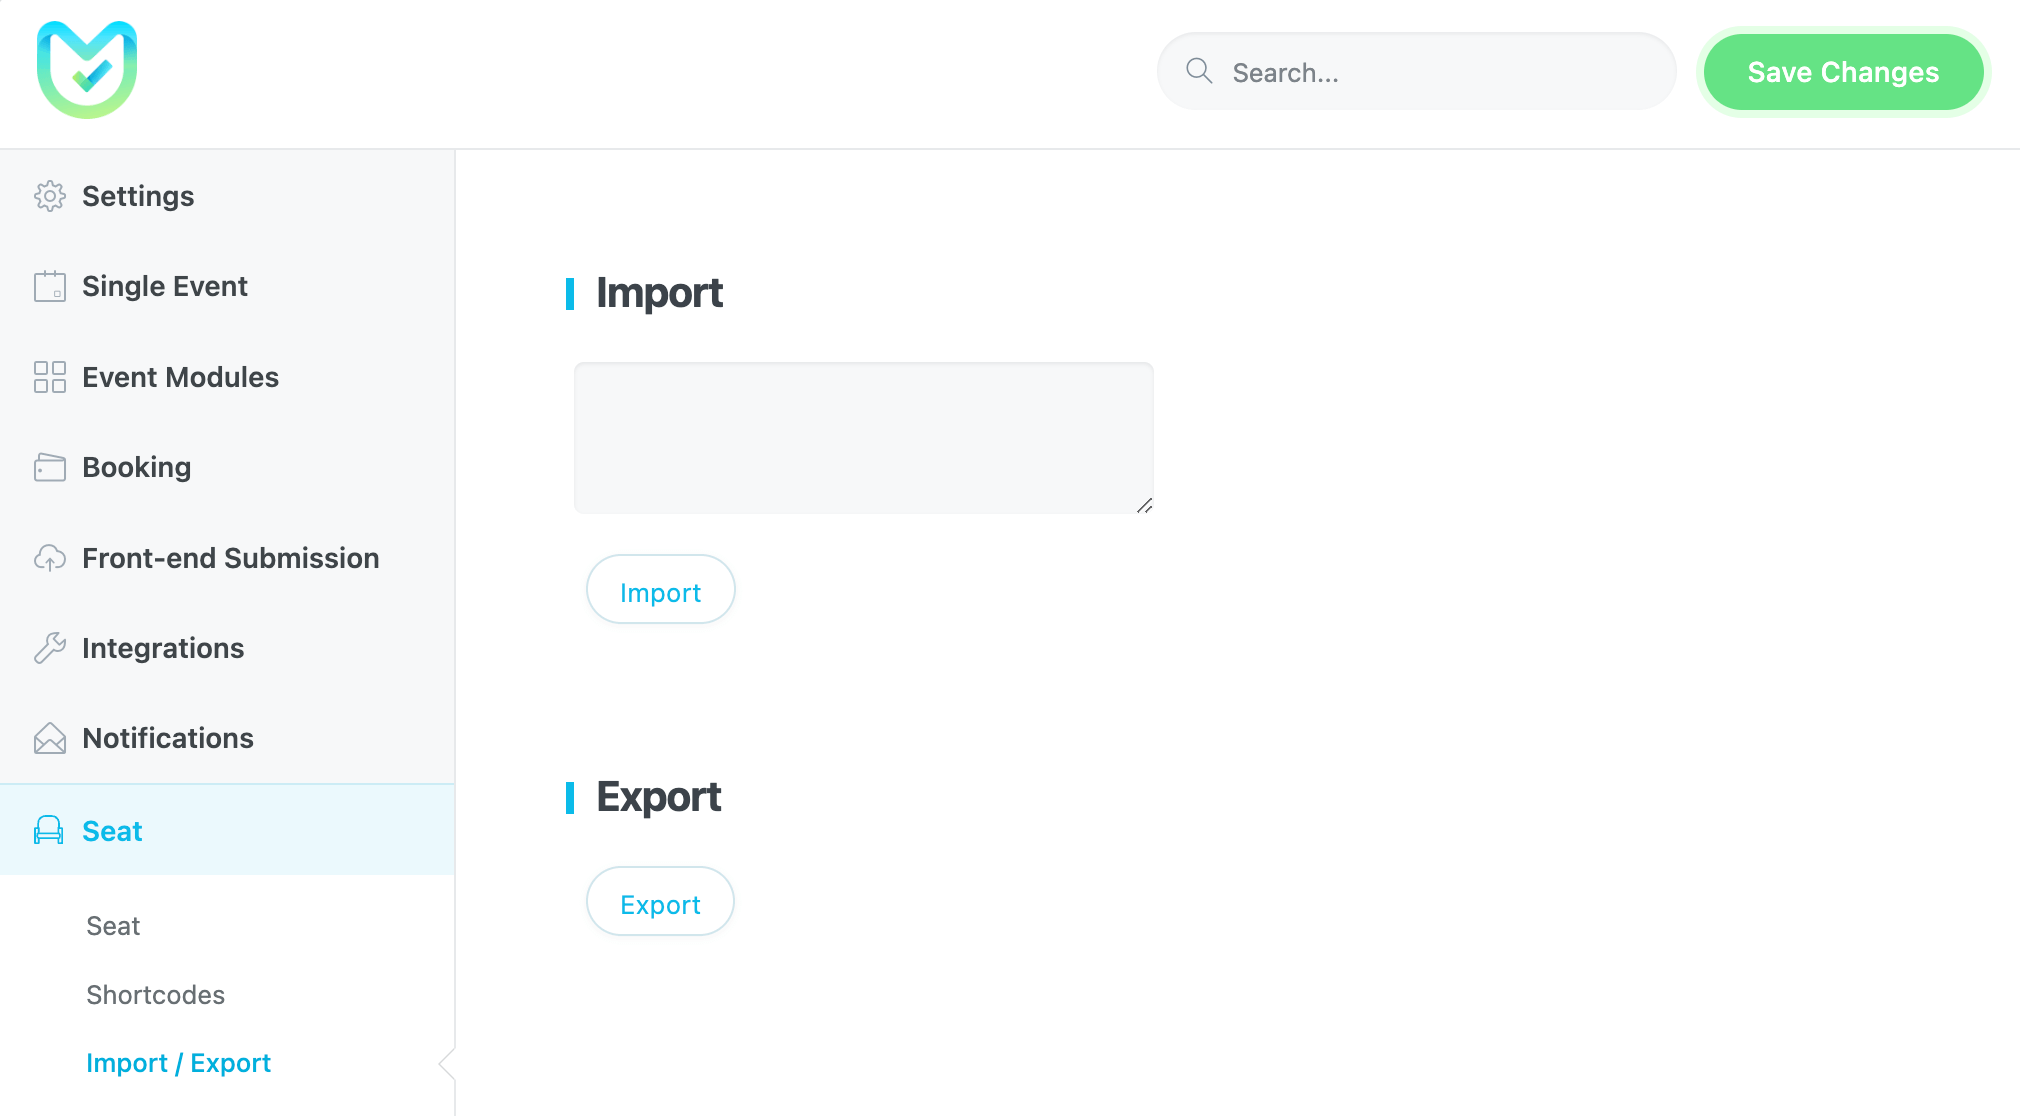
Important Note: To utilize this feature, you must create a plan for each event individually. However, you also have the option to use a global plan by importing its JSON code into the specific event. To do this, first export the global plan from MEC Settings > Seat > Import/Export. Then, import it into the event edit page under Seat options > Import/Export.
After importing the global plan or designing the individual plan for the event, there are four methods:
1. Assigning the whole plan to a certain ticket
Click on General settings and set the ticket option for the desired ticket from the single event edit page > seat options.

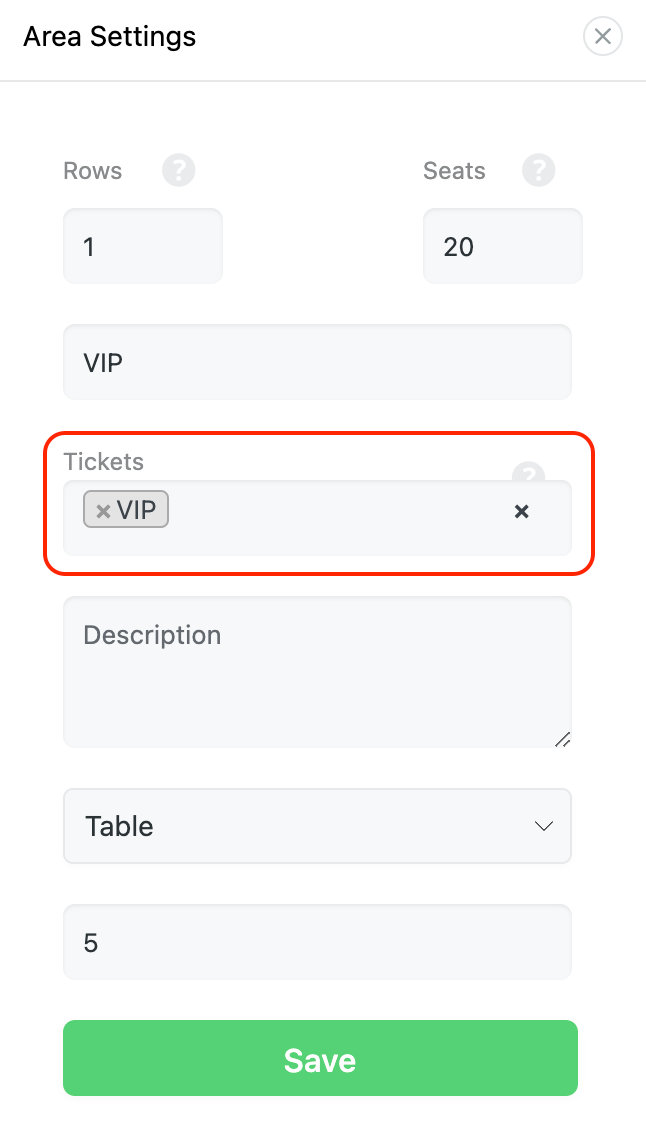
2. Assigning a specific ticket to a particular area
When creating a new one, you can assign a particular ticket to that area. This example shows that the “VIP” ticket has been assigned to the “VIP” area.
3. Assigning one or more rows of a plan to a certain ticket
Click on the gear icon next to the desired rows in your plan to open up the settings page. Now, you can set the option for the desired ticket.
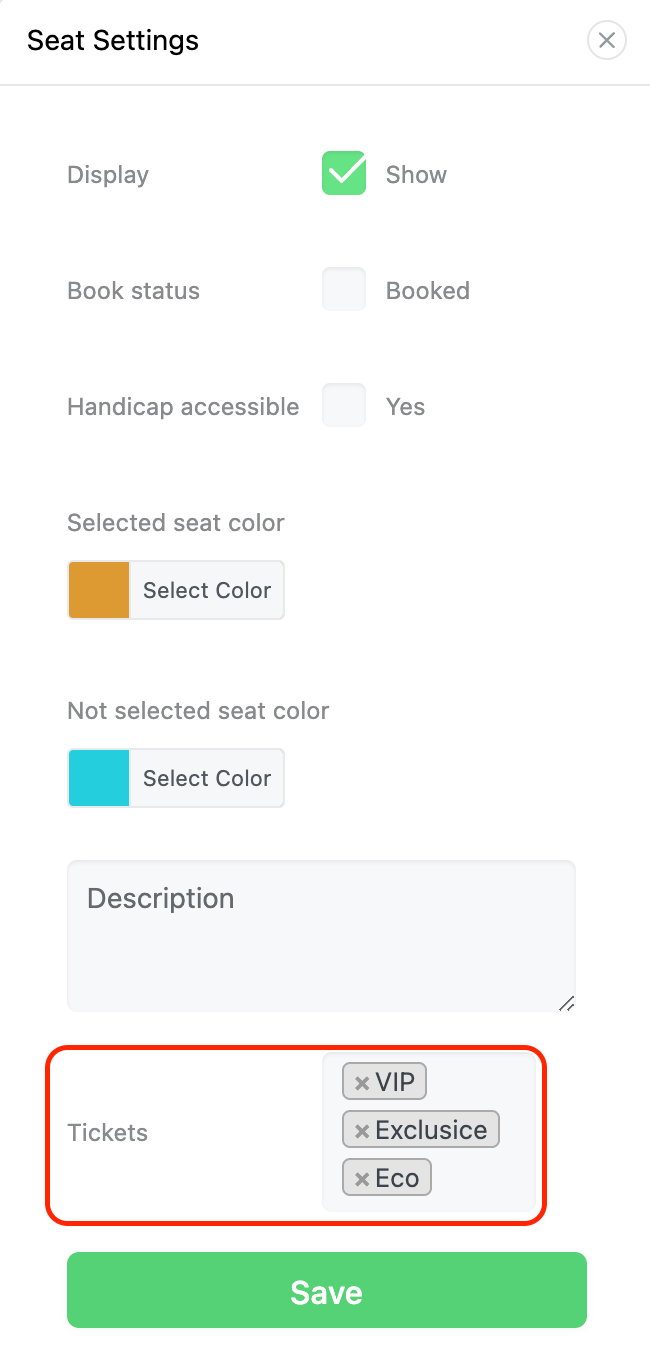
4. Assigning single seats to a certain ticket
You must click on the seats you want to assign to your plan to open its settings page. The settings page looks exactly like the previous methods, and you should set the ticket options for the desired tickets and save them.
Now, your participants can only book the tickets you have picked for the seats that you have designed.
Seat Shortcodes
You can use Seat Shortcodes to display the seat area plan on any page you want. Simply copy the shortcode [mec-seats event_id=”{EventID}” start_occurrence=”{DateTime}” limit=”{Number}”] to your desired page, and the seat plan will be shown there.

Example:
[mec-seats event_id="19" start_occurrence="2025-08-01" limit="1"]The seat numbers of the registered bookings
The booked seat numbers will be displayed in the registered bookings. Please take a look at an example in the screenshot below:
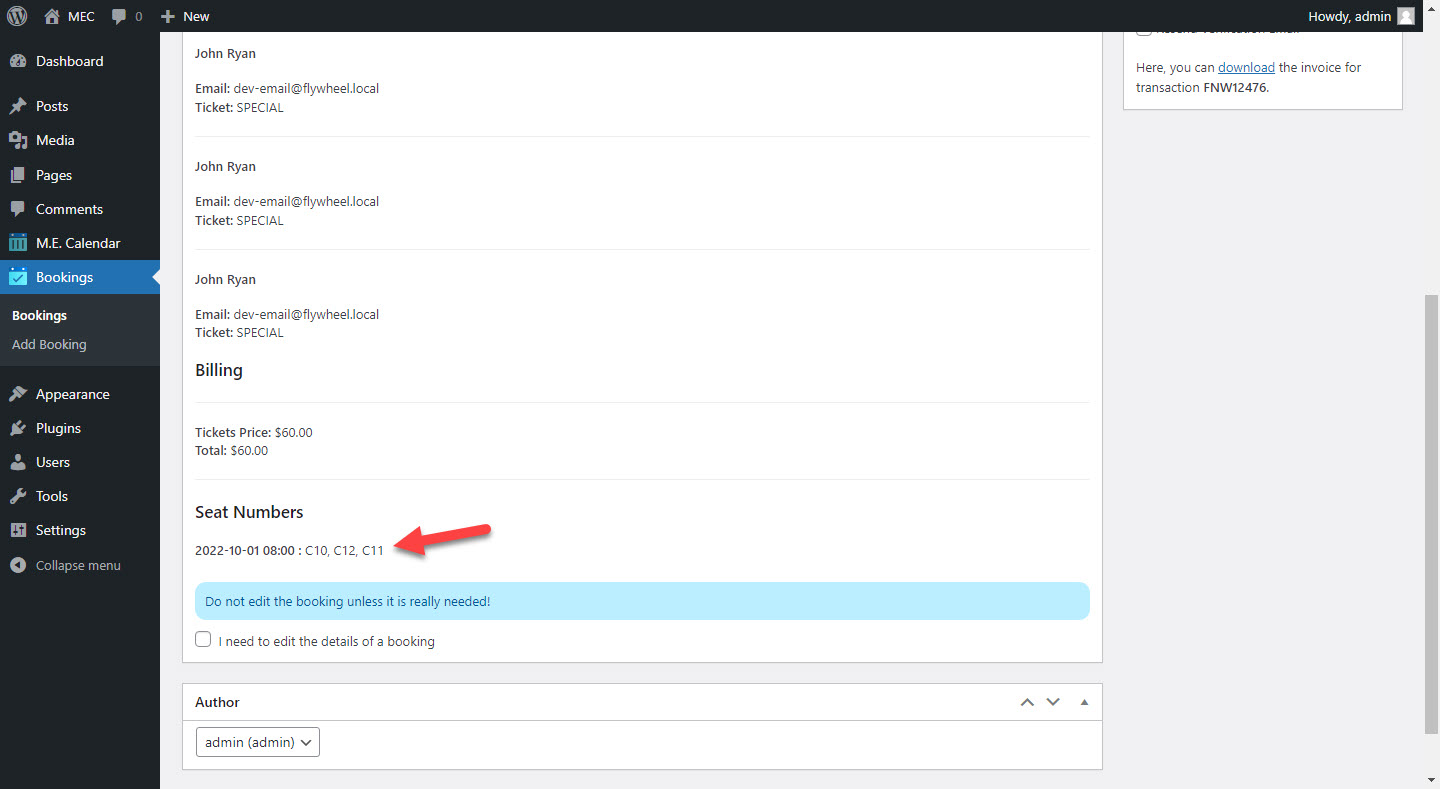
Note: By clicking the I need to edit the details of the booking checkbox, you can change the seat number for that booking.
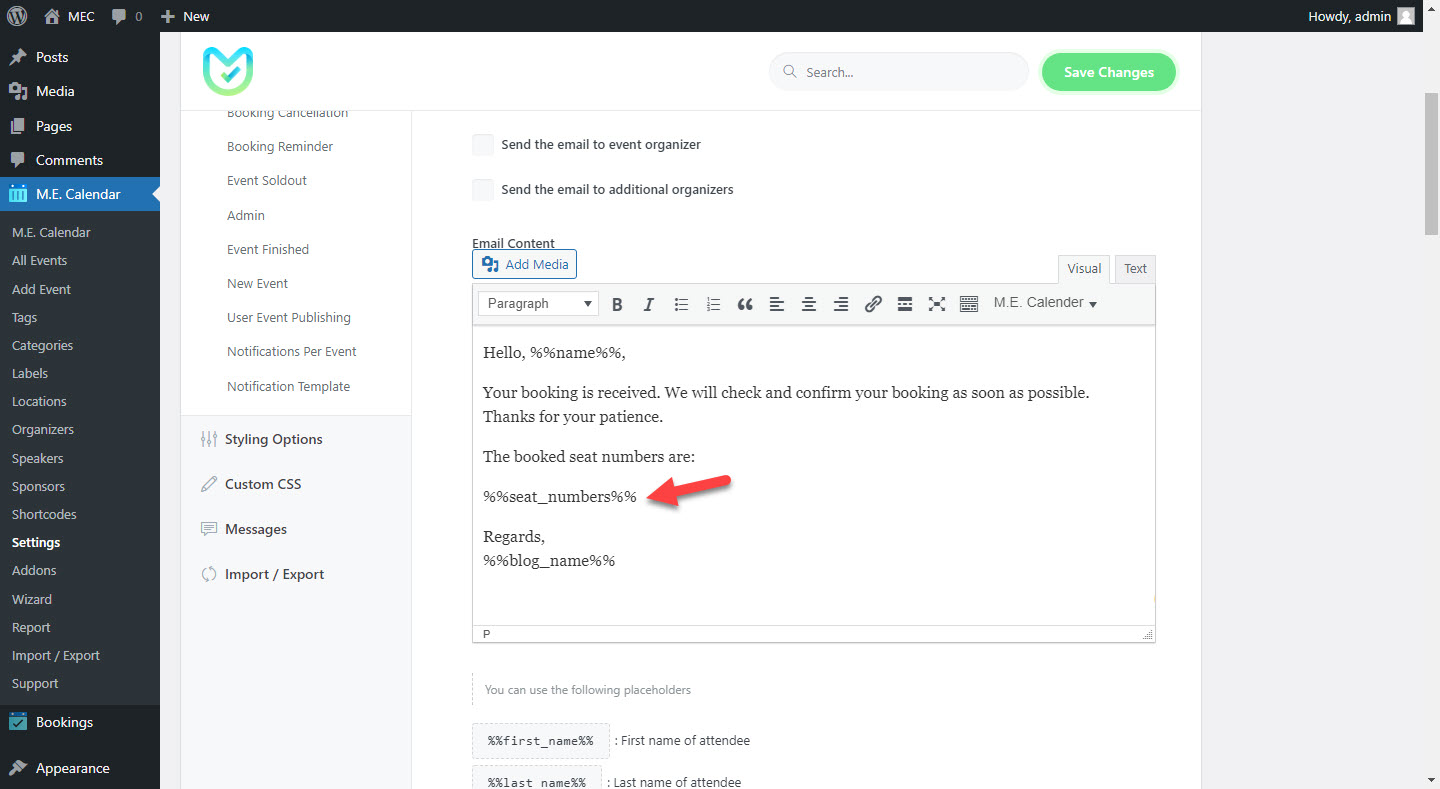
Notification email placeholders
To keep users informed about their booked seat numbers, the placeholder %%seat_numbers%% will be included in the following notification emails: Booking, Booking Confirmation, Booking Rejection, Booking Verification, Booking Cancellation, Booking Reminder, Event Sold Out, Admin, and Event Finished. You can easily display the booked seat numbers by incorporating this placeholder into your emails.
Use Cases (When This Addon is Useful)
- Theaters and Concerts: Perfect for venues with assigned rows and numbered seats where pricing may vary by proximity to the stage.
- Gala Dinners and Weddings: Useful for arranging guests around circular tables or specific banquet layouts.
- Conferences and Seminars: Ideal for classroom-style setups where attendees prefer to choose their vantage point or sit in specific rows.
Situations This Addon May Not Be Ideal
- Non-WordPress Environments: This tool is built specifically for Modern Events Calendar on WordPress.
- Complex Add-ons: It cannot handle additional service bookings like meals or equipment rentals within the seating interface.
- User-Led Changes: Attendees cannot change their own seats after the booking is finalized; this must be done by an admin.
Troubleshooting for Beginners
- Seat Plan Not Appearing?: Ensure the Booking Module is active in MEC Settings and that the Seat Module is enabled for that specific event.
- Changes Not Visible?: If you update colors or styles and they don’t appear on the front end, clear your website cache.
- Duplicate Booking Concerns?: The system marks seats as “reserved” as soon as they are selected. They are released if the Seat Pending Time expires without a completed booking.
FAQ
How do I enable seat selection for my events?
To enable seat selection, install and activate the MEC Event Seat Addon. In the event editor, navigate to the “Seats” section, where you can design a custom seating layout using the seat builder. Once configured, the seating map will appear on the event booking page, allowing attendees to select their seats.
Can I create different seating layouts for different events?
Yes, each event can have a unique seating arrangement. The seat builder allows you to create custom layouts tailored to specific event types, such as theater-style seating, classroom setups, or banquet arrangements.
How can I set different prices for different seats?
You can assign different ticket prices to specific seating areas within the seat builder. For example, VIP seats can have a higher price than general admission seats. The pricing options can be configured in the seat management panel.
Can users see which seats are already booked?
Yes, the seat selection interface updates in real-time. Attendees can see which seats are available, booked, or unavailable before making their selection.
Can attendees change their selected seats after booking?
By default, once a seat is booked, it cannot be changed by the user. However, event organizers can manually adjust seat assignments from the WordPress dashboard if needed.
How do I limit the number of available seats for an event?
You can define the total number of available seats on the Single Event edit page. The system will automatically disable further bookings once the limit is reached, ensuring that the event does not exceed capacity.
Can I assign seat categories with different colors?
Yes, you can customize seat colors and labels to visually distinguish different seating categories, such as VIP, standard, or balcony seating. These customizations help attendees easily identify their seating options.
Is the seat selection feature mobile-friendly?
Yes, the seat selection interface is fully responsive. Users can choose their seats from any device, including desktops, tablets, and smartphones, without compromising usability.
How do I prevent duplicate seat bookings?
The addon prevents duplicate bookings by marking seats as “reserved” as soon as a user selects them. If a user abandons the booking process, the system will release the seat after a set time to avoid accidental blocking.
Can I create multiple seating zones for a single event?
Yes, the addon supports multi-zone seating, allowing you to create different sections within a venue, such as the main floor, balcony, or VIP lounge, each with its own pricing and availability.
How do attendees receive confirmation of their seat selection?
Once a user completes the booking process, they receive an automated confirmation email containing their seat details, event information, and any relevant instructions.
Can I manually assign or adjust seats from the admin panel?
Yes, organizers can manually assign, adjust, or cancel seat bookings from the WordPress admin panel. This is useful for accommodating special requests or handling last-minute changes.
How can I customize the appearance of the seat selection interface?
You can use custom CSS to style the seat selection interface, adjusting colors, fonts, and layouts to match your website’s branding.
Is there a way to offer group bookings with seat selection?
Yes, the system allows users to select multiple seats in a single transaction, making it easy for groups to book seats together.
Updated on: 12/04/2026
Thank you!